You can get the PDF version of the user guide from the following link:
PDF DownloadThis is the multi-page printable view of this section. Click here to print.
Huawei Container Storage Suite
- 1: About This Document
- 2: Overview
- 3: Quick Start
- 4: Compatibility and Features
- 4.1: Flash Storage (OceanStor Dorado/OceanStor V5/OceanStor V6 and Later)
- 4.1.1: File Service
- 4.1.1.1: Compatibility
- 4.1.1.1.1: Storage
- 4.1.1.1.2: Container Platform
- 4.1.1.1.3: OS
- 4.1.1.2: Features
- 4.1.1.2.1: Huawei CSI
- 4.1.2: Block Service
- 4.1.2.1: Compatibility
- 4.1.2.1.1: Storage
- 4.1.2.1.2: Container Platform
- 4.1.2.1.3: OS
- 4.1.2.2: Features
- 4.1.2.2.1: Huawei CSI
- 4.2: Flash Storage (OceanStor A600/A800)
- 4.2.1: File Service
- 4.2.1.1: Compatibility
- 4.2.1.1.1: Storage
- 4.2.1.1.2: Container Platform
- 4.2.1.1.3: OS
- 4.2.1.2: Features
- 4.2.1.2.1: Huawei CSI
- 4.3: DME (Interconnected with an OceanStor A800 Cluster)
- 4.3.1: File Service
- 4.3.1.1: Compatibility
- 4.3.1.1.1: Storage
- 4.3.1.1.2: Container Platform
- 4.3.1.1.3: OS
- 4.3.1.2: Features
- 4.3.1.2.1: Huawei CSI
- 4.4: Mass Storage (OceanStor Pacific/FusionStorage Block Series)
- 4.4.1: File Service
- 4.4.1.1: Compatibility
- 4.4.1.1.1: Storage
- 4.4.1.1.2: Container Platform
- 4.4.1.1.3: OS
- 4.4.1.2: Features
- 4.4.1.2.1: Huawei CSI
- 4.4.2: Block Service
- 4.4.2.1: Compatibility
- 4.4.2.1.1: Storage
- 4.4.2.1.2: Container Platform
- 4.4.2.1.3: OS
- 4.4.2.2: Features
- 4.4.2.2.1: Huawei CSI
- 4.5: Mass Storage (OceanDisk Series)
- 4.5.1: File Service
- 4.5.1.1: Compatibility
- 4.5.1.1.1: Storage
- 4.5.1.1.2: Container Platform
- 4.5.1.1.3: OS
- 4.5.1.2: Features
- 4.5.1.2.1: Huawei CSI
- 4.5.2: Block Service
- 4.5.2.1: Compatibility
- 4.5.2.1.1: Storage
- 4.5.2.1.2: Container Platform
- 4.5.2.1.3: OS
- 4.5.2.2: Features
- 4.5.2.2.1: Huawei CSI
- 5: Installation and Deployment
- 5.1: CSI
- 5.1.1: Installation Preparations
- 5.1.1.1: Downloading the Huawei CSI Software Package
- 5.1.1.2: Uploading a Huawei CSI Image
- 5.1.1.3: Checking User Configurations on Huawei Storage
- 5.1.1.4: Checking Volume Snapshot-Dependent Components
- 5.1.1.5: Checking the Host Multipathing Configuration
- 5.1.1.6: Checking the Status of Host-Dependent Software
- 5.1.1.7: Checking the Images on Which CSI Depends
- 5.1.2: Installation
- 5.1.2.1: Installation Using Helm
- 5.1.2.1.1: Installing Huawei CSI on Kubernetes, OpenShift, and Tanzu
- 5.1.2.1.2: Installing Huawei CSI on the CCE or CCE Agile Platform
- 5.1.2.1.3: Parameters in the values.yaml File of Helm
- 5.1.2.2: Manual Installation
- 5.1.3: Uninstallation
- 5.1.3.1: Uninstallation Using Helm
- 5.1.3.1.1: Uninstalling Huawei CSI on Kubernetes, OpenShift, and Tanzu
- 5.1.3.1.2: Uninstalling Huawei CSI on CCE or CCE Agile
- 5.1.3.1.3: Uninstalling CSI-Dependent Component Services
- 5.1.3.2: Manual Uninstallation
- 5.1.4: Upgrade
- 5.1.4.1: Upgrade Using Helm
- 5.1.4.1.1: Upgrading from 2.x or 3.x to 4.x
- 5.1.4.1.2: Upgrading Huawei CSI on Kubernetes, OpenShift, and Tanzu
- 5.1.4.1.3: Upgrading Huawei CSI on CCE or CCE Agile
- 5.1.4.2: Manual Upgrade
- 5.1.5: Rollback
- 5.1.5.1: Rollback Using Helm
- 5.1.5.1.1: Rolling Back Huawei CSI on Kubernetes, OpenShift, and Tanzu
- 5.1.5.1.2: Rolling Back Huawei CSI on CCE or CCE Agile
- 5.1.5.2: Manual Rollback
- 6: Basic Services
- 6.1: Storage Backend Management
- 6.1.1: Configuring the Storage Backend
- 6.1.1.1: Flash Storage (OceanStor Dorado/OceanStor V5/OceanStor V6 and Later)
- 6.1.1.1.1: File System
- 6.1.1.1.2: Dtree
- 6.1.1.1.3: Block Service
- 6.1.1.1.3.1: iSCSI
- 6.1.1.1.3.2: FC
- 6.1.1.1.3.3: NVMe over RoCE
- 6.1.1.1.3.4: NVMe over TCP
- 6.1.1.1.3.5: FC-NVMe
- 6.1.1.2: Flash Storage (OceanStor A600/A800)
- 6.1.1.2.1: Local File System
- 6.1.1.2.2: Dtree
- 6.1.1.3: DME (Interconnected with an OceanStor A800 Cluster)
- 6.1.1.3.1: Global File System
- 6.1.1.4: Mass Storage (OceanStor Pacific/FusionStorage Block Series)
- 6.1.1.4.1: File System
- 6.1.1.4.2: Dtree
- 6.1.1.4.3: Block Service
- 6.1.1.5: Mass Storage (OceanDisk Series)
- 6.1.1.5.1: File System
- 6.1.1.5.1.1: NFS
- 6.1.1.5.2: Block Service
- 6.1.1.5.2.1: iSCSI
- 6.1.1.5.2.2: FC
- 6.1.1.5.2.3: NVMe over RoCE
- 6.1.2: Managing Storage Backends
- 6.1.2.1: Querying a Storage Backend
- 6.1.2.2: Updating a Storage Backend
- 6.1.2.2.1: Updating the Password of a Storage Backend Using oceanctl
- 6.1.2.2.2: Updating the Login Authentication Mode of a Storage Backend
- 6.1.2.2.3: Updating a Storage Backend
- 6.1.2.3: Deleting a Storage Backend
- 6.1.2.4: Adding a Storage Backend Certificate
- 6.1.2.5: Deleting a Storage Backend Certificate
- 6.2: StorageClass Management
- 6.2.1: Configuring a StorageClass
- 6.2.1.1: Flash Storage (OceanStor Dorado/OceanStor V5/OceanStor V6 and Later)
- 6.2.1.1.1: File System
- 6.2.1.1.2: Dtree
- 6.2.1.1.3: Block Service
- 6.2.1.2: Flash Storage (OceanStor A600/A800)
- 6.2.1.2.1: File System
- 6.2.1.3: DME (Interconnected with an OceanStor A800 Cluster)
- 6.2.1.3.1: File System
- 6.2.1.4: Mass Storage (OceanStor Pacific/FusionStorage Block Series)
- 6.2.1.4.1: File System
- 6.2.1.4.2: Dtree
- 6.2.1.4.3: Block Service
- 6.2.1.5: Mass Storage (OceanDisk Series)
- 6.2.1.5.1: File System
- 6.2.1.5.2: Block Service
- 6.2.2: Managing a StorageClass
- 6.2.2.1: Querying a StorageClass
- 6.2.2.2: Modifying a StorageClass
- 6.2.2.3: Deleting a StorageClass
- 6.3: Persistent Volume Management
- 6.3.1: Configuring PVs
- 6.3.1.1: Configuring Dynamic PVs
- 6.3.1.2: Configuring a Static PV
- 6.3.1.3: Managing PVs
- 6.3.2: Managing PVs
- 6.3.2.1: Expanding the Capacity of a PV
- 6.3.2.2: Cloning a PV
- 6.3.2.3: Changing a PV
- 6.3.2.3.1: Enabling the PVC Change Feature
- 6.3.2.3.1.1: Enabling the PVC Change Feature Using Helm
- 6.3.2.3.1.2: Enabling the PVC Change Feature Manually
- 6.3.2.3.2: Configuring PVC Changes
- 6.3.2.3.2.1: Creating a PVC Change
- 6.3.2.3.2.2: Querying a PVC Change
- 6.3.2.3.2.3: Deleting a PVC Change
- 7: Advanced Services
- 7.1: Snapshot Management
- 7.1.1: Configuring a Volume Snapshot
- 7.1.2: Managing Volume Snapshots
- 7.1.2.1: Querying a VolumeSnapshot
- 7.1.2.2: Creating a PV Using a VolumeSnapshot
- 7.1.2.3: Deleting a VolumeSnapshot
- 8: Common O&M Operations
- 8.1: Installing Helm 3
- 8.2: Collecting Information
- 8.2.1: Obtaining the CSI Version
- 8.2.2: Viewing Huawei CSI Logs
- 8.2.3: Collecting Logs
- 8.3: Downloading a Container Image
- 8.4: Updating the huawei-csi-controller or huawei-csi-node Service
- 8.5: Modifying the Log Output Mode
- 8.6: Enabling the ReadWriteOncePod Feature Gate
- 8.7: Configuring Access to the Kubernetes Cluster as a Non-root User
- 8.8: Configuring IPv6
- 8.8.1: Configuring IPv6 During the Initial Installation of Huawei CSI
- 8.8.2: Switching from IPv4 to IPv6 for Huawei CSI
- 8.9: Configuring Storage Topology Awareness
- 8.10: Configuring ALUA
- 8.10.1: Configuring ALUA Parameters for a Huawei Enterprise Storage Backend
- 8.10.2: Configuring ALUA Parameters for a Distributed Storage Backend
- 8.10.3: Example ALUA Configuration Policy of OceanStor V5 Series
- 8.10.4: Example ALUA Configuration Policy of OceanStor Dorado
- 8.10.5: Example ALUA Configuration Policy of Distributed Storage
- 9: Troubleshooting
- 9.1: Huawei CSI Service Issues
- 9.1.1: Failed to Start the huawei-csi-node Service with Error Message "/var/lib/iscsi is not a directory" Reported
- 9.1.2: Huawei CSI Services Fail to Be Started and Error Message "/etc/localtime is not a file" Is Displayed
- 9.1.3: Failed to Start huawei-csi Services with the Status Displayed as InvalidImageName
- 9.2: Storage Backend Issues
- 9.2.1: A Backend Fails to Be Created Using the oceanctl Tool and Error Message "context deadline exceeded" Is Displayed
- 9.2.2: The Value of the ONLINE Field Is "false" When the oceanctl Tool Is Used to Obtain Storage Backend Information
- 9.2.3: An Account Is Locked After the Password Is Updated on the Storage Device
- 9.3: PVC Issues
- 9.3.1: When a PVC Is Created, the PVC Is in the Pending State
- 9.3.2: Before a PVC Is Deleted, the PVC Is in the Pending State
- 9.3.3: Failed to Expand the Capacity of a Generic Ephemeral Volume
- 9.3.4: Failed to Expand the PVC Capacity Because the Target Capacity Exceeds the Storage Pool Capacity
- 9.4: Pod Issues
- 9.4.1: After a Worker Node in the Cluster Breaks Down and Recovers, Pod Failover Is Complete but the Source Host Where the Pod Resides Has Residual Drive Letters
- 9.4.2: When a Pod Is Created, the Pod Is in the ContainerCreating State
- 9.4.3: A Pod Is in the ContainerCreating State for a Long Time When It Is Being Created
- 9.4.4: A Pod Fails to Be Created and the Log Shows That the Execution of the mount Command Times Out
- 9.4.5: A Pod Fails to Be Created and the Log Shows That the mount Command Fails to Be Executed
- 9.4.6: A Pod Fails to Be Created and Message "publishInfo doesn't exist" Is Displayed in the Events Log
- 9.4.7: After a Pod Fails to Be Created or kubelet Is Restarted, Logs Show That the Mount Point Already Exists
- 9.4.8: "I/O error" Is Displayed When a Volume Directory Is Mounted to a Pod
- 9.4.9: Failed to Create a Pod Because the iscsi_tcp Service Is Not Started Properly When the Kubernetes Platform Is Set Up for the First Time
- 9.4.10: A Pod Fails to Be Created and Logs Show That an Initiator Has Been Associated with Another Host
- 9.4.11: A Pod Fails to Be Created and Logs Show "Get DMDevice by alias: dm-x failed"
- 9.4.12: After Pods on the Same Node Are Deleted in a Batch Using the NVMe Protocol, Residual NVMe Links Exist on the Node
- 9.4.13: In the SAN HyperMetro Scenario, the Subpath of the Aggregated Disks Corresponding to the Mounted Volume Is Lost
- 9.5: Common Problems and Solutions for Interconnecting with the Tanzu Kubernetes Cluster
- 10: Command Parameter Description
- 11: Appendix
1 - About This Document
Intended Audience
This document is intended for:
- Technical support engineers
- O&M engineers
- Engineers with basic knowledge of storage and Kubernetes
Symbol Conventions
The symbols that may be found in this document are defined as follows.


2 - Overview
Container Storage Interface (CSI) is an industry standard protocol used to connect container platforms such as Kubernetes to underlying storage systems. Huawei CSI is a mandatory component that connects Huawei enterprise storage and distributed storage products to Kubernetes clusters, providing persistent storage services for containerized workload.
Kubernetes uses a series of officially maintained sidecar components to register and listen Kubernetes object resources and invoke the CSI driver to trigger physical operations on Huawei storage. For example, when a Persistent Volume (PV) is created, the Huawei CSI driver creates a LUN (block storage) or file system on the storage device. Figure 1 shows the overall structure of Kubernetes, Huawei CSI, and Huawei storage.
Figure 1 CSI overall architecture
Huawei CSI consists of two components: huawei-csi-controller and huawei-csi-node.
- huawei-csi-controller: one or more Pods (including Controller Service and Identity Service) running in Deployment mode. It is used to interact with Huawei storage using RESTful. Therefore, the node running the huawei-csi-controller component must be connected to the management plane network of the storage.
- huawei-csi-node: a Pod (including Node Service and Identity Service) that runs on Kubernetes worker nodes in DaemonSet mode. It is used to mount and unmount a LUN/file system provided by Huawei storage on worker nodes. Therefore, the node running the huawei-csi-node component must be connected to the service plane network of the storage.
Figure 2 shows the deployment model of Huawei CSI.

This document describes how to install, deploy, and use the Huawei CSI V4.11.0 plug-in.
3 - Quick Start
This chapter describes how to quickly install and use Huawei CSI to manage Persistent Volume Claims (PVCs).
Huawei CSI Use Process
Figure 1 CSI installation and use process
Compatibility and Features
Before using this plug-in, learn about its compatibility with Huawei storage, container platforms, and host operating systems (OSs), as well as supported features. For details, see Compatibility and Features .
Installation Preparations
Before installing Huawei CSI, you need to prepare the configurations of related environments such as container platforms and hosts. For details, see Installation Preparations .
Installation and Deployment
Huawei CSI provides two installation modes: installation using Helm and manual installation, which are suitable for different container platforms such as Kubernetes and OpenShift. For details, see Installation and Deployment .
Creating a Storage Backend
Before using Huawei CSI, you need to create storage backend resources. For details, see Configuring the Storage Backend .
Using Huawei CSI
Now, you can use Huawei CSI to manage PVCs. For details, see Configuring a StorageClass and Configuring PVs .
4 - Compatibility and Features
4.1 - Flash Storage (OceanStor Dorado/OceanStor V5/OceanStor V6 and Later)
4.1.1 - File Service
4.1.1.1 - Compatibility
4.1.1.1.1 - Storage
Compatibility with Huawei CSI Storage
Table 1 Supported Huawei storage products
6.1.3, 6.1.5, 6.1.6, 6.1.7, 6.1.8, V700R001C00, V700R001C10, V700R001C20 | |
6.1.0, 6.1.2, 6.1.3, 6.1.5, 6.1.6, 6.1.7, 6.1.8, V700R001C00, V700R001C10, V700R001C20 |
Table 2 Huawei storage versions supported by Huawei enterprise storage dtrees
6.1.0, 6.1.2, 6.1.3, 6.1.5, 6.1.6, 6.1.7, 6.1.8, V700R001C00, V700R001C10, V700R001C20 |
4.1.1.1.2 - Container Platform
Huawei CSI Platform Compatibility
Table 1 Supported container management platforms
4.1.1.1.3 - OS
Huawei CSI OS Compatibility
Table 1 Supported host OSs
4.1.1.2 - Features
4.1.1.2.1 - Huawei CSI
Table 1 Features supported by Huawei storage and constraints
Table 2 Features supported by Huawei enterprise storage dtrees
√ (RWX/RWO/ROX/RWOP: Kubernetes 1.22 or later supports RWOP.) | |
4.1.2 - Block Service
4.1.2.1 - Compatibility
4.1.2.1.1 - Storage
Compatibility with Huawei CSI Storage
Table 1 Supported Huawei storage products
6.1.3, 6.1.5, 6.1.6, 6.1.7, 6.1.8, V700R001C00, V700R001C10, V700R001C20 | |
6.1.0, 6.1.2, 6.1.3, 6.1.5, 6.1.6, 6.1.7, 6.1.8, V700R001C00, V700R001C10, V700R001C20 |
4.1.2.1.2 - Container Platform
Huawei CSI Platform Compatibility
Table 1 Supported container management platforms
4.1.2.1.3 - OS
Huawei CSI OS Compatibility
Table 1 Supported host OSs
4.1.2.2 - Features
4.1.2.2.1 - Huawei CSI
Table 1 Features supported by Huawei storage and constraints
- When using the iSCSI protocol to connect the CSI to a storage system with multiple controller enclosures, you need to log in to the storage background and run the change target_name display_mode mode=Full command to ensure that the target IQN obtained by the CSI from the storage system is the same as the actual IQN.
- If a container platform is deployed on a virtualization platform, you are advised to use the iSCSI protocol when the CSI is connected to SAN storage.
- If the customer requires the FC, NVMe over FC, or NVMe over RoCE protocol, the virtualization platform needs to be configured. In this case, the customer’s virtualization team needs to provide technical support.
- When NVMe over RoCE or NVMe over FC is used, the supported nvme-cli tool version is 1.9 or later. When NVMe over TCP is used, the supported nvme-cli tool version is 2.0 or later. The query command is nvme version.
4.2 - Flash Storage (OceanStor A600/A800)
4.2.1 - File Service
4.2.1.1 - Compatibility
4.2.1.1.1 - Storage
Compatibility with Huawei CSI Storage
Table 1 Supported Huawei storage products
4.2.1.1.2 - Container Platform
Huawei CSI Platform Compatibility
Table 1 Supported container management platforms
4.2.1.1.3 - OS
Huawei CSI OS Compatibility
Table 1 Supported host OSs
4.2.1.2 - Features
4.2.1.2.1 - Huawei CSI
Table 1 Features and constraints supported by Huawei A series storage
Table 2 Features supported by Huawei A series storage dtrees
√ (RWX/RWO/ROX/RWOP: Kubernetes 1.22 or later supports RWOP.) | |
4.3 - DME (Interconnected with an OceanStor A800 Cluster)
4.3.1 - File Service
4.3.1.1 - Compatibility
4.3.1.1.1 - Storage
Compatibility with Huawei CSI Storage
Table 1 Supported Huawei storage products
4.3.1.1.2 - Container Platform
Huawei CSI Platform Compatibility
Table 1 Supported container management platforms
4.3.1.1.3 - OS
Huawei CSI OS Compatibility
Table 1 Supported host OSs
4.3.1.2 - Features
4.3.1.2.1 - Huawei CSI
Table 1 Features supported by Huawei storage and constraints
4.4 - Mass Storage (OceanStor Pacific/FusionStorage Block Series)
4.4.1 - File Service
4.4.1.1 - Compatibility
4.4.1.1.1 - Storage
Compatibility with Huawei CSI Storage
Table 1 Supported Huawei storage products
8.1.0, 8.1.1, 8.1.2, 8.1.3, 8.1.5, 8.2.0, 8.2.1, V800R001C10, V800R001C20 |
Table 2 Huawei storage versions supported by Huawei distributed storage dtrees
8.1.0, 8.1.1, 8.1.2, 8.1.3, 8.1.5, 8.2.0, 8.2.1, V800R001C10, V800R001C20 |
4.4.1.1.2 - Container Platform
Huawei CSI Platform Compatibility
Table 1 Supported container management platforms
4.4.1.1.3 - OS
Table 1 Supported host OSs
4.4.1.2 - Features
4.4.1.2.1 - Huawei CSI
Table 1 Features supported by Huawei storage and constraints
Table 2 Features supported by Huawei distributed storage dtrees
√ (RWX/RWO/ROX/RWOP: Kubernetes 1.22 or later supports RWOP.) | |
4.4.2 - Block Service
4.4.2.1 - Compatibility
4.4.2.1.1 - Storage
Compatibility with Huawei CSI Storage
Table 1 Supported Huawei storage products
8.1.0, 8.1.1, 8.1.2, 8.1.3, 8.1.5, 8.2.0, 8.2.1, V800R001C10, V800R001C20 |
4.4.2.1.2 - Container Platform
Huawei CSI Platform Compatibility
Table 1 Supported container management platforms
4.4.2.1.3 - OS
Huawei CSI OS Compatibility
Table 1 Supported host OSs
4.4.2.2 - Features
4.4.2.2.1 - Huawei CSI
4.5 - Mass Storage (OceanDisk Series)
4.5.1 - File Service
4.5.1.1 - Compatibility
4.5.1.1.1 - Storage
Compatibility with Huawei CSI Storage
Table 1 Supported Huawei storage products
4.5.1.1.2 - Container Platform
Huawei CSI Platform Compatibility
Table 1 Supported container management platforms
4.5.1.1.3 - OS
Table 1 Supported host OSs
4.5.1.2 - Features
4.5.1.2.1 - Huawei CSI
Table 1 Features supported by Huawei storage and constraints
Volumes created in Dynamic Provisioning or Manage Provisioning mode are supported. | |
RWO, ROX, RWX, and RWOP. RWOP is supported only in Kubernetes 1.22 or later. | |
4.5.2 - Block Service
4.5.2.1 - Compatibility
4.5.2.1.1 - Storage
Compatibility with Huawei CSI Storage
Table 1 Supported Huawei storage products
4.5.2.1.2 - Container Platform
Huawei CSI Platform Compatibility
Table 1 Supported container management platforms
4.5.2.1.3 - OS
Huawei CSI OS Compatibility
Table 1 Supported host OSs
UltraPath 31.1.0, supporting FC/iSCSI | |||
4.5.2.2 - Features
4.5.2.2.1 - Huawei CSI
Volumes created in Dynamic Provisioning or Manage Provisioning mode are supported. | |
RWO/ROX/RWOP: supported by all types of volumes. RWOP is supported only by Kubernetes 1.22 and later versions. | |
- When using the iSCSI protocol to connect the CSI to a storage system with multiple controller enclosures, you need to log in to the storage background and run the change target_name display_mode mode=Full command to ensure that the target IQN obtained by the CSI from the storage system is the same as the actual IQN.
- If a container platform is deployed on a virtualization platform, you are advised to use the iSCSI protocol when the CSI is connected to SAN storage.
- If the customer requires the FC, NVMe over FC, or NVMe over RoCE protocol, the virtualization platform needs to be configured. In this case, the customer’s virtualization team needs to provide technical support.
- When NVMe over RoCE or NVMe over FC is used, the supported nvme-cli tool version is 1.9 or later. When NVMe over TCP is used, the supported nvme-cli tool version is 2.0 or later. The query command is nvme version.
5 - Installation and Deployment
5.1 - CSI
5.1.1 - Installation Preparations
This chapter describes the preparations for the installation.
Prerequisites
- The container management platform has been deployed and is running properly. The container platform compatibility requirements in Compatibility and Features are met.
- (Mandatory for enterprise storage) Initial configuration for interconnecting with Huawei enterprise storage has been completed, including storage pool division and port configuration. The version of the storage product meets the requirements in Compatibility and Features .
- (Mandatory for distributed storage) Initial configuration for interconnecting with Huawei distributed storage has been completed, including storage pool division and port configuration. The version of the storage product meets the requirements in Compatibility and Features .
- The connectivity between Huawei storage and the container platform host has been configured. For example, the worker node running huawei-csi-controller communicates properly with the management IP address of the storage device to be connected, and the worker node running huawei-csi-node communicates properly with the service IP address of the storage device to be connected. In iSCSI scenarios, the ping command can be used to verify the connectivity.
- Ensure that the language of the operating system is English.
- Ensure that storage resource names, such as storage pool names and tenant names, are in English.
5.1.1.1 - Downloading the Huawei CSI Software Package
This section describes how to download the software package and the component structure of the software package.
Open a browser and enter https://github.com/Huawei/eSDK_K8S_Plugin/releases in the address box.
Download the software package of the 4.11.0 version based on the CPU architecture.

- Software package naming rule: Plug-in name (eSDK_Storage_CSI) + Version number + CPU architecture
- CSI supports the following CPU architectures: x86, Arm, and PPC64LE.
Decompress the downloaded software package. The following table shows the component structure of the software package.
Table 1 Component description
5.1.1.2 - Uploading a Huawei CSI Image
Huawei provides the huawei-csi image for users. For details about how to obtain the image file, see Downloading the Huawei CSI Software Package .
To use the CSI image on the container management platform, you need to import the CSI image to the cluster in advance:
- Method 1: (Recommended) Use Docker to upload the CSI image to the image repository. For details, see Uploading an Image to the Image Repository .
- Method 2: Manually import the CSI image to all nodes where Huawei CSI needs to be deployed. For details, see Uploading an Image to a Local Node .
Uploading an Image to the Image Repository
The installation of Huawei CSI depends on the following image files provided by Huawei. Import and upload the image files in sequence. For details about how to obtain the image files, see Downloading the Huawei CSI Software Package .
- huawei-csi-v4.11.0-arch.tar
- storage-backend-controller-v4.11.0-arch.tar
- storage-backend-sidecar-v4.11.0-arch.tar
- huawei-csi-extender-v4.11.0-arch.tar
Prerequisites
A Linux host with Docker installed is available, and the host can access the image repository.
Procedure
Run the following command to import the CSI image to the current node. arch indicates the CPU architecture.
docker load -i huawei-csi-v4.11.0-<arch>.tarRun the following command to add the image repository address to the image tag. repo.huawei.com indicates the image repository address.
docker tag huawei-csi:4.11.0 <repo.huawei.com>/huawei-csi:4.11.0Run the following command to upload the CSI image to the image repository. repo.huawei.com indicates the image repository address.
docker push <repo.huawei.com>/huawei-csi:4.11.0
- Run the corresponding CLI command to load and push the image based on the container runtime environment (for example, Docker or Containerd).
- For details about how to import and upload images to the CCE or CCE Agile platform, see the user manual of the platform.
Uploading an Image to a Local Node
If the image has been uploaded to the image repository, skip this section.
Prerequisites
- The node has the corresponding Huawei CSI image file. For details about how to obtain the image file, see Downloading the Huawei CSI Software Package .
- Docker or another container engine has been installed on the node.
Procedure
- Use a remote access tool, such as PuTTY, to log in to the node where the image is to be imported through the management IP address.
- Copy the image directory in the Kubernetes CSI component package to any directory on the current node.
- Run the cd image command to go to the image working directory. For details about the tool path, see Table 1 .
- Run the following commands in sequence to import all Huawei CSI images in the image directory to the local node. In the commands, name indicates the name of a .tar image package.
Run the following command using the Docker container engine:
docker load -i <name>.tarRun the following command using the containerd container engine:
ctr -n k8s.io image import <name>.tarRun the following command using the Podman container engine:
podman load -i <name>.tar
If another container engine is installed on the node, use the image import command for the corresponding container engine.
5.1.1.3 - Checking User Configurations on Huawei Storage
After Huawei storage is connected to the container platform, Huawei CSI needs to manage storage resources on Huawei storage based on service requirements, such as creating and mapping volumes. In this case, Huawei CSI needs to use the users created on Huawei storage to communicate with Huawei storage. The following table lists the user information required for different storage devices.
Table 1 User requirements for connecting storage to CSI
- If a user-defined role is used, you need to configure permissions for the role. For details about how to configure the minimum permissions, see Configuring Custom Permissions .
- If the LDAP authentication mode is used, you need to set the authenticationMode parameter when creating a backend. For details, see the parameter description in Configuring the Storage Backend .
- Based on the principle of minimum and system security requirements, users under the super administrator role are not recommended.
5.1.1.4 - Checking Volume Snapshot-Dependent Components
This section describes how to check the volume snapshot-dependent components in the cluster.
If Huawei CSI is deployed in a version earlier than Kubernetes v1.20, perform the following steps:
Run the following command to check the Kubernetes version. The following uses Kubernetes v1.16.0 as an example.
kubectl get nodeThe following is an example of the command output.
NAME          STATUS       ROLES     AGE    VERSION
test-master   Ready        master    311d   v1.16.0
test-node     Ready        <none>    311d   v1.16.0
Copy the helm directory in the Kubernetes CSI component package to any directory on the master node. For details about the Helm tool path, see Table 1 .
Go to the helm/esdk/crds/snapshot-crds directory and run the following command to delete the snapshot CRD installation file.
rm -rf ./huawei-csi-snapshot-crd-v1.yaml
5.1.1.5 - Checking the Host Multipathing Configuration
If you plan to use the FC/iSCSI/NVMe over RoCE/NVMe over FC protocol to access Huawei storage in a container environment, you are advised to use host multipathing software to enhance the link redundancy and performance of the host and storage. If you do not want to use the software, skip this section.
For details about the OSs and multipathing software that can be interconnected with Huawei CSI software, see the OS compatibility in Compatibility and Features .
- If you want to use the FC/iSCSI protocol to connect to Huawei storage, you are advised to use native DM-Multipath provided by the OS.
- If you want to use the NVMe over RoCE/NVMe over FC protocol to connect to Huawei storage, you are advised to use Huawei-developed UltraPath-NVMe.
- If you want to use the SCSI protocol to connect to Huawei storage, disable DM-Multipath provided by the OS.
Prerequisites
Multipathing software has been correctly installed on a host.
- If you use native DM-Multipath provided by the OS, contact your host or OS provider to obtain the documents and software packages required for the installation.
- If you use Huawei-developed UltraPath or UltraPath-NVMe, contact Huawei engineers to obtain the UltraPath or UltraPath-NVMe documents and software packages. For details about the software package version, see the OS compatibility in Compatibility and Features .
Procedure
If you use the iSCSI/FC protocol to connect to Huawei enterprise storage, configure and check host multipathing by referring to OceanStor Dorado and OceanStor Host Connectivity Guide for Red Hat .
If you use the NVMe over RoCE/NVMe over FC protocol to connect to Huawei enterprise storage, configure and check host multipathing by referring to OceanStor Dorado and OceanStor Host Connectivity Guide for Red Hat .
If you use iSCSI to connect to Huawei distributed storage, configure and check host multipathing by referring to Configuring Multipathing for an Application Server in FusionStorage 8.0.1 Block Storage Basic Service Configuration Guide
If you use the native multipathing software provided by the OS, check whether the /etc/multipath.conf file contains the following configuration item.
defaults {
        user_friendly_names yes
        find_multipaths no
}
If the configuration item does not exist, add it to the beginning of the /etc/multipath.conf file.
For details about the functions of the user_friendly_names and find_multipaths parameters, see dm_multipath/config_file_defaults .
5.1.1.6 - Checking the Status of Host-Dependent Software
This section describes how to check whether the status of host-dependent software on worker nodes in a cluster is normal. In this example, the host OS is CentOS 7.9 x86_64.
Check the status of the iSCSI client.
systemctl status iscsi iscsidCheck the status of the NFS client.
systemctl status rpcbindCheck the status of DM-Multipath.
systemctl status multipathd.socket multipathdCheck the status of UltraPath.
systemctl status nxupCheck the status of UltraPath-NVMe.
systemctl status upudev upService_plusCheck the status of the NVMe-Native multipathing software. If Y is displayed in the command output, the status is enabled.
cat /sys/module/nvme_core/parameters/multipathCheck the status of the DataTurbo client. For details, see OceanStor DataTurbo 25.1.0 DTFS User Guide .
Check the status of the NFS+ client. For details, see NFS+ Client 1.x User Guide .
5.1.1.7 - Checking the Images on Which CSI Depends
The installation of Huawei CSI depends on the images listed in the following table. If all worker nodes in the cluster have been connected to the Internet and can pull images online, you can skip this section. If nodes in the cluster cannot connect to the Internet, download the corresponding image file based on the Kubernetes version and upload it to the image repository or import it to all worker nodes in the Kubernetes cluster.
The huawei-csi-controller service depends on the following sidecar images: livenessprobe, csi-provisioner, csi-attacher, csi-resizer, csi-snapshotter, snapshot-controller, storage-backend-controller, storage-backend-sidecar, huawei-csi-driver, and huawei-csi-extender. The huawei-csi-node service depends on the following sidecar images: livenessprobe, csi-node-driver-registrar, and huawei-csi-driver.
For details about the functions and details of each image, see the following table.
Table 1 Images on which Huawei CSI depends
If the cluster is not connected to the Internet, manually download the container images and upload them to the cluster. For details, see Downloading a Container Image .
5.1.2 - Installation
This section describes how to install Huawei CSI.
In the current version, resource requests and limits are added to Huawei CSI. For details, see Huawei CSI Resource Management .
Prerequisites
- Operations described in Installation Preparations have been completed.
- All worker nodes of the cluster communicate properly with the service network of the storage device to be connected. In iSCSI scenarios, the ping command can be used to verify the connectivity.
- Software clients required by the corresponding protocol, such as iSCSI and NFS clients, have been installed on all worker nodes of the cluster.
5.1.2.1 - Installation Using Helm
This section describes how to install Huawei CSI using Helm 3.
Helm Installation Description
- Huawei CSI can be installed as the root user or a non-root user. When installing Huawei CSI as a non-root user, ensure that the current user can access the API Server of the Kubernetes cluster. For details about how to configure access to the Kubernetes cluster as a non-root user, see Configuring Access to the Kubernetes Cluster as a Non-root User .
- Huawei CSI must be run as the root user.
Helm is a software package management tool in the Kubernetes ecosystem. Similar to Ubuntu APT, CentOS YUM, or Python pip, Helm manages Kubernetes application resources.
You can use Helm to package, distribute, install, upgrade, and roll back Kubernetes applications in a unified manner.
- For details about how to obtain and install Helm, see https://helm.sh/docs/intro/install/ .
- For details about the mapping between Helm and Kubernetes versions, see https://helm.sh/docs/topics/version_skew/ .
When installing huawei-csi-controller, Helm deploys the following components in the workloads of the Deployment type in the specified namespace:
- huawei-csi-driver: Huawei CSI driver.
- storage-backend-controller: Huawei backend management controller, used to manage storageBackendClaim resources.
- storage-backend-sidecar: used to manage storageBackendContent resources.
- Kubernetes External Provisioner: used to provide or delete volumes.
- Kubernetes External Attacher: used to attach or detach volumes.
- Kubernetes External Resizer: used to expand the capacity of volumes.
- Kubernetes External liveness-probe: used to determine the health status of a Pod.
- (Optional) huawei-csi-extender: used to support changing persistent volumes.
- (Optional) Kubernetes External Snapshotter: used to provide snapshot support (installed as CRD).
- (Optional) Kubernetes External Snapshot Controller: used to control volume snapshots.
When installing huawei-csi-node, Helm deploys the following components in the workloads of the DaemonSet type in the specified namespace:
- huawei-csi-driver: Huawei CSI driver.
- Kubernetes Node Registrar: used to process driver registration.
- liveness-probe: used to determine the health status of a Pod.
5.1.2.1.1 - Installing Huawei CSI on Kubernetes, OpenShift, and Tanzu
Installation Procedure
Use a remote access tool, such as PuTTY, to log in to any master node in the cluster through the management IP address.
Copy the helm directory in the Kubernetes CSI component package to any directory on the master node. For details about the Helm tool path, see Table 1 .
Go to the helm/esdk working directory.
cd helm/esdkPrepare the values.yaml file. Huawei CSI provides the values.yaml template file in the helm/esdk directory of the software package. You can also modify parameters according to Parameters in the values.yaml File of Helm to customize Huawei CSI.
Perform the following configuration before the installation:
- If the container platform is Kubernetes, skip this step.
- If the container platform is OpenShift, perform the configuration in Installation and Configuration on the OpenShift Platform .
- If the container platform is Tanzu, perform the configuration in Installation and Configuration on the Tanzu Platform .
Run the following command to update the storage backend CRD.
kubectl apply -f ./crds/backend/(Optional) Check snapshot-dependent components by following the instructions provided in Checking Volume Snapshot-Dependent Components . After confirming that the components are correct, run the following command to update the snapshot CRD. If controller.snapshot.enabled is set to false or the Kubernetes version is earlier than v1.20, you can skip this step. For details, see Table 2 .
kubectl apply -f ./crds/snapshot-crds/ --validate=falseRun the following command to install Huawei CSI. In the preceding command, helm-huawei-csi indicates the custom Helm chart name, ./ indicates that the Helm project in the current directory is used, and huawei-csi indicates the custom Helm chart namespace.
helm install helm-huawei-csi ./ -n huawei-csi --create-namespaceThe following is an example of the command output.
NAME: helm-huawei-csi
LAST DEPLOYED: Wed Jun  8 11:50:28 2022
NAMESPACE: huawei-csi
STATUS: deployed
REVISION: 1
TEST SUITE: None
After the huawei-csi service is deployed, run the following command to check whether the service is started.
kubectl get pod -n huawei-csiThe following is an example of the command output. If the Pod status is Running, the installation is successful.
NAME                                     READY   STATUS    RESTARTS   AGE
huawei-csi-controller-6dfcc4b79f-9vjtq   9/9     Running   0          24m
huawei-csi-controller-6dfcc4b79f-csphc   9/9     Running   0          24m
huawei-csi-node-g6f4k                    3/3     Running   0          20m
huawei-csi-node-tqs87                    3/3     Running   0          20m
Installation and Configuration on the OpenShift Platform
For the OpenShift platform, perform the following steps to create the SecurityContextConstraints resource.
Run the following command to edit the helm_scc.yaml file.
vi helm_scc.yamlModify the helm_scc.yaml file. In the following commands, huawei-csi indicates the created namespace. Replace it based on the actual situation.
apiVersion: security.openshift.io/v1
kind: SecurityContextConstraints
metadata:
  name: helm-scc
allowHostDirVolumePlugin: true
allowHostIPC: true
allowHostNetwork: true
allowHostPID: true
allowHostPorts: true
allowPrivilegeEscalation: true
allowPrivilegedContainer: true

defaultAddCapabilities:
- SYS_ADMIN
runAsUser:
  type: RunAsAny
seLinuxContext:
  type: RunAsAny
fsGroup:
  type: RunAsAny
users:
- system:serviceaccount:huawei-csi:huawei-csi-controller
- system:serviceaccount:huawei-csi:huawei-csi-node
Run the following command to create a SecurityContextConstraints file.
oc create -f helm_scc.yaml
Installation and Configuration on the Tanzu Platform
On the Tanzu platform, run the following command to configure the kubelet installation directory.
Go to the helm/esdk directory in the installation package, and run the following command to open the configuration file. For details about the installation package directory, see Table 1 .
vi values.yamlModify the kubeletConfigDir parameter as follows and save the settings.
# Specify kubelet config dir path.
# kubernetes and openshift is usually /var/lib/kubelet
# Tanzu is usually /var/vcap/data/kubelet
# CCE is usually /mnt/paas/kubernetes/kubelet
kubeletConfigDir: /var/vcap/data/kubelet
For TKGI 1.16 or earlier of the Tanzu platform, run the following commands to configure the RBAC permission.
Run the following command to create a file named rbac.yaml.
vi rbac.yamlCopy the following content to the rbac.yaml file, save the file, and exit.
apiVersion: rbac.authorization.k8s.io/v1
kind: ClusterRole
metadata:
  name: huawei-csi-psp-role
rules:
- apiGroups: ['policy']
  resources: ['podsecuritypolicies']
  verbs: ['use']
---
apiVersion: rbac.authorization.k8s.io/v1
kind: ClusterRoleBinding
metadata:
  name: huawei-csi-psp-role-cfg
roleRef:
  kind: ClusterRole
  name: huawei-csi-psp-role
  apiGroup: rbac.authorization.k8s.io
subjects:
- kind: Group
  apiGroup: rbac.authorization.k8s.io
  name: system:serviceaccounts:huawei-csi
- kind: Group
  apiGroup: rbac.authorization.k8s.io
  name: system:serviceaccounts:default
Run the following command to create the RBAC permission.
kubectl create -f rbac.yaml
5.1.2.1.2 - Installing Huawei CSI on the CCE or CCE Agile Platform
This section describes how to install Huawei CSI on the CCE or CCE Agile platform.
Creating a Helm Installation Package
The CCE or CCE Agile platform cannot directly install Huawei CSI using Helm. You need to manually create a Helm installation package and upload it to the chart list on the platform for installation.
Use a remote access tool, such as PuTTY, to log in to any node where Helm is deployed through the management IP address.
Copy the helm directory in the Huawei CSI component package to any directory on the node. For details about the Helm tool path, see Table 1 .
Go to the helm working directory.
cd helm/Modify the kubeletConfigDir and csiDriver.driverName parameters in the helm/esdk/values.yaml file.
vi ./esdk/values.yamlModify the following parameters:
# Specify kubelet config dir path.
# kubernetes and openshift is usually /var/lib/kubelet
# Tanzu is usually /var/vcap/data/kubelet
# CCE is usually /mnt/paas/kubernetes/kubelet
kubeletConfigDir: /mnt/paas/kubernetes/kubelet

# The CSI driver parameter configuration
csiDriver:
  # Driver name, it is strongly recommended not to modify this parameter
  # The CCE platform needs to modify this parameter, e.g. csi.oceanstor.com
  driverName: csi.oceanstor.com
Run the following command to create a Helm installation package. This command will generate the installation package to the current path.
helm package ./esdk/ -d ./
Installing Huawei CSI
Use a remote access tool, such as PuTTY, to log in to any master node where the CCE Agile platform is deployed through the management IP address.
Run the following command to create a namespace for deploying Huawei CSI. huawei-csi indicates the custom namespace.
kubectl create namespace huawei-csiExport the Helm installation package. For details, see Creating a Helm Installation Package .
On the home page, choose Charts > My Charts > Upload Chart. The Upload Chart dialog box is displayed. Import the exported Helm installation package to the CCE Agile platform.
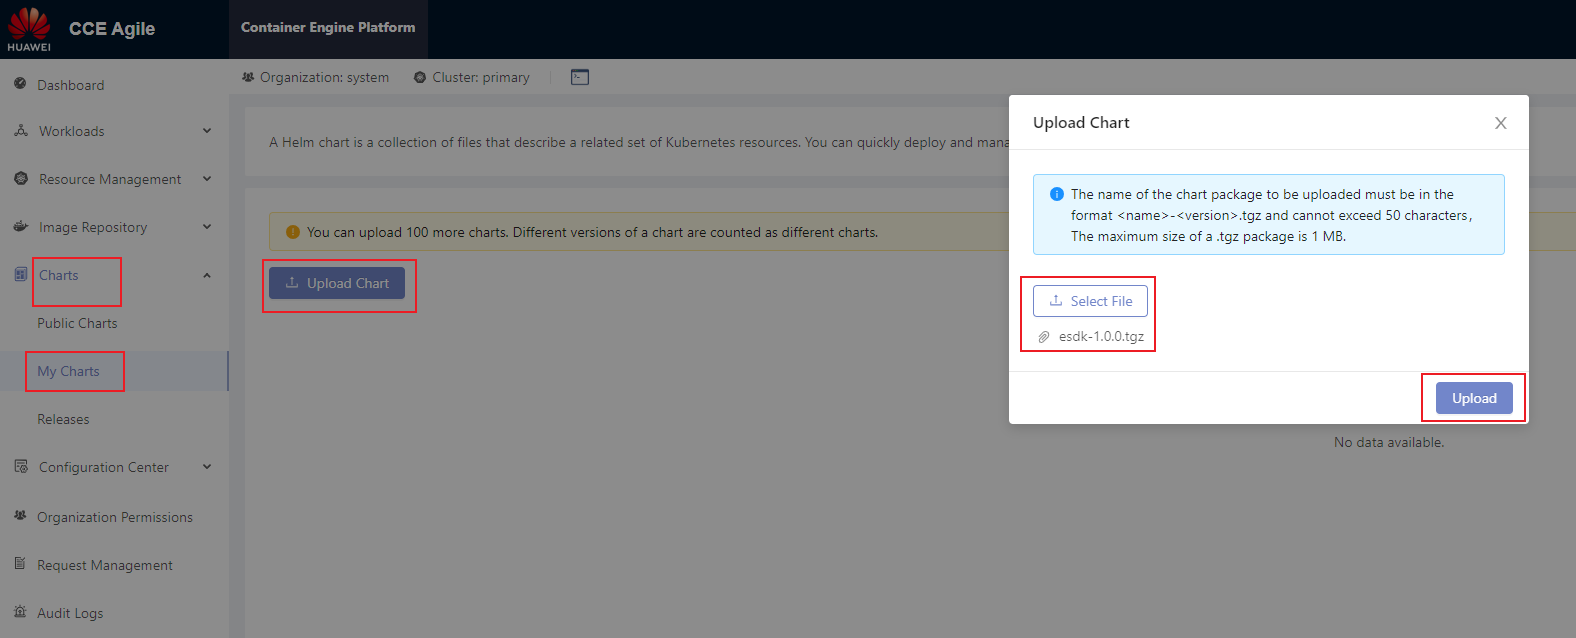
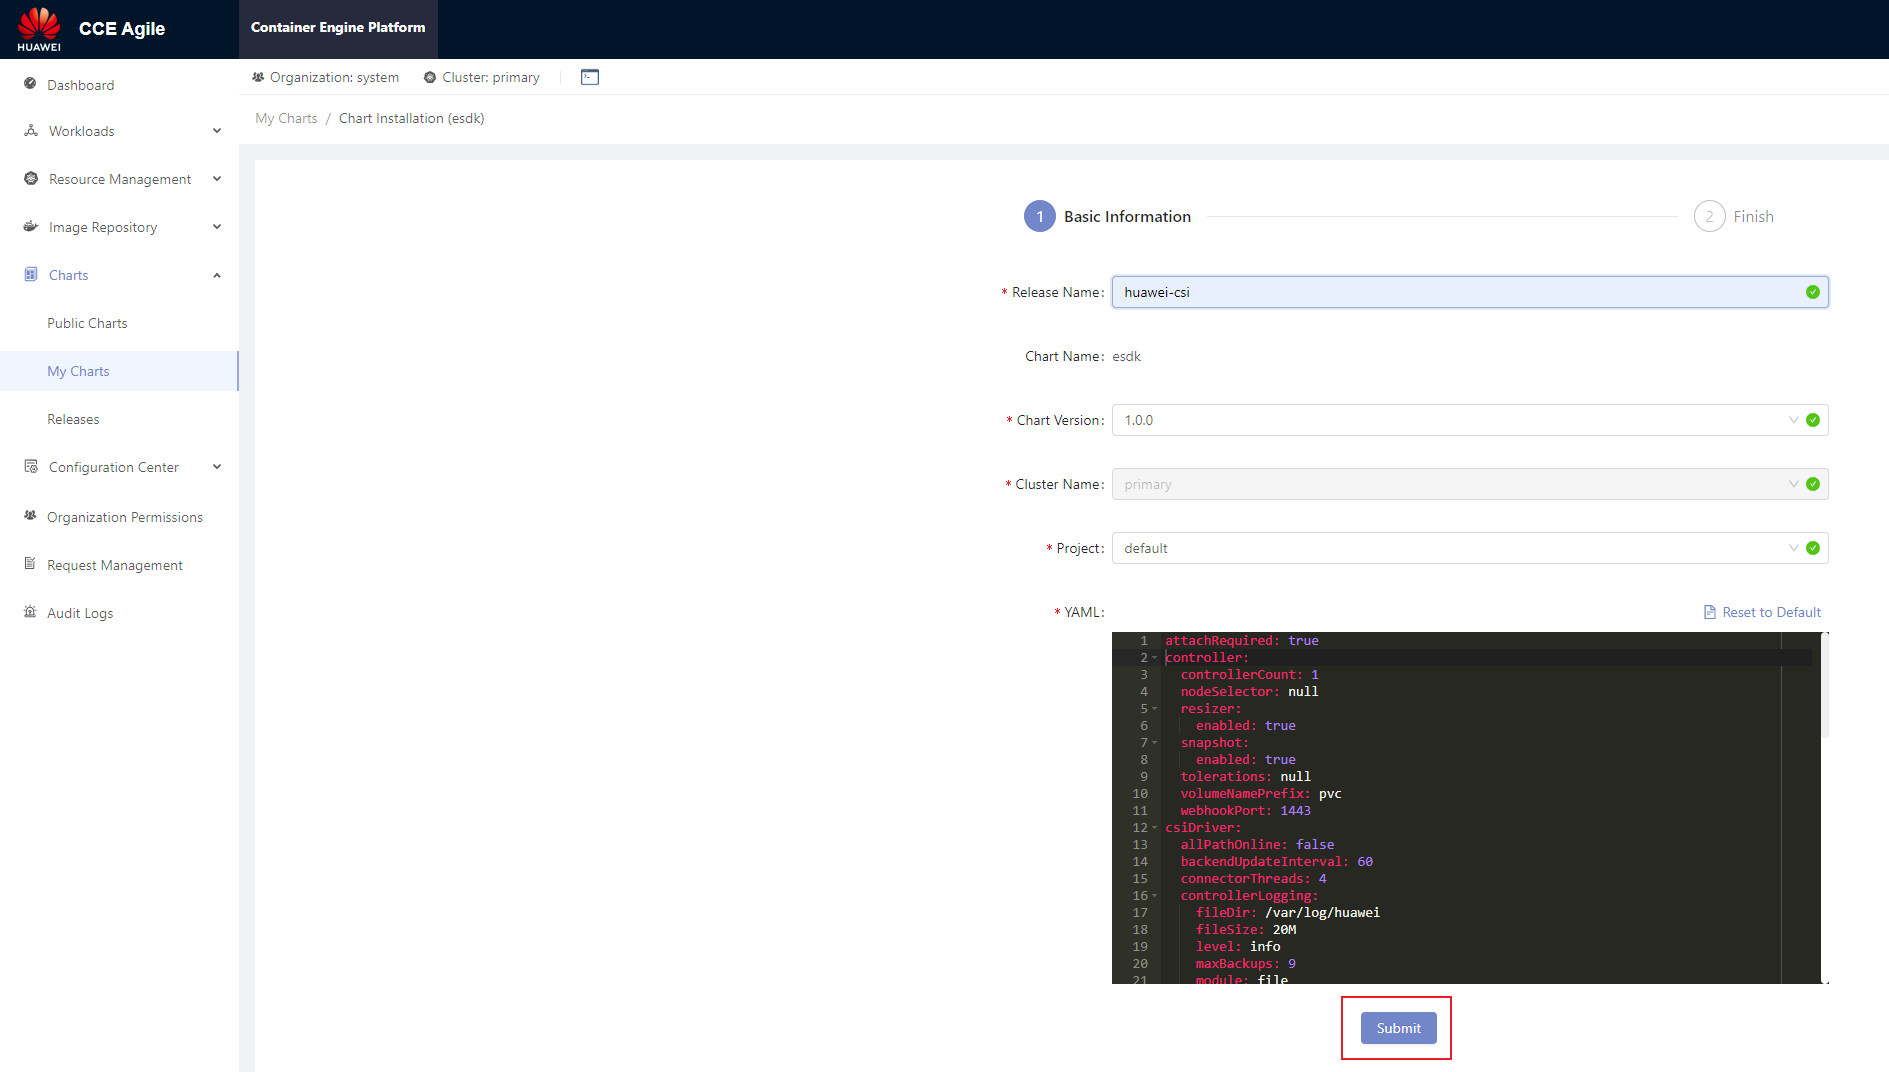
After the installation package is uploaded, choose Charts > My Charts. On the My Charts page that is displayed, choose Install > Submit. The chart release name can be customized.
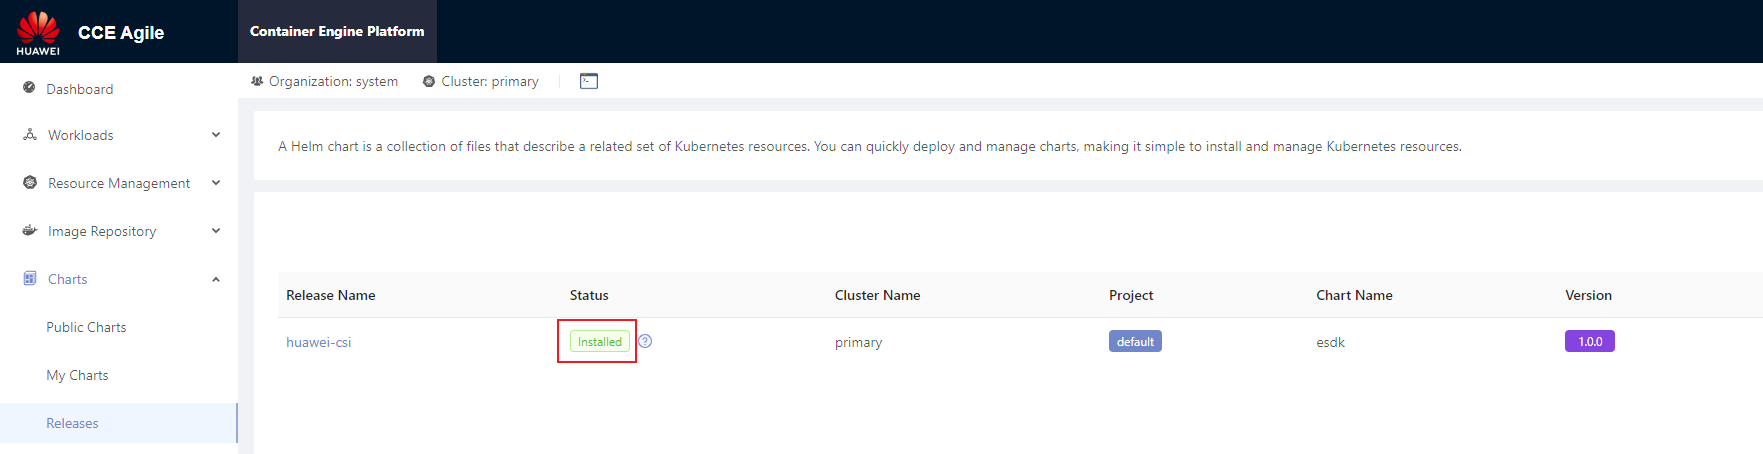
On the home page, choose Charts > Releases and select the project specified during installation (for example, default in the following figure). After the installation is successful, Installed is displayed in the Status column.
5.1.2.1.3 - Parameters in the values.yaml File of Helm
When using Helm to install CSI, you need to prepare the values.yaml file of the Helm project based on the features required during deployment. Huawei CSI provides the values.yaml template file in the helm/esdk directory of the software package.
This section describes the configuration items in the values.yaml file and backend configuration examples in typical scenarios.
images Parameters
The images parameters in the values.yaml file are used to configure the component image information on which Huawei CSI depends during running. Set the following parameters:
Table 1 images parameters
livenessprobe sidecar image. | |||
csi-provisioner sidecar image. | |||
csi-attacher sidecar image. | |||
csi-resizer sidecar image. | |||
csi-snapshotter sidecar image. | |||
snapshot-controller sidecar image. | |||
csi-node-driver-registrar sidecar image. | registry.k8s.io/sig-storage/csi-node-driver-registrar:v2.13.0 |
- For details about the values of huaweiCSIService, storageBackendSidecar, storageBackendController, and huaweiCSIExtender, see Uploading a Huawei CSI Image . Use the name and version of the finally generated image.
- For details about other sidecar image parameters, see Checking the Images on Which CSI Depends . Use the name and version of the finally uploaded image.
controller Parameters
The controller parameters are used to configure the huawei-csi-controller component.
Table 2 controller parameters
If the Kubernetes version is earlier than v1.17, the huawei-csi-controller component can be deployed only in single-copy mode because the csi-provisioner sidecar image provided by the Kubernetes community does not support the --leader-election parameter. Therefore, if the Kubernetes version is earlier than v1.17, this parameter can only be set to 1. | ||||
PV name prefix. The default value is pvc, that is, the name of a created PV is pvc-<uuid>. The prefix must comply with the naming rules of DNS Subdomain Names, and the total length of the PV name cannot exceed 253 characters. | The corresponding provisioner parameter name is --volume-name-prefix. It is recommended that the prefix contain no more than 20 characters. For details, see Configuring the PV Name Prefix.
| |||
If a port conflict occurs, change the port number to an idle one. | ||||
If you want to use snapshot-related functions, enable this feature. | ||||
Node selector of huawei-csi-controller. After this parameter is set, huawei-csi-controller will be scheduled only to a node with the label. | For details about the node selector, see Assign Pods to Nodes. | |||
Taint toleration of huawei-csi-controller. After this parameter is set, huawei-csi-controller can tolerate taints on a node. | For details about taints and tolerations, see Taints and Tolerations. | |||
Node affinity of huawei-csi-controller. After this parameter is set, huawei-csi-controller will be preferentially scheduled to a node with the label. | For details about node affinity, see Assigning Pods to Nodes. | |||
Liveness probe port of huawei-csi-controller, used for health check. | If a port conflict occurs, change the port number to an idle one. | |||
If you want to use PVC change-related functions, enable this feature. | ||||
Minimum retry interval when a PVC change fails to be created. | ||||
Maximum retry interval when a PVC change fails to be created. | ||||
Whether to run CSI services on the Service of the Kubernetes cluster. | After this function is enabled, other services in the Kubernetes cluster can access CSI services through gRPC. | |||
Port used when CSI services run on the Service of the Kubernetes cluster. | If a port conflict occurs, change the port number to an idle one. |
If controller.snapshot.enabled is set to true, you need to install the volume snapshot CRD resource in the helm/crd/snapshot-crds directory.
node Parameters
The node parameters are used to configure the huawei-csi-node component.
Table 3 node parameters
Maximum number of volumes provisioned by Huawei CSI that can be used by a node. If this parameter is not specified or is set to 0, the number is unlimited. If nodeName is specified during Pod creation, this configuration will be ignored. | For details, see Volume Limits. | |||
Node selector of huawei-csi-node. After this parameter is set, huawei-csi-node will be scheduled only to a node with the label. | For details about the node selector, see Assign Pods to Nodes. | |||
Taint toleration of huawei-csi-node. After this parameter is set, huawei-csi-node can tolerate taints on a node. | - key: "node.kubernetes.io/memory-pressure" operator: "Exists" effect: "NoExecute" - key: "node.kubernetes.io/disk-pressure" operator: "Exists" effect: "NoExecute" - key: "node.kubernetes.io/network-unavailable" operator: "Exists" effect: "NoExecute" | For details about taints and tolerations, see Taints and Tolerations. | ||
Node affinity of huawei-csi-node. After this parameter is set, huawei-csi-node will be preferentially scheduled to a node with the label. | For details about node affinity, see Assigning Pods to Nodes. | |||
Liveness probe port of huawei-csi-node, used for health check. | If a port conflict occurs, change the port number to an idle one. | |||
Name of the directory where a block device is mounted to kubelet. | After a block device is successfully mounted, the directory structure of the mount path is as follows: /var/lib/kubelet/plugins/kubernetes.io/csi/{kubeletVolumeDevicesDirName}/publish/{specName}/{podUID} |
csiDriver Parameters
The csiDriver parameters include the basic configurations for running Huawei CSI, such as Huawei driver name and multipathing type.
Table 4 csiDriver parameters
Maximum number of disks that can be concurrently scanned/detached. The value is an integer ranging from 1 to 10. | A larger value indicates that more concurrent disk scanning and detaching operations are performed on a single node at the same time. When DM-Multipath is used, a large number of concurrent requests may cause unknown problems and affect the overall time. | |||
Whether to use multipathing software. The value is a Boolean value. | It is strongly recommended that multipathing software be enabled to enhance the redundancy and performance of storage links. | |||
Multipathing software used when the storage protocol is fc or iscsi. The following parameter values can be configured: | ||||
Multipathing software used when the storage protocol is NVMe. The following parameter values can be configured: | ||||
Timeout interval for waiting for multipathing aggregation when DM-Multipath is used on the host. The value ranges from 1 to 600 seconds. | ||||
In scenarios such as mounting and capacity expansion, the CSI plug-in needs to run some host commands, for example, running the mount command to mount a file system. This parameter is used to control the timeout interval for running a single command. | ||||
Whether to enable CSI automatic disk scanning when the roce-nvme or tcp-nvme protocol is used. | If an external tool is used to establish an NVMe_over_RoCE or NVMe_over_TCP connection, set this parameter to false. For example, if the SNSD automatic connection function is enabled on storage devices, you can set this parameter to false. | |||
Whether to check that the number of paths aggregated by DM-Multipath or NVMe-Native is equal to the actual number of online paths. The following parameter values can be configured:
| This parameter is mandatory when csiDriver.scsiMultipathType is set to DM-multipath or csiDriver.nvmeMultipathType is set to NVMe-Native. | |||
Interval for updating backend capabilities. The value ranges from 60 to 600 seconds. | ||||
Record type of the controller log. The following parameter values can be configured:
| When the value is file, logs are retained in the specified directory of the node. When the Pod where CSI is located is destroyed, logs are still retained. When the value is console, logs are retained in the temporary space of the Pod where CSI is located. When the Pod where CSI is located is destroyed, the logs are also destroyed. | |||
Output level of the controller log. The following parameter values can be configured:
| ||||
Ensure that the directory has sufficient space for storing logs. It is recommended that the space be greater than or equal to 200 MB. | ||||
Maximum number of controller log file backups in file output mode. | ||||
Record type of the node log. The following parameter values can be configured:
| When the value is file, logs are retained in the specified directory of the node. When the Pod where CSI is located is destroyed, logs are still retained. When the value is console, logs are retained in the temporary space of the Pod where CSI is located. When the Pod where CSI is located is destroyed, the logs are also destroyed. | |||
Output level of the node log. The following parameter values can be configured:
| ||||
Ensure that the directory has sufficient space for storing logs. It is recommended that the space be greater than or equal to 200 MB. | ||||
Maximum number of node log file backups in file output mode. | ||||
After this item is enabled, the CSI node will automatically report the node IP address. | ||||
By default, the information required by CSI on all nodes is saved to a Secret. After this function is enabled, an independent Secret is created for each node to save information. NOTICE: After this function is enabled, the following conditions must be met:
|
If Huawei CSI has been deployed in your container environment, ensure that the value of csiDriver.driverName is the same as that configured during previous deployment. Otherwise, existing volumes or snapshots provisioned by Huawei CSI in the system cannot be managed by the newly deployed Huawei CSI.
Other Parameters
Other parameters include some features of the CSI plug-in or the policies for obtaining images.
Table 5 Other parameters
Kubernetes namespace where Huawei CSI is running, which can be customized. The name must consist of lowercase letters, digits, and hyphens (-), for example, my-name and 123-abc. | ||||
Used by the Kubernetes cluster to pass the identity authentication of an image registry to pull private images. | For details, see Pull an Image from a Private Registry. | |||
The CSIDriver feature is a GA version in Kubernetes v1.18. Therefore, to use this feature, the Kubernetes version must be later than v1.18. If the Kubernetes version is earlier than v1.18, set this parameter to false. | ||||
Whether the CSI plug-in skips the attach operation. The following parameter values can be configured: | The attachRequired parameter can be configured in Kubernetes v1.18. If CSIDriverObject.isCreate is set to true and attachRequired is set to false, the huawei-csi plug-in will not deploy the csi-attacher sidecar. | |||
Whether the ownership and permissions of a basic volume can be changed before the volume is mounted. The following parameter values can be configured:
| The fsGroupPolicy parameter can be configured in Kubernetes v1.20, and takes effect only when CSIDriverObject.isCreate is set to true. This feature is a Beta version in Kubernetes v1.20 but a GA version in Kubernetes v1.23. Therefore, the Kubernetes version must be later than v1.20. | |||
This parameter takes effect only in the multi-controller scenario. | ||||
This parameter takes effect only in the multi-controller scenario. | ||||
This parameter takes effect only in the multi-controller scenario. | ||||
| ||||
| ||||
You can allocate container resources related to huawei-csi-controller and huawei-csi-node: resources.<component>.<container-name> <component> supports the following values:
controller.<container-name> supports the following values:
node.<container-name> supports the following values:
| For the default values of different container resources, see Huawei CSI Resource Management. | The following uses livenessProbe of huawei-csi-controller as an example: resources: controller: limits: cpu: 100m memory: 128Mi requests: cpu: 10m memory: 128Mi |
Ensure that the namespace entered in kubernetes.namespace exists on Kubernetes. If the namespace does not exist, run the following command to create it. In this example, the namespace for running Huawei CSI is huawei-csi.kubectl create namespace huawei-csi
5.1.2.2 - Manual Installation
This section describes how to manually install Huawei CSI.
Currently, only the Kubernetes platform supports manual installation of Huawei CSI.
Procedure
Use a remote access tool, such as PuTTY, to log in to any master node in the cluster through the management IP address.
Copy the manual directory in the Kubernetes CSI component package to any directory on the master node.
Run the following command to create a namespace. huawei-csi is used as an example namespace.
kubectl create ns huawei-csiGo to the manual/esdk working directory. For details about the path, see Table 1 .
cd manual/esdkRun the following command to update the storage backend CRD.
kubectl apply -f ./crds/backend/(Optional) Check snapshot-dependent components by following the instructions provided in Checking Volume Snapshot-Dependent Components . After confirming that the components are correct, run the following command to update the snapshot CRD. If the Kubernetes version is earlier than v1.20, skip this step.
kubectl apply -f ./crds/snapshot-crds/ --validate=false(Optional) Run the following command to install CSIDriver. If the CSIDriver feature is not used, you can skip this step. For details, see the CSIDriver feature.
kubectl apply -f ./deploy/csidriver.yamlRun the following command to install the huawei-csi-controller service.
If the Kubernetes version is earlier than v1.20, modify the ./deploy/huawei-csi-controller.yaml file as follows:- If the Kubernetes version is earlier than v1.20, the snapshot feature is not supported. In this case, delete the snapshot-related container configurations items csi-snapshotter and snapshot-controller. If the Kubernetes version is earlier than v1.17, modify the ./deploy/huawei-csi-controller.yaml file as follows:
- If the Kubernetes version is earlier than v1.17, the snapshot feature is not supported. In this case, delete the snapshot-related container configurations items csi-snapshotter and snapshot-controller.
- If the Kubernetes version is earlier than v1.17, the csi-provisioner sidecar image provided by the Kubernetes community does not support the –leader-election parameter. Therefore, the leader-election parameter of the csi-provisioner container is deleted and only single-copy deployment is supported.
- Modify the dependent image version based on the version requirements in Checking the Images on Which CSI Depends .
kubectl apply -f ./deploy/huawei-csi-controller.yamlRun the following command to install the huawei-csi-node service.
kubectl apply -f ./deploy/huawei-csi-node.yamlRun the following command to check whether the services are started.
kubectl get pod -n huawei-csiThe following is an example of the command output. If the Pod status is Running, the installation is successful.
NAME                                     READY   STATUS    RESTARTS   AGE
huawei-csi-controller-68745d489c-v5xkj   9/9     Running   0          13m
huawei-csi-node-4hbqp                    3/3     Running   0          13m
huawei-csi-node-f7dkf                    3/3     Running   0          13m
huawei-csi-node-xrntc                    3/3     Running   0          13m
In the multi-copy controller deployment scenario, you can modify the spec.replica field of the Deployment resource in the ./deploy/huawei-csi-controller.yaml file to specify the number of copies. After the modification, run the kubectl apply -f ./deploy/huawei-csi-controller.yaml command to make the configuration take effect.
5.1.3 - Uninstallation
This section describes how to uninstall Huawei CSI. The uninstallation method varies according to the installation mode.
If you do not uninstall Huawei CSI for the purpose of an upgrade, ensure that all resources (such as PV, PVC, snapshot, and storage backend resources) provisioned by Huawei CSI have been cleared on your container platform before uninstalling Huawei CSI. Otherwise, once you uninstall Huawei CSI, these resources cannot be automatically scheduled, managed, or cleared.
5.1.3.1 - Uninstallation Using Helm
5.1.3.1.1 - Uninstalling Huawei CSI on Kubernetes, OpenShift, and Tanzu
This section describes how to uninstall Huawei CSI on the Kubernetes, OpenShift, and Tanzu platforms.
Procedure
Use a remote access tool, such as PuTTY, to log in to any master node in the Kubernetes cluster through the management IP address.
Run the following command to uninstall Huawei CSI. In the command, helm-huawei-csi indicates the custom Helm chart name and huawei-csi indicates the namespace where the Helm chart resides. This command will uninstall the huawei-csi-controller, huawei-csi-node, and RBAC resources of Huawei CSI.
helm uninstall helm-huawei-csi -n huawei-csiAfter the uninstallation command is executed, you need to check whether the uninstallation is successful. In the preceding command, huawei-csi indicates the namespace where the chart is located.
helm list -n huawei-csiThe following is an example of the command output. If the command output is empty, the service is successfully uninstalled.
NAME NAMESPACE REVISION UPDATED STATUS CHART APP VERSIONUninstall the huawei-csi-host-info object. For details, see Uninstalling the huawei-csi-host-info Object .
Uninstall the webhook resource. For details, see Uninstalling a Webhook Resource .
(Optional) Uninstall the snapshot-dependent component service. For details, see Uninstalling the Snapshot-Dependent Component Service .
(Optional) Uninstall the Lease resource. For details, see Uninstalling a Lease Resource .
(Optional) Run the following command to delete the namespace where Huawei CSI is located. The default namespace huawei-csi is used as an example.
kubectl delete ns huawei-csi
5.1.3.1.2 - Uninstalling Huawei CSI on CCE or CCE Agile
This section describes how to uninstall Huawei CSI on the CCE or CCE Agile platform. The following uses CCE Agile v22.3.2 as an example.
Procedure
Log in to the CCE Agile platform.
On the home page, choose Charts > Releases. The Releases page is displayed.
Select a Huawei CSI release and click Uninstall. In the displayed dialog box, click OK.

Uninstall the huawei-csi-host-info object. For details, see Uninstalling the huawei-csi-host-info Object .
Uninstall the webhook resource. For details, see Uninstalling a Webhook Resource .
(Optional) Uninstall the snapshot-dependent component service. For details, see Uninstalling the Snapshot-Dependent Component Service .
(Optional) Run the following command to delete the namespace where Huawei CSI is located. huawei-csi is used as an example namespace.
kubectl delete ns huawei-csi
5.1.3.1.3 - Uninstalling CSI-Dependent Component Services
This section describes how to uninstall the CSI-dependent component services.
Uninstalling the huawei-csi-host-info Object
Secret object huawei-csi-host-info stores the initiator information about each node in the cluster, for example, iSCSI initiators. When you run the helm uninstall command, the resource will not be uninstalled. To uninstall the resource, perform the following steps:
Use a remote access tool, such as PuTTY, to log in to any master node in the Kubernetes cluster through the management IP address.
Run the following command to check whether the Secret object exists. huawei-csi is the namespace where the Secret object is located.
kubectl get secret -n huawei-csi -l secret-provisioner=csi.huawei.comIf the Secret exists in 2 , run the following command to delete the Secret:
kubectl delete secret -n huawei-csi -l secret-provisioner=csi.huawei.comRun the following command to check whether the Secret object exists. huawei-csi is the namespace where the Secret object is located.
kubectl get secret huawei-csi-host-info -n huawei-csiIf the Secret exists in 4 , run the following command to uninstall the Secret object. huawei-csi-host-info is the name of the Secret object.
kubectl delete secret huawei-csi-host-info -n huawei-csi
Uninstalling a Webhook Resource
The webhook resource named storage-backend-controller.xuanwu.huawei.io is used to verify the backend key information and connectivity with the storage. When you run the helm uninstall command, the resource will not be uninstalled. To uninstall the resource, perform the following steps:
Use a remote access tool, such as PuTTY, to log in to any master node in the Kubernetes cluster through the management IP address.
Run the following command to query the webhook-dependent component service.
kubectl get validatingwebhookconfigurations.admissionregistration.k8s.io storage-backend-controller.xuanwu.huawei.ioThe following is an example of the command output.
NAME                                          WEBHOOKS   AGE
storage-backend-controller.xuanwu.huawei.io   1          12d
Run the following command to uninstall the webhook-dependent component service.
kubectl delete validatingwebhookconfigurations.admissionregistration.k8s.io storage-backend-controller.xuanwu.huawei.ioRun the following command to check whether the service is successfully uninstalled. If the command output is empty, the uninstallation is successful.
kubectl get validatingwebhookconfigurations.admissionregistration.k8s.io storage-backend-controller.xuanwu.huawei.io
Uninstalling the Snapshot-Dependent Component Service
- Do not uninstall the snapshot-dependent component service when snapshots exist. Otherwise, Kubernetes will automatically delete all user snapshots and they cannot be restored. For details, see Delete a CustomResourceDefinition .
- Do not uninstall the snapshot-dependent component service during the CSI upgrade.
Scenario Description
- Currently, Huawei CSI uses the snapshot feature.
- Currently, only Huawei CSI is available in the Kubernetes cluster, and Huawei CSI is no longer used.
- Before the uninstallation, ensure that no VolumeSnapshot resource managed by Huawei CSI exists in the Kubernetes cluster.
Procedure
Use a remote access tool, such as PuTTY, to log in to any master node in the Kubernetes cluster through the management IP address.
Run the following command to uninstall the snapshot-dependent component service.
kubectl delete crd volumesnapshotclasses.snapshot.storage.k8s.io volumesnapshotcontents.snapshot.storage.k8s.io volumesnapshots.snapshot.storage.k8s.ioRun the following command to check whether the service is successfully uninstalled. If the command output is empty, the uninstallation is successful.
kubectl get crd | grep snapshot.storage.k8s.io
Uninstalling a Lease Resource
When huawei-csi-controller is deployed in multi-copy mode, a Lease resource is generated to store the current Holder information. When you run the helm uninstall command, the resource will not be uninstalled. To uninstall the resource, perform the following steps:
Use a remote access tool, such as PuTTY, to log in to any master node in the Kubernetes cluster through the management IP address.
Run the following command to query the Lease information.
kubectl get lease -n huawei-csiThe following is an example of the command output.
NAME                                         HOLDER    AGE
csi-huawei-com                               node-1    24d
external-attacher-leader-csi-huawei-com      node-1    24d
external-resizer-csi-huawei-com              node-1    24d
external-snapshotter-leader-csi-huawei-com   node-1    24d
snapshot-controller-leader                   node-1    24d
storage-backend-controller                   node-1    24d
huawei-csi-extender                          node-1    24d
Run the following command to uninstall the Lease resource.
kubectl delete lease -n huawei-csi csi-huawei-com external-attacher-leader-csi-huawei-com external-resizer-csi-huawei-com external-snapshotter-leader-csi-huawei-com snapshot-controller-leader storage-backend-controller huawei-csi-extenderRun the following command to check whether the uninstallation is successful.
kubectl get lease -n huawei-csiThe following is an example of the command output. If the command output is empty, the uninstallation is successful.
No resources found in huawei-csi namespace.
5.1.3.2 - Manual Uninstallation
This section describes how to manually uninstall Huawei CSI.
If you do not uninstall Huawei CSI for the purpose of an upgrade, ensure that all resources (such as PV, PVC, snapshot, and storage backend resources) provisioned by Huawei CSI have been cleared on your container platform before uninstalling Huawei CSI. Otherwise, once you uninstall Huawei CSI, these resources cannot be automatically scheduled, managed, or cleared.
Uninstalling the huawei-csi-node Service
Use a remote access tool, such as PuTTY, to log in to any master node in the Kubernetes cluster through the management IP address.
Run the following command to uninstall the huawei-csi-node service. Replace huawei-csi with the namespace where Huawei CSI is located.
kubectl delete daemonset huawei-csi-node -n huawei-csiRun the following command to check whether the service is successfully uninstalled. If NotFound is displayed, the service is successfully uninstalled.
kubectl get daemonset huawei-csi-node -n huawei-csi
Uninstalling the huawei-csi-controller Service
Use a remote access tool, such as PuTTY, to log in to any master node in the Kubernetes cluster through the management IP address.
Run the following command to uninstall the huawei-csi-controller service. Replace huawei-csi with the namespace where Huawei CSI is located.
kubectl delete deployment huawei-csi-controller -n huawei-csiRun the following command to check whether the service is successfully uninstalled. If NotFound is displayed, the service is successfully uninstalled.
kubectl get deployment huawei-csi-controller -n huawei-csi
Uninstalling the csidriver Object
If the CSIDriver feature is not used during installation , you can skip the following steps.
Use a remote access tool, such as PuTTY, to log in to any master node in the Kubernetes cluster through the management IP address.
Run the following command to uninstall the csidriver object.
kubectl delete csidriver csi.huawei.comRun the following command to check whether the service is successfully uninstalled. If NotFound is displayed, the service is successfully uninstalled.
kubectl get csidriver csi.huawei.com
Deleting the RBAC Permission
Use a remote access tool, such as PuTTY, to log in to any master node in the Kubernetes cluster through the management IP address.
Delete the RBAC permission.
kubectl -n huawei-csi -l provisioner=csi.huawei.com delete ServiceAccount,Service,role,rolebinding,ClusterRole,ClusterRoleBinding
Uninstalling Other Resources
Uninstall the huawei-csi-host-info object. For details, see Uninstalling the huawei-csi-host-info Object .
Uninstall the webhook resource. For details, see Uninstalling a Webhook Resource .
(Optional) Uninstall the snapshot-dependent component service. For details, see Uninstalling the Snapshot-Dependent Component Service .
(Optional) Uninstall the Lease resource. For details, see Uninstalling a Lease Resource .
(Optional) Run the following command to delete the namespace where Huawei CSI is located. The default namespace huawei-csi is used as an example.
kubectl delete ns huawei-csi
5.1.4 - Upgrade
This section describes how to upgrade Huawei CSI.
In the current version, resource requests and limits are added to Huawei CSI. For details, see Huawei CSI Resource Management .
5.1.4.1 - Upgrade Using Helm
This section describes how to upgrade Huawei CSI.
- To upgrade Huawei CSI from 2.x to 4.11.0, uninstall it by referring to the user guide of the earlier version and install Huawei CSI by referring to Installation Using Helm .
- To upgrade Huawei CSI from 2.x or 3.x to 4.11.0, see Upgrading from 2.x or 3.x to 4.x .
- To upgrade Huawei CSI from 4.x to 4.11.0, see Upgrading Huawei CSI on Kubernetes, OpenShift, and Tanzu .
- Some CSI 2.x versions are unavailable now. If the upgrade fails, CSI may fail to be rolled back to a version which is unavailable now.
- During the upgrade or rollback, you cannot use Huawei CSI to create new resources or mount or unmount an existing PVC.
- During the upgrade or rollback, do not uninstall the snapshot-dependent component service.
- During the upgrade or rollback, the existing resources such as PVCs, snapshots, and Pods will run properly and will not affect your service access.
5.1.4.1.1 - Upgrading from 2.x or 3.x to 4.x
Backing Up Storage Backend Configurations
If you have evaluated the risks mentioned in the preceding notice and need to upgrade CSI from 2.x or 3.x to 4.11.0, perform the following steps to back up storage backend configurations:
Use a remote access tool, such as PuTTY, to log in to any master node in the Kubernetes cluster through the management IP address.
Run the following command to back up the backend information to the configmap.json file. For the OpenShift platform, replace kubectl with oc.
kubectl get cm huawei-csi-configmap -n huawei-csi -o json > configmap.json
Upgrading Huawei CSI
Perform the upgrade according to the procedure described in Upgrading Huawei CSI .
Configuring the Storage Backend
Configure the storage backend based on the backend information backed up in Backing Up Storage Backend Configurations according to Storage Backend Management . The command for configuring the storage backend based on the backup backend information is as follows:
oceanctl create backend -f configmap.json -i json -n huawei-csi
5.1.4.1.2 - Upgrading Huawei CSI on Kubernetes, OpenShift, and Tanzu
Prerequisites
- Huawei CSI of an earlier version is installed using Helm.
- A Huawei CSI image of a new version has been created and uploaded to the image repository or imported to all nodes by following the instructions provided in Uploading a Huawei CSI Image .
Upgrading Huawei CSI
If CSI of an earlier version is deployed using Helm, perform the following steps to upgrade Huawei CSI.
Use a remote access tool, such as PuTTY, to log in to any master node in the Kubernetes cluster through the management IP address.
Copy the CSI component package of the target version to any directory on the master node.
Go to the helm/esdk working directory. For the directory path, see Table 1 .
cd helm/esdkRun the kubectl apply -f ./crds/backend/ command to update the storage backend CRD.
kubectl apply -f ./crds/backend/(Optional) Check snapshot-dependent components by following the instructions provided in Checking Volume Snapshot-Dependent Components . After confirming that the components are correct, run the following command to update the snapshot CRD. If controller.snapshot.enabled is set to false or the Kubernetes version is earlier than v1.20, you can skip this step. For details, see Table 2 .
kubectl apply -f ./crds/snapshot-crds/ --validate=falseRun the following command to obtain the original service configuration file. helm-huawei-csi indicates the Helm chart name specified during the installation of the earlier version, and huawei-csi indicates the Helm chart namespace specified during the installation of the earlier version.
helm get values helm-huawei-csi -n huawei-csi -a > ./update-values.yamlRun the vi update-values.yaml command to open the file obtained in 6 , modify the images configuration items, and update the image to the latest version. For details about the parameters to be modified, see Table 1 .
Table 1 images configuration items
Image used by Huawei backends to manage storageBackendContent resources.
Image used by Huawei backends to manage storageBackendClaim resources.
livenessprobe sidecar image.
csi-resizer sidecar image.
csi-node-driver-registrar sidecar image.
registry.k8s.io/sig-storage/csi-node-driver-registrar:v2.13.0
csi-snapshotter sidecar image.
snapshot-controller sidecar image.
csi-provisioner sidecar image.
csi-attacher sidecar image.
(Optional) If you need to update configuration items or add configuration information during the upgrade, modify the configuration information in the update-values.yaml file by referring to Parameters in the values.yaml File of Helm .
During the upgrade, if the update-values.yaml and values.yaml configuration files contain the same configuration item, the configuration in the update-values.yaml file takes effect preferentially.Run the following command to upgrade Huawei CSI. In the following command, helm-huawei-csi indicates the specified Helm chart name, huawei-csi indicates the specified Helm chart namespace, and update-values.yaml indicates the file obtained in 6 .
helm upgrade helm-huawei-csi ./ -n huawei-csi -f ./values.yaml -f ./update-values.yamlAfter the huawei-csi service is deployed, run the following command to check whether the service is started.
kubectl get pod -n huawei-csiThe following is an example of the command output. If the Pod status is Running, the service is started successfully.
NAME                                     READY   STATUS    RESTARTS   AGE
huawei-csi-controller-6dfcc4b79f-9vjtq   9/9     Running   0          24m
huawei-csi-controller-6dfcc4b79f-csphc   9/9     Running   0          24m
huawei-csi-node-g6f4k                    3/3     Running   0          20m
huawei-csi-node-tqs87                    3/3     Running   0          20m
5.1.4.1.3 - Upgrading Huawei CSI on CCE or CCE Agile
Prerequisites
You have downloaded the CSI software package of a new version.
Procedure
- Uninstall CSI. For details, see Uninstalling Huawei CSI on CCE or CCE Agile .
- Install CSI of the new version. For details, see Installing Huawei CSI on the CCE or CCE Agile Platform .
5.1.4.2 - Manual Upgrade
This section describes how to manually upgrade Huawei CSI.
During the upgrade or rollback, the existing resources such as PVCs, snapshots, and Pods will run properly and will not affect your service access.
- Some CSI 2.x versions are unavailable now. If the upgrade fails, CSI may fail to be rolled back to a version which is unavailable now.
- During the upgrade or rollback, you cannot use Huawei CSI to create new resources or mount or unmount an existing PVC.
- During the upgrade or rollback, do not uninstall the snapshot-dependent component service.
Upgrading CSI from 2.x or 3.x to 4.11.0
To upgrade CSI from 2.x or 3.x to 4.11.0, perform the following operations:
Use a remote access tool, such as PuTTY, to log in to any master node in the Kubernetes cluster through the management IP address.
Run the following command to back up the backend information to the configmap.json file. For the OpenShift platform, replace kubectl with oc.
kubectl get cm huawei-csi-configmap -n huawei-csi -o json > configmap.jsonUninstall CSI. For details, see Manual Uninstallation .
Install CSI of the current version. For details, see Manual Installation .
Install the backend information backed up in 2 according to Storage Backend Management . The command for configuring the storage backend based on the backup backend information is as follows:
oceanctl create backend -f configmap.json -i json -n huawei-csi
Upgrading CSI from 4.x to 4.11.0
To upgrade CSI from 4.x to 4.11.0, perform the following operations:
- Use a remote access tool, such as PuTTY, to log in to any master node in the Kubernetes cluster through the management IP address.
- Uninstall CSI. For details, see Manual Uninstallation .
- Install CSI of the current version. For details, see Manual Installation .
5.1.5 - Rollback
5.1.5.1 - Rollback Using Helm
If CSI fails to be upgraded from 2.x or 3.x to 4.11.0 and needs to be rolled back, uninstall CSI by referring to Uninstallation Using Helm and then download and install CSI of the source version.
- During the upgrade or rollback, the existing resources such as PVCs, snapshots, and Pods will run properly and will not affect your service access.
- During the upgrade or rollback, you cannot use Huawei CSI to create new resources or mount or unmount an existing PVC.
- During the upgrade or rollback, do not uninstall the snapshot-dependent component service.
5.1.5.1.1 - Rolling Back Huawei CSI on Kubernetes, OpenShift, and Tanzu
Prerequisites
- CSI has been updated using Helm 3.
Procedure
Use a remote access tool, such as PuTTY, to log in to any master node in the Kubernetes cluster through the management IP address.
Go to the helm/esdk working directory. For the directory path, see Table 1 .
cd helm/esdkRun the following command to query the historical versions of the CSI services deployed using Helm.
helm history helm-huawei-csi -n huawei-csiThe following is an example of the command output.
REVISION        UPDATED                         STATUS          CHART           APP VERSION     DESCRIPTION
1       	Mon Jan  8 04:15:40 2024	superseded	esdk-4.4.0	4.4.0      	Install complete
2       	Mon Jan  8 04:16:12 2024	deployed  	esdk-4.11.0	4.11.0      	Upgrade complete
Run the following command to roll back the CSI services to the specified version.
In the preceding command, revision-number indicates a version number queried in 3 . For example, the version is 1.
helm rollback helm-huawei-csi -n huawei-csi 1The following is an example of the command output. If Rollback was a success is displayed in the command output, the CSI services are successfully rolled back to the specified version.
Rollback was a success! Happy Helming!
5.1.5.1.2 - Rolling Back Huawei CSI on CCE or CCE Agile
- During the upgrade or rollback, the existing resources such as PVCs, snapshots, and Pods will run properly and will not affect your service access.
- During the upgrade or rollback, you cannot use Huawei CSI to create new resources or mount or unmount an existing PVC.
- During the upgrade or rollback, do not uninstall the snapshot-dependent component service.
Prerequisites
You have downloaded the CSI software package of the source version.
Procedure
- Use a remote access tool, such as PuTTY, to log in to any master node in the Kubernetes cluster through the management IP address.
- Uninstall CSI. For details, see Procedure .
- Reinstall CSI of the source version. For details, see Installing Huawei CSI on the CCE or CCE Agile Platform .
5.1.5.2 - Manual Rollback
Uninstall CSI by referring to Manual Uninstallation , and then download and install CSI of the source version.
- During the upgrade or rollback, the existing resources such as PVCs, snapshots, and Pods will run properly and will not affect your service access.
- During the upgrade or rollback, you cannot use Huawei CSI to create new resources or mount or unmount an existing PVC.
- During the upgrade or rollback, do not uninstall the snapshot-dependent component service.
Prerequisites
You have downloaded the CSI software package of the source version.
Procedure
- Use a remote access tool, such as PuTTY, to log in to any master node in the Kubernetes cluster through the management IP address.
- Uninstall CSI. For details, see Manual Uninstallation .
- Reinstall CSI of the source version. For details, see Manual Installation .
6 - Basic Services
6.1 - Storage Backend Management
Backend is an abstract concept of Huawei storage resources. Each Huawei storage device can abstract multiple backend resources using features such as tenants, storage pools, and protocols. Each backend exists independently and defines Huawei storage information required for providing persistent volumes for Kubernetes clusters. The relationship between storage backends, storage devices, and storage pools is 1:1:n.
This section describes how to use the oceanctl tool to configure and manage storage backends.
Description of the oceanctl Tool
- You have obtained the oceanctl tool, copied the oceanctl tool to the environment directory, for example, /usr/local/bin, and obtained the execute permission. The oceanctl tool is stored in /bin/oceanctl of the software package.
- Before using the oceanctl tool, ensure that the oceanctl tool version is the same as the CSI version. For details about how to check the oceanctl version, see Obtaining Help Information . The current version number should be V4.11.0.
- The oceanctl tool depends on kubectl (for the Kubernetes platform) or oc (for the OpenShift platform) commands. Therefore, you need to run the tool on a node where kubectl or oc commands can be executed.
- By default, the user who runs oceanctl commands must have the read and write permissions on the /var/log directory. If you do not have the permissions on the directory, run the –log-dir=/path/to/custom command to specify a directory on which you have the permissions as the log file directory.
- huawei-csi is the default namespace used by oceanctl to create a backend.
- For details about oceanctl commands, see Description of oceanctl Commands .
6.1.1 - Configuring the Storage Backend
- When oceanctl is used to create a storage backend, the entered account and key information is stored in the Secret object. It is recommended that the customer container platform encrypt the Secret object based on the suggestions of the supplier or K8s community. For details about how to encrypt the Secret object in the K8s community, see Encrypting Confidential Data at Rest .
- When a backend is created using a .json file, the backend name of an earlier version may contain uppercase letters or underscores (_). In this case, the old name is remapped to a new name. The mapping process automatically occurs and does not affect the original functions. For example, ABC_123 is mapped to abc-123-fd68e. The mapping rules are as follows:
- Uppercase letters are converted to lowercase letters.
- An underscore (_) is converted to a hyphen (-).
- A 5-digit hash code is added to the end.
- If a storage backend is connected to a vStore, the vStore name cannot be changed after the storage backend is created.
6.1.1.1 - Flash Storage (OceanStor Dorado/OceanStor V5/OceanStor V6 and Later)
6.1.1.1.1 - File System
6.1.1.1.1.1 - NFS
This section describes how to create a storage backend of the NFS protocol type.
Configuration Item Description
Table 1 backend parameters
Storage backend name. The value can contain a maximum of 63 characters, including lowercase letters, digits, and hyphens (-). It must start with a letter or digit. | ||||
The storage backend must be in the same namespace as Huawei CSI. | ||||
vStore name on the storage side. This parameter needs to be specified when the connected backend is OceanStor V5 and resources need to be provisioned under a specified vStore. | This parameter needs to be specified only when the backend is OceanStor V5 and vStores need to be supported. | |||
Management URLs of the storage device. The value format is a list. The value can be a domain name or an IP address + port number. | ||||
Storage pools of storage devices. The value format is a list. | ||||
| ||||
Service access port. Nodes will use this port to read and write storage resources. The value format is a list. | ||||
Enables or disables the automatic management function of NFS share clients.
| This parameter takes effect only when csiDriver.reportNodeIP and CSIDriverObject.attachRequired are set to true during CSI deployment. When this parameter is enabled, the CSI dynamically sets the permissions of the NFS share clients corresponding to the host IP addresses that meet the rules to read/write or none during PVC mounting or unmounting. | |||
List of IP CIDR blocks for NFS communication between hosts. Example: |
| |||
This parameter is mandatory when a PV to be created on the storage side needs to support the NAS HyperMetro feature. In this case, you need to enter the ID of the HyperMetro vStore pair to which the PV to be created belongs. | You can query the HyperMetro vStore pair ID on DeviceManager. | |||
Backend name of the HyperMetro peer. The value is a character string. This parameter is mandatory when a PV to be created on the storage side needs to support the NAS HyperMetro feature. In this case, you need to enter the name of the other backend to form a HyperMetro pair with the current backend. | The names of the two backends in the pair must be entered. After the two backends form a HyperMetro relationship, they cannot form a HyperMetro relationship with other backends. | |||
Storage topology awareness configuration. The parameter format is JSON of the list type. | This parameter is mandatory if storage topology awareness is enabled. For details, see Configuring Storage Topology Awareness. | |||
Maximum number of concurrent connections to a storage backend. | The value ranges from 1 to 30. If this parameter is not set or the value is not in the specified range, the default value 30 is used. | |||
Authentication mode for logging in to a storage backend. The following modes are supported: | When Huawei enterprise storage is OceanStor V5, the ID of the LDAP domain authentication server must be 0. |
Creating Storage Backends of the Local Type
Prepare a backend configuration file, for example, backend.yaml.
storage: "oceanstor-nas"
name: "backend-demo"
namespace: "huawei-csi"
urls:
  - "https://192.168.129.157:8088"
pools:
  - "StoragePool001"
parameters:
  protocol: "nfs"
  portals:
    - "10.10.30.20"
maxClientThreads: "30"
Run the following command to create a storage backend.
oceanctl create backend -f /path/to/backend.yaml -i yamlThe following is an example of the command output.
NUMBER  CONFIGURED    NAME           STORAGE              URLS
1       false         backend-demo   oceanstor-nas        https://192.168.129.157:8088
Please enter the backend number to configure (Enter 'exit' to exit):
Enter the serial number of the backend to be created and enter the account and password.
Please enter the backend number to configure (Enter 'exit' to exit):1
Please enter this backend user name: admin
Please enter this backend password:

Backend backend-demo is configured
NUMBER  CONFIGURED    NAME            STORAGE              URLS
1       true          backend-demo    oceanstor-nas        https://192.168.129.157:8088
Please enter the backend number to configure (Enter 'exit' to exit):
Check the storage backend creation result.
oceanctl get backendThe following is an example of the command output. If the backend status is Bound, the creation is successful.
NAMESPACE     NAME            PROTOCOL    STORAGETYPE      SN                    STATUS  ONLINE  URL
huawei-csi    backend-demo    nfs         oceanstor-nas    xxxxxxxxxxxxxxxxxxxx  Bound   true    https://192.168.129.157:8088
Creating Storage Backends of the HyperMetro Type
- Before configuring NAS HyperMetro, you need to configure the HyperMetro relationship between two storage devices, including the remote device and HyperMetro domain. The HyperMetro domain of the file system can only work in HyperMetro active-active (AA) mode. For details about the configuration operation, see the product documentation of the corresponding storage model.
- The accounts for connecting to NAS HyperMetro backends must be the administrator accounts of the storage vStores.
- Except NAS HyperMetro backends, the management URLs of other backends cannot be the URL of a logical management port of a vStore that has established the HyperMetro relationship.
- When a HyperMetro storage backend is used, do not provision common file systems. Otherwise, services may be interrupted in logical port failover scenarios.
Prepare a storage backend configuration file, for example, backend.yaml.
storage: "oceanstor-nas"
name: "backend-active"
namespace: "huawei-csi"
urls:
  - "https://192.168.129.155:8088"
pools:
  - "StoragePool001"
metrovStorePairID: "2100xxxxxxxxxx0000000000600000000"
metroBackend: "backend-standby"
parameters:
  protocol: "nfs"
  portals:
    - "192.168.129.156"
maxClientThreads: "30"
---
storage: "oceanstor-nas"
name: "backend-standby"
namespace: "huawei-csi"
urls:
  - "https://192.168.129.157:8088"
pools:
  - "StoragePool001"
metrovStorePairID: "2100xxxxxxxxxx0000000000600000000"
metroBackend: "backend-active"
parameters:
  protocol: "nfs"
  portals:
    - "192.168.129.158"
maxClientThreads: "30"
Run the following command to create a storage backend.
oceanctl create backend -f /path/to/backend.yaml -i yamlThe following is an example of the command output.
NUMBER  CONFIGURED    NAME              STORAGE              URLS
1       false         backend-active    oceanstor-nas        https://192.168.129.155:8088
2       false         backend-standby   oceanstor-nas        https://192.168.129.157:8088
Please enter the backend number to configure (Enter 'exit' to exit):
Enter the serial number of the backend to be created and enter the account and password.
Please enter the backend number to configure (Enter 'exit' to exit):1
Please enter this backend user name: user1
Please enter this backend password:

Backend backend-standby is configured
NUMBER  CONFIGURED    NAME              STORAGE              URLS
1       true          backend-active    oceanstor-nas        https://192.168.129.155:8088
2       true          backend-standby   oceanstor-nas        https://192.168.129.157:8088
Please enter the backend number to configure (Enter 'exit' to exit):
Check the storage backend creation result.
oceanctl get backendThe following is an example of the command output. If the backend status is Bound, the creation is successful.
NAMESPACE     NAME              PROTOCOL    STORAGETYPE      SN                    STATUS  ONLINE  URL
huawei-csi    backend-active    nfs         oceanstor-nas    xxxxxxxxxxxxxxxxxxxx  Bound   true    https://192.168.129.155:8088
huawei-csi    backend-standby   nfs         oceanstor-nas    xxxxxxxxxxxxxxxxxxxx  Bound   true    https://192.168.129.157:8088
6.1.1.1.1.2 - NFS+
This section describes how to create a storage backend of the NFS+ protocol type.
Configuration Item Description
Table 1 backend parameters
Storage backend name. The value can contain a maximum of 63 characters, including lowercase letters, digits, and hyphens (-). It must start with a letter or digit. | ||||
The storage backend must be in the same namespace as Huawei CSI. | ||||
Management URLs of the storage device. The value format is a list. The value can be a domain name or an IP address + port number. | ||||
Storage pools of storage devices. The value format is a list. | ||||
Service access port. Nodes will use this port to read and write storage resources. The value format is a list. | ||||
This parameter is mandatory when a PV to be created on the storage side needs to support the NAS HyperMetro feature. In this case, you need to enter the ID of the HyperMetro vStore pair to which the PV to be created belongs. | You can query the HyperMetro vStore pair ID on DeviceManager. | |||
Backend name of the HyperMetro peer. The value is a character string. This parameter is mandatory when a PV to be created on the storage side needs to support the NAS HyperMetro feature. In this case, you need to enter the name of the other backend to form a HyperMetro pair with the current backend. | The names of the two backends in the pair must be entered. After the two backends form a HyperMetro relationship, they cannot form a HyperMetro relationship with other backends. | |||
Storage topology awareness configuration. The parameter format is JSON of the list type. | This parameter is mandatory if storage topology awareness is enabled. For details, see Configuring Storage Topology Awareness. | |||
Maximum number of concurrent connections to a storage backend. | The value ranges from 1 to 30. If this parameter is not set or the value is not in the specified range, the default value 30 is used. | |||
Authentication mode for logging in to a storage backend. The following modes are supported: |
Creating Storage Backends of the Local Type
Prepare a backend configuration file, for example, backend.yaml.
storage: "oceanstor-nas"
name: "backend-demo"
namespace: "huawei-csi"
urls:
  - "https://192.168.129.157:8088"
pools:
  - "StoragePool001"
parameters:
  protocol: "nfs+"
  portals:
    - "10.10.30.20"
    - "10.10.30.30"
maxClientThreads: "30"
Run the following command to create a storage backend.
oceanctl create backend -f /path/to/backend.yaml -i yamlThe following is an example of the command output.
NUMBER  CONFIGURED    NAME           STORAGE              URLS
1       false         backend-demo   oceanstor-nas        https://192.168.129.157:8088
Please enter the backend number to configure (Enter 'exit' to exit):
Enter the serial number of the backend to be created and enter the account and password.
Please enter the backend number to configure (Enter 'exit' to exit):1
Please enter this backend user name: admin
Please enter this backend password:

Backend backend-demo is configured
NUMBER  CONFIGURED    NAME            STORAGE              URLS
1       true          backend-demo    oceanstor-nas        https://192.168.129.157:8088
Please enter the backend number to configure (Enter 'exit' to exit):
Check the storage backend creation result.
oceanctl get backendThe following is an example of the command output. If the backend status is Bound, the creation is successful.
NAMESPACE     NAME            PROTOCOL     STORAGETYPE      SN                    STATUS  ONLINE  URL
huawei-csi    backend-demo    nfs+         oceanstor-nas    xxxxxxxxxxxxxxxxxxxx  Bound   true    https://192.168.129.157:8088
Creating Storage Backends of the HyperMetro Type
- Before configuring NAS HyperMetro, you need to configure the HyperMetro relationship between two storage devices, including the remote device and HyperMetro domain. The HyperMetro domain of the file system can only work in HyperMetro active-active (AA) mode. For details about the configuration operation, see the product documentation of the corresponding storage model.
- The accounts for connecting to NAS HyperMetro backends must be the administrator accounts of the storage vStores.
- Except NAS HyperMetro backends, the management URLs of other backends cannot be the URL of a logical management port of a vStore that has established the HyperMetro relationship.
- When a HyperMetro storage backend is used, do not provision common file systems. Otherwise, services may be interrupted in logical port failover scenarios.
Procedure
Prepare a storage backend configuration file, for example, backend.yaml.
storage: "oceanstor-nas"
name: "backend-active"
namespace: "huawei-csi"
urls:
  - "https://192.168.129.155:8088"
pools:
  - "StoragePool001"
metrovStorePairID: "2100xxxxxxxxxx0000000000600000000"
metroBackend: "backend-standby"
parameters:
  protocol: "nfs+"
  portals:
    - "192.168.129.156"
    - "192.168.129.157"
maxClientThreads: "30"
---
storage: "oceanstor-nas"
name: "backend-standby"
namespace: "huawei-csi"
urls:
  - "https://192.168.129.158:8088"
pools:
  - "StoragePool001"
metrovStorePairID: "2100xxxxxxxxxx0000000000600000000"
metroBackend: "backend-active"
parameters:
  protocol: "nfs+"
  portals:
    - "192.168.129.159"
    - "192.168.129.160"
maxClientThreads: "30"
Run the following command to create a storage backend.
oceanctl create backend -f /path/to/backend.yaml -i yamlThe following is an example of the command output.
NUMBER  CONFIGURED    NAME              STORAGE              URLS
1       false         backend-active    oceanstor-nas        https://192.168.129.155:8088
2       false         backend-standby   oceanstor-nas        https://192.168.129.158:8088
Please enter the backend number to configure (Enter 'exit' to exit):
Enter the serial number of the backend to be created and enter the account and password.
Please enter the backend number to configure (Enter 'exit' to exit):1
Please enter this backend user name: user1
Please enter this backend password:

Backend backend-standby is configured
NUMBER  CONFIGURED    NAME              STORAGE              URLS
1       true          backend-active    oceanstor-nas        https://192.168.129.155:8088
2       true          backend-standby   oceanstor-nas        https://192.168.129.158:8088
Please enter the backend number to configure (Enter 'exit' to exit):
Check the storage backend creation result.
oceanctl get backendThe following is an example of the command output. If the backend status is Bound, the creation is successful.
NAMESPACE     NAME              PROTOCOL     STORAGETYPE      SN                    STATUS  ONLINE  URL
huawei-csi    backend-active    nfs+         oceanstor-nas    xxxxxxxxxxxxxxxxxxxx  Bound   true    https://192.168.129.155:8088
huawei-csi    backend-standby   nfs+         oceanstor-nas    xxxxxxxxxxxxxxxxxxxx  Bound   true    https://192.168.129.158:8088
6.1.1.1.2 - Dtree
6.1.1.1.2.1 - NFS
This section describes how to create a storage backend of the NFS protocol type.
Configuration Item Description
Table 1 backend parameters
Storage backend name. The value can contain a maximum of 63 characters, including lowercase letters, digits, and hyphens (-). It must start with a letter or digit. | ||||
The storage backend must be in the same namespace as Huawei CSI. | ||||
Management URLs of the storage device. The value format is a list. The value can be a domain name or an IP address + port number. | ||||
Service access port. Nodes will use this port to read and write storage resources. The value format is a list. | ||||
Enables or disables the automatic management function of NFS share clients.
| This parameter takes effect only when csiDriver.reportNodeIP and CSIDriverObject.attachRequired are set to true during CSI deployment. When this parameter is enabled, the CSI dynamically sets the permissions of the NFS share clients corresponding to the host IP addresses that meet the rules to read/write or none during PVC mounting or unmounting. | |||
List of IP CIDR blocks for NFS communication between hosts. Example: |
| |||
Name of a file system on the current storage device. A dtree is created in the file system. | ||||
Storage topology awareness configuration. The parameter format is JSON of the list type. | This parameter is mandatory if storage topology awareness is enabled. For details, see Configuring Storage Topology Awareness. | |||
Maximum number of concurrent connections to a storage backend. | The value ranges from 1 to 30. If this parameter is not set or the value is not in the specified range, the default value 30 is used. | |||
Authentication mode for logging in to a storage backend. The following modes are supported: |
Creating a Storage Backend
Prepare a backend configuration file, for example, backend.yaml.
storage: "oceanstor-dtree"
name: "backend-demo"
namespace: "huawei-csi"
urls:
  - "https://192.168.129.157:8088"
parameters:
  protocol: "nfs"
  parentname: "parent-filesystem"
  portals:
    - "10.10.30.20"
maxClientThreads: "30"
Run the following command to create a storage backend.
oceanctl create backend -f /path/to/backend.yaml -i yamlThe following is an example of the command output.
NUMBER  CONFIGURED    NAME           STORAGE              URLS
1       false         backend-demo   oceanstor-dtree      https://192.168.129.157:8088
Please enter the backend number to configure (Enter 'exit' to exit):
Enter the serial number of the backend to be created and enter the account and password.
Please enter the backend number to configure (Enter 'exit' to exit):1
Please enter this backend user name: admin
Please enter this backend password:

Backend backend-demo is configured
NUMBER  CONFIGURED    NAME            STORAGE              URLS
1       true          backend-demo    oceanstor-dtree      https://192.168.129.157:8088
Please enter the backend number to configure (Enter 'exit' to exit):
Check the storage backend creation result.
oceanctl get backendThe following is an example of the command output. If the backend status is Bound, the creation is successful.
NAMESPACE     NAME            PROTOCOL    STORAGETYPE      SN                    STATUS  ONLINE  URL
huawei-csi    backend-demo    nfs         oceanstor-dtree  xxxxxxxxxxxxxxxxxxxx  Bound   true    https://192.168.129.157:8088
6.1.1.1.2.2 - NFS+
This section describes how to create a storage backend of the NFS+ protocol type.
Configuration Item Description
Table 1 backend parameters
Storage backend name. The value can contain a maximum of 63 characters, including lowercase letters, digits, and hyphens (-). It must start with a letter or digit. | ||||
The storage backend must be in the same namespace as Huawei CSI. | ||||
Management URLs of the storage device. The value format is a list. The value can be a domain name or an IP address + port number. | ||||
Service access port. Nodes will use this port to read and write storage resources. The value format is a list. | ||||
Name of a file system on the current storage device. A dtree is created in the file system. | ||||
Storage topology awareness configuration. The parameter format is JSON of the list type. | This parameter is mandatory if storage topology awareness is enabled. For details, see Configuring Storage Topology Awareness. | |||
Maximum number of concurrent connections to a storage backend. | The value ranges from 1 to 30. If this parameter is not set or the value is not in the specified range, the default value 30 is used. | |||
Authentication mode for logging in to a storage backend. The following modes are supported: |
Creating a Storage Backend
Prepare a backend configuration file, for example, backend.yaml.
storage: "oceanstor-dtree"
name: "backend-demo"
namespace: "huawei-csi"
urls:
  - "https://192.168.129.157:8088"
parameters:
  protocol: "nfs+"
  parentname: "parent-filesystem"
  portals:
    - "10.10.30.20"
    - "10.10.30.30"
maxClientThreads: "30"
Run the following command to create a storage backend.
oceanctl create backend -f /path/to/backend.yaml -i yamlThe following is an example of the command output.
NUMBER  CONFIGURED    NAME           STORAGE              URLS
1       false         backend-demo   oceanstor-dtree      https://192.168.129.157:8088
Please enter the backend number to configure (Enter 'exit' to exit):
Enter the serial number of the backend to be created and enter the account and password.
Please enter the backend number to configure (Enter 'exit' to exit):1
Please enter this backend user name: admin
Please enter this backend password:

Backend backend-demo is configured
NUMBER  CONFIGURED    NAME            STORAGE              URLS
1       true          backend-demo    oceanstor-dtree      https://192.168.129.157:8088
Please enter the backend number to configure (Enter 'exit' to exit):
Check the storage backend creation result.
oceanctl get backendThe following is an example of the command output. If the backend status is Bound, the creation is successful.
NAMESPACE     NAME            PROTOCOL     STORAGETYPE      SN                    STATUS  ONLINE  URL
huawei-csi    backend-demo    nfs+         oceanstor-dtree  xxxxxxxxxxxxxxxxxxxx  Bound   true    https://192.168.129.157:8088
6.1.1.1.3 - Block Service
6.1.1.1.3.1 - iSCSI
This section describes how to create a storage backend of the iSCSI protocol type.
Configuration Item Description
Table 1 backend parameters
Storage backend name. The value can contain a maximum of 63 characters, including lowercase letters, digits, and hyphens (-). It must start with a letter or digit. | ||||
The storage backend must be in the same namespace as Huawei CSI. | ||||
Management URLs of the storage device. The value format is a list. The value can be a domain name or an IP address + port number. | ||||
Storage pools of storage devices. The value format is a list. | ||||
Service access port. Nodes will use this port to read and write storage resources. The value format is a list. |
| |||
ALUA configuration of the storage backend. If the worker node uses the native multipathing software provided by the OS and ALUA is enabled, you need to configure this parameter. | If ALUA is enabled for the host multipathing software, ensure that the backend ALUA configuration is the same as that of the host ALUA configuration. For details, see Configuring ALUA. | |||
Storage topology awareness configuration. The parameter format is JSON of the list type. | This parameter is mandatory if storage topology awareness is enabled. For details, see Configuring Storage Topology Awareness. | |||
Maximum number of concurrent connections to a storage backend. | The value ranges from 1 to 30. If this parameter is not set or the value is not in the specified range, the default value 30 is used. | |||
Authentication mode for logging in to a storage backend. The following modes are supported: | When Huawei enterprise storage is OceanStor V5, the ID of the LDAP domain authentication server must be 0. | |||
Backend name of the HyperMetro peer. The value is a character string. This parameter is mandatory when a PV to be created on the storage side needs to support the SAN HyperMetro feature. In this case, you need to enter the name of the other backend to form a HyperMetro pair with the current backend. | The names of the two backends in the pair must be entered. After the two backends form a HyperMetro relationship, they cannot form a HyperMetro relationship with other backends. | |||
This parameter is mandatory when a PV to be created on the storage side needs to support the SAN HyperMetro feature. In this case, you need to enter the name of the HyperMetro domain to which the PV to be created belongs. |
Creating a Storage Backend
Prepare a backend configuration file, for example, backend.yaml.
storage: "oceanstor-san"
name: "backend-demo"
namespace: "huawei-csi"
urls:
  - "https://192.168.129.157:8088"
pools:
  - "StoragePool001"
parameters:
  protocol: "iscsi"
  portals:
    - "10.10.30.20"
    - "10.10.30.21"
maxClientThreads: "30"
Run the following command to create a storage backend.
oceanctl create backend -f /path/to/backend.yaml -i yamlThe following is an example of the command output.
NUMBER  CONFIGURED    NAME           STORAGE              URLS
1       false         backend-demo   oceanstor-san        https://192.168.129.157:8088
Please enter the backend number to configure (Enter 'exit' to exit):
Enter the serial number of the backend to be created and enter the account and password.
Please enter the backend number to configure (Enter 'exit' to exit):1
Please enter this backend user name: admin
Please enter this backend password:

Backend backend-demo is configured
NUMBER  CONFIGURED    NAME            STORAGE              URLS
1       true          backend-demo    oceanstor-san        https://192.168.129.157:8088
Please enter the backend number to configure (Enter 'exit' to exit):
Check the storage backend creation result.
oceanctl get backendThe following is an example of the command output. If the backend status is Bound, the creation is successful.
NAMESPACE     NAME            PROTOCOL    STORAGETYPE      SN                    STATUS  ONLINE  URL
huawei-csi    backend-demo    iscsi       oceanstor-san    xxxxxxxxxxxxxxxxxxxx  Bound   true    https://192.168.129.157:8088
Creating Storage Backends of the HyperMetro Type
- Before configuring SAN HyperMetro, you need to configure the HyperMetro relationship between two storage devices, including the remote device and HyperMetro domain. For details, see the product documentation of the corresponding storage model.
Prepare a storage backend configuration file, for example, backend.yaml.
storage: "oceanstor-san"
name: "backend-active"
namespace: "huawei-csi"
urls:
  - "https://192.168.129.155:8088"
pools:
  - "StoragePool001"
hyperMetroDomain: "BlockHyperMetroDomain"
metroBackend: "backend-standby"
parameters:
  protocol: "iscsi"
  portals:
    - "192.168.129.156"
    - "192.168.129.158"
maxClientThreads: "30"
---
storage: "oceanstor-san"
name: "backend-standby"
namespace: "huawei-csi"
urls:
  - "https://192.168.129.157:8088"
pools:
  - "StoragePool001"
hyperMetroDomain: "BlockHyperMetroDomain"
metroBackend: "backend-active"
parameters:
  protocol: "iscsi"
  portals:
    - "192.168.129.157"
    - "192.168.129.159"
maxClientThreads: "30"
Run the following command to create a storage backend.
oceanctl create backend -f /path/to/backend.yaml -i yamlThe following is an example of the command output.
NUMBER  CONFIGURED    NAME              STORAGE              URLS
1       false         backend-active    oceanstor-san        https://192.168.129.155:8088
2       false         backend-standby   oceanstor-san        https://192.168.129.157:8088
Please enter the backend number to configure (Enter 'exit' to exit):
Enter the serial number of the backend to be created and enter the account and password.
Please enter the backend number to configure (Enter 'exit' to exit):1
Please enter this backend user name: user1
Please enter this backend password:

Backend backend-standby is configured
NUMBER  CONFIGURED    NAME              STORAGE              URLS
1       true          backend-active    oceanstor-san        https://192.168.129.155:8088
2       true          backend-standby   oceanstor-san        https://192.168.129.157:8088
Please enter the backend number to configure (Enter 'exit' to exit):
Check the storage backend creation result.
oceanctl get backendThe following is an example of the command output. If the backend status is Bound, the creation is successful.
NAMESPACE     NAME              PROTOCOL    STORAGETYPE      SN                    STATUS  ONLINE  URL
huawei-csi    backend-active    iscsi         oceanstor-san    xxxxxxxxxxxxxxxxxxxx  Bound   true    https://192.168.129.155:8088
huawei-csi    backend-standby   iscsi         oceanstor-san    xxxxxxxxxxxxxxxxxxxx  Bound   true    https://192.168.129.157:8088
6.1.1.1.3.2 - FC
This section describes how to create a storage backend of the FC protocol type.
Configuration Item Description
Table 1 backend parameters
Storage backend name. The value can contain a maximum of 63 characters, including lowercase letters, digits, and hyphens (-). It must start with a letter or digit. | ||||
The storage backend must be in the same namespace as Huawei CSI. | ||||
Management URLs of the storage device. The value format is a list. The value can be a domain name or an IP address + port number. | ||||
Storage pools of storage devices. The value format is a list. | ||||
ALUA configuration of the storage backend. If the worker node uses the native multipathing software provided by the OS and ALUA is enabled, you need to configure this parameter. | If ALUA is enabled for the host multipathing software, ensure that the backend ALUA configuration is the same as that of the host ALUA configuration. For details, see Configuring ALUA. | |||
Storage topology awareness configuration. The parameter format is JSON of the list type. | This parameter is mandatory if storage topology awareness is enabled. For details, see Configuring Storage Topology Awareness. | |||
Maximum number of concurrent connections to a storage backend. | The value ranges from 1 to 30. If this parameter is not set or the value is not in the specified range, the default value 30 is used. | |||
Authentication mode for logging in to a storage backend. The following modes are supported: | When Huawei enterprise storage is OceanStor V5, the ID of the LDAP domain authentication server must be 0. | |||
Backend name of the HyperMetro peer. The value is a character string. This parameter is mandatory when a PV to be created on the storage side needs to support the SAN HyperMetro feature. In this case, you need to enter the name of the other backend to form a HyperMetro pair with the current backend. | The names of the two backends in the pair must be entered. After the two backends form a HyperMetro relationship, they cannot form a HyperMetro relationship with other backends. | |||
This parameter is mandatory when a PV to be created on the storage side needs to support the SAN HyperMetro feature. In this case, you need to enter the name of the HyperMetro domain to which the PV to be created belongs. |
Creating a Storage Backend
Prepare a backend configuration file, for example, backend.yaml.
storage: "oceanstor-san"
name: "backend-demo"
namespace: "huawei-csi"
urls:
  - "https://192.168.129.157:8088"
pools:
  - "StoragePool001"
parameters:
  protocol: "fc"
maxClientThreads: "30"
Run the following command to create a storage backend.
oceanctl create backend -f /path/to/backend.yaml -i yamlThe following is an example of the command output.
NUMBER  CONFIGURED    NAME           STORAGE              URLS
1       false         backend-demo   oceanstor-san        https://192.168.129.157:8088
Please enter the backend number to configure (Enter 'exit' to exit):
Enter the serial number of the backend to be created and enter the account and password.
Please enter the backend number to configure (Enter 'exit' to exit):1
Please enter this backend user name: admin
Please enter this backend password:

Backend backend-demo is configured
NUMBER  CONFIGURED    NAME            STORAGE              URLS
1       true          backend-demo    oceanstor-san        https://192.168.129.157:8088
Please enter the backend number to configure (Enter 'exit' to exit):
Check the storage backend creation result.
oceanctl get backendThe following is an example of the command output. If the backend status is Bound, the creation is successful.
NAMESPACE     NAME            PROTOCOL    STORAGETYPE      SN                    STATUS  ONLINE  URL
huawei-csi    backend-demo    fc          oceanstor-san    xxxxxxxxxxxxxxxxxxxx  Bound   true    https://192.168.129.157:8088
Creating Storage Backends of the HyperMetro Type
- Before configuring SAN HyperMetro, you need to configure the HyperMetro relationship between two storage devices, including the remote device and HyperMetro domain. For details, see the product documentation of the corresponding storage model.
Prepare a storage backend configuration file, for example, backend.yaml.
storage: "oceanstor-san"
name: "backend-active"
namespace: "huawei-csi"
urls:
  - "https://192.168.129.155:8088"
pools:
  - "StoragePool001"
hyperMetroDomain: "BlockHyperMetroDomain"
metroBackend: "backend-standby"
parameters:
  protocol: "fc"
maxClientThreads: "30"
---
storage: "oceanstor-san"
name: "backend-standby"
namespace: "huawei-csi"
urls:
  - "https://192.168.129.157:8088"
pools:
  - "StoragePool001"
hyperMetroDomain: "BlockHyperMetroDomain"
metroBackend: "backend-active"
parameters:
  protocol: "fc"
maxClientThreads: "30"
Run the following command to create a storage backend.
oceanctl create backend -f /path/to/backend.yaml -i yamlThe following is an example of the command output.
NUMBER  CONFIGURED    NAME              STORAGE              URLS
1       false         backend-active    oceanstor-san        https://192.168.129.155:8088
2       false         backend-standby   oceanstor-san        https://192.168.129.157:8088
Please enter the backend number to configure (Enter 'exit' to exit):
Enter the serial number of the backend to be created and enter the account and password.
Please enter the backend number to configure (Enter 'exit' to exit):1
Please enter this backend user name: user1
Please enter this backend password:

Backend backend-standby is configured
NUMBER  CONFIGURED    NAME              STORAGE              URLS
1       true          backend-active    oceanstor-san        https://192.168.129.155:8088
2       true          backend-standby   oceanstor-san        https://192.168.129.157:8088
Please enter the backend number to configure (Enter 'exit' to exit):
Check the storage backend creation result.
oceanctl get backendThe following is an example of the command output. If the backend status is Bound, the creation is successful.
NAMESPACE     NAME              PROTOCOL    STORAGETYPE      SN                    STATUS  ONLINE  URL
huawei-csi    backend-active    fc          oceanstor-san    xxxxxxxxxxxxxxxxxxxx  Bound   true    https://192.168.129.155:8088
huawei-csi    backend-standby   fc          oceanstor-san    xxxxxxxxxxxxxxxxxxxx  Bound   true    https://192.168.129.157:8088
6.1.1.1.3.3 - NVMe over RoCE
This section describes how to create a storage backend of the NVMe over RoCE protocol type.
Configuration Item Description
Table 1 backend parameters
Storage backend name. The value can contain a maximum of 63 characters, including lowercase letters, digits, and hyphens (-). It must start with a letter or digit. | ||||
The storage backend must be in the same namespace as Huawei CSI. | ||||
Management URLs of the storage device. The value format is a list. The value can be a domain name or an IP address + port number. | ||||
Storage pools of storage devices. The value format is a list. | ||||
Service access port. Nodes will use this port to read and write storage resources. The value format is a list. |
| |||
Storage topology awareness configuration. The parameter format is JSON of the list type. | This parameter is mandatory if storage topology awareness is enabled. For details, see Configuring Storage Topology Awareness. | |||
Maximum number of concurrent connections to a storage backend. | The value ranges from 1 to 30. If this parameter is not set or the value is not in the specified range, the default value 30 is used. | |||
Authentication mode for logging in to a storage backend. The following modes are supported: | When Huawei enterprise storage is OceanStor V5, the ID of the LDAP domain authentication server must be 0. |
Creating a Storage Backend
Prepare a backend configuration file, for example, backend.yaml.
storage: "oceanstor-san"
name: "backend-demo"
namespace: "huawei-csi"
urls:
  - "https://192.168.129.157:8088"
pools:
  - "StoragePool001"
parameters:
  protocol: "roce-nvme"
  portals:
    - "10.10.30.20"
    - "10.10.30.21"
maxClientThreads: "30"
Run the following command to create a storage backend.
oceanctl create backend -f /path/to/backend.yaml -i yamlThe following is an example of the command output.
NUMBER  CONFIGURED    NAME           STORAGE              URLS
1       false         backend-demo   oceanstor-san        https://192.168.129.157:8088
Please enter the backend number to configure (Enter 'exit' to exit):
Enter the serial number of the backend to be created and enter the account and password.
Please enter the backend number to configure (Enter 'exit' to exit):1
Please enter this backend user name: admin
Please enter this backend password:

Backend backend-demo is configured
NUMBER  CONFIGURED    NAME            STORAGE              URLS
1       true          backend-demo    oceanstor-san        https://192.168.129.157:8088
Please enter the backend number to configure (Enter 'exit' to exit):
Check the storage backend creation result.
oceanctl get backendThe following is an example of the command output. If the backend status is Bound, the creation is successful.
NAMESPACE     NAME            PROTOCOL    STORAGETYPE      SN                    STATUS  ONLINE  URL
huawei-csi    backend-demo    roce-nvme   oceanstor-san    xxxxxxxxxxxxxxxxxxxx  Bound   true    https://192.168.129.157:8088
6.1.1.1.3.4 - NVMe over TCP
This section describes how to create a storage backend of the NVMe over TCP protocol type.
Configuration Item Description
Table 1 backend parameters
Storage backend name. The value can contain a maximum of 63 characters, including lowercase letters, digits, and hyphens (-). It must start with a letter or digit. | ||||
The storage backend must be in the same namespace as Huawei CSI. | ||||
Management URLs of the storage device. The value format is a list. The value can be a domain name or an IP address + port number. | ||||
Storage pools of storage devices. The value format is a list. | ||||
Service access port. Nodes will use this port to read and write storage resources. The value format is a list. |
| |||
Storage topology awareness configuration. The parameter format is JSON of the list type. | This parameter is mandatory if storage topology awareness is enabled. For details, see Configuring Storage Topology Awareness. | |||
Maximum number of concurrent connections to a storage backend. | The value ranges from 1 to 30. If this parameter is not set or the value is not in the specified range, the default value 30 is used. | |||
Authentication mode for logging in to a storage backend. The following modes are supported: |
Creating a Storage Backend
Prepare a backend configuration file, for example, backend.yaml.
storage: "oceanstor-san"
name: "backend-demo"
namespace: "huawei-csi"
urls:
  - "https://192.168.129.157:8088"
pools:
  - "StoragePool001"
parameters:
  protocol: "tcp-nvme"
  portals:
    - "10.10.30.20"
    - "10.10.30.21"
maxClientThreads: "30"
Run the following command to create a storage backend.
oceanctl create backend -f /path/to/backend.yaml -i yamlThe following is an example of the command output.
NUMBER  CONFIGURED    NAME           STORAGE              URLS
1       false         backend-demo   oceanstor-san        https://192.168.129.157:8088
Please enter the backend number to configure (Enter 'exit' to exit):
Enter the serial number of the backend to be created and enter the account and password.
Please enter the backend number to configure (Enter 'exit' to exit):1
Please enter this backend user name: admin
Please enter this backend password:

Backend backend-demo is configured
NUMBER  CONFIGURED    NAME            STORAGE              URLS
1       true          backend-demo    oceanstor-san        https://192.168.129.157:8088
Please enter the backend number to configure (Enter 'exit' to exit):
Check the storage backend creation result.
oceanctl get backendThe following is an example of the command output. If the backend status is Bound, the creation is successful.
NAMESPACE     NAME            PROTOCOL    STORAGETYPE      SN                    STATUS  ONLINE  URL
huawei-csi    backend-demo    tcp-nvme    oceanstor-san    xxxxxxxxxxxxxxxxxxxx  Bound   true    https://192.168.129.157:8088
6.1.1.1.3.5 - FC-NVMe
This section describes how to create a storage backend of the FC-NVMe protocol type.
Configuration Item Description
Table 1 backend parameters
Storage backend name. The value can contain a maximum of 63 characters, including lowercase letters, digits, and hyphens (-). It must start with a letter or digit. | ||||
The storage backend must be in the same namespace as Huawei CSI. | ||||
Management URLs of the storage device. The value format is a list. The value can be a domain name or an IP address + port number. | ||||
Storage pools of storage devices. The value format is a list. | ||||
Storage topology awareness configuration. The parameter format is JSON of the list type. | This parameter is mandatory if storage topology awareness is enabled. For details, see Configuring Storage Topology Awareness. | |||
Maximum number of concurrent connections to a storage backend. | The value ranges from 1 to 30. If this parameter is not set or the value is not in the specified range, the default value 30 is used. | |||
Authentication mode for logging in to a storage backend. The following modes are supported: | When Huawei enterprise storage is OceanStor V5, the ID of the LDAP domain authentication server must be 0. |
Creating a Storage Backend
Prepare a backend configuration file, for example, backend.yaml.
storage: "oceanstor-san"
name: "backend-demo"
namespace: "huawei-csi"
urls:
  - "https://192.168.129.157:8088"
pools:
  - "StoragePool001"
parameters:
  protocol: "fc-nvme"
maxClientThreads: "30"
Run the following command to create a storage backend.
oceanctl create backend -f /path/to/backend.yaml -i yamlThe following is an example of the command output.
NUMBER  CONFIGURED    NAME           STORAGE              URLS
1       false         backend-demo   oceanstor-san        https://192.168.129.157:8088
Please enter the backend number to configure (Enter 'exit' to exit):
Enter the serial number of the backend to be created and enter the account and password.
Please enter the backend number to configure (Enter 'exit' to exit):1
Please enter this backend user name: admin
Please enter this backend password:

Backend backend-demo is configured
NUMBER  CONFIGURED    NAME            STORAGE              URLS
1       true          backend-demo    oceanstor-san        https://192.168.129.157:8088
Please enter the backend number to configure (Enter 'exit' to exit):
Check the storage backend creation result.
oceanctl get backendThe following is an example of the command output. If the backend status is Bound, the creation is successful.
NAMESPACE     NAME            PROTOCOL    STORAGETYPE      SN                    STATUS  ONLINE  URL
huawei-csi    backend-demo    fc-nvme     oceanstor-san    xxxxxxxxxxxxxxxxxxxx  Bound   true    https://192.168.129.157:8088
6.1.1.2 - Flash Storage (OceanStor A600/A800)
6.1.1.2.1 - Local File System
6.1.1.2.1.1 - NFS
This section describes how to create a storage backend of the NFS protocol type.
Configuration Item Description
Table 1 backend parameters
Storage backend name. The value can contain a maximum of 63 characters, including lowercase letters, digits, and hyphens (-). It must start with a letter or digit. | ||||
The storage backend must be in the same namespace as Huawei CSI. | ||||
Management URLs of the storage device. The value format is a list. | The value can be a domain name or an IP address + port number. | |||
Storage pools of storage devices. The value format is a list. | ||||
Service access port. Nodes will use this port to read and write storage resources. The value format is a list. | ||||
Storage topology awareness configuration. The parameter format is JSON of the list type. | This parameter is mandatory if storage topology awareness is enabled. For details, see Configuring Storage Topology Awareness. | |||
Maximum number of concurrent connections to a storage backend. | The value ranges from 1 to 30. If this parameter is not set or the value is not in the specified range, the default value 30 is used. | |||
Authentication mode for logging in to a storage backend. The following modes are supported: |
Creating a Storage Backend
Prepare a backend configuration file, for example, backend.yaml.
storage: "oceanstor-a-series-nas"
name: "backend-demo"
namespace: "huawei-csi"
urls:
  - "https://192.168.129.157:8088"
pools:
  - "StoragePool001"
parameters:
  protocol: "nfs"
  portals:
    - "10.10.30.20"
maxClientThreads: "30"
Run the following command to create a storage backend.
oceanctl create backend -f /path/to/backend.yaml -i yamlThe following is an example of the command output.
NUMBER  CONFIGURED    NAME           STORAGE                   URLS
1       false         backend-demo   oceanstor-a-series-nas    https://192.168.129.157:8088
Please enter the backend number to configure (Enter 'exit' to exit):
Enter the serial number of the backend to be created and enter the account and password.
Please enter the backend number to configure (Enter 'exit' to exit):1
Please enter this backend user name: admin
Please enter this backend password:

Backend backend-demo is configured
NUMBER  CONFIGURED    NAME            STORAGE                   URLS
1       true          backend-demo    oceanstor-a-series-nas    https://192.168.129.157:8088
Please enter the backend number to configure (Enter 'exit' to exit):
Check the storage backend creation result.
oceanctl get backendThe following is an example of the command output. If the backend status is Bound, the creation is successful.
NAMESPACE     NAME            PROTOCOL    STORAGETYPE             SN                    STATUS  ONLINE  URL
huawei-csi    backend-demo    nfs         oceanstor-a-series-nas  xxxxxxxxxxxxxxxxxxxx  Bound   true    https://192.168.129.157:8088
6.1.1.2.1.2 - DataTurbo
This section describes how to create a storage backend of the DataTurbo protocol type.
Configuration Item Description
Table 1 backend parameters
Storage backend name. The value can contain a maximum of 63 characters, including lowercase letters, digits, and hyphens (-). It must start with a letter or digit. | ||||
The storage backend must be in the same namespace as Huawei CSI. | ||||
Management URLs of the storage device. The value format is a list. | The value can be a domain name or an IP address + port number. | |||
Storage pools of storage devices. The value format is a list. | ||||
Storage topology awareness configuration. The parameter format is JSON of the list type. | This parameter is mandatory if storage topology awareness is enabled. For details, see Configuring Storage Topology Awareness. | |||
Maximum number of concurrent connections to a storage backend. | The value ranges from 1 to 30. If this parameter is not set or the value is not in the specified range, the default value 30 is used. | |||
Authentication mode for logging in to a storage backend. The following modes are supported: |
Creating a Storage Backend
Prepare a backend configuration file, for example, backend.yaml.
storage: "oceanstor-a-series-nas"
name: "backend-demo"
namespace: "huawei-csi"
urls:
  - "https://192.168.129.157:8088"
pools:
  - "StoragePool001"
parameters:
  protocol: "dtfs"
maxClientThreads: "30"
Run the following command to create a storage backend.
oceanctl create backend -f /path/to/backend.yaml -i yamlThe following is an example of the command output.
NUMBER  CONFIGURED    NAME           STORAGE              URLS
1       false         backend-demo   oceanstor-a-series-nas    https://192.168.129.157:8088
Please enter the backend number to configure (Enter 'exit' to exit):
Enter the serial number of the backend to be created and enter the account and password.
Please enter the backend number to configure (Enter 'exit' to exit):1
Please enter this backend user name: admin
Please enter this backend password:

Backend backend-demo is configured
NUMBER  CONFIGURED    NAME            STORAGE              URLS
1       true          backend-demo    oceanstor-a-series-nas    https://192.168.129.157:8088
Please enter the backend number to configure (Enter 'exit' to exit):
Check the storage backend creation result.
oceanctl get backendThe following is an example of the command output. If the backend status is Bound, the creation is successful.
NAMESPACE     NAME            PROTOCOL   STORAGETYPE             SN                    STATUS  ONLINE  URL
huawei-csi    backend-demo    dtfs       oceanstor-a-series-nas  xxxxxxxxxxxxxxxxxxxx  Bound   true    https://192.168.129.157:8088
6.1.1.2.2 - Dtree
6.1.1.2.2.1 - NFS
This section describes how to create a storage backend of the NFS protocol type.
Configuration Item Description
Table 1 backend parameters
Storage backend name. The value can contain a maximum of 63 characters, including lowercase letters, digits, and hyphens (-). It must start with a letter or digit. | ||||
The storage backend must be in the same namespace as Huawei CSI. | ||||
Management URLs of the storage device. The value format is a list. | The value can be a domain name or an IP address + port number. | |||
Service access port. Nodes will use this port to read and write storage resources. The value format is a list. | ||||
Name of a file system on the current storage device. Dtree is created in the file system. | ||||
Storage topology awareness configuration. The parameter format is JSON of the list type. | This parameter is mandatory if storage topology awareness is enabled. For details, see Configuring Storage Topology Awareness. | |||
Maximum number of concurrent connections to a storage backend. | The value ranges from 1 to 30. If this parameter is not set or the value is not in the specified range, the default value 30 is used. | |||
Authentication mode for logging in to a storage backend. The following modes are supported: |
Creating a Storage Backend
Prepare a backend configuration file, for example, backend.yaml.
storage: "oceanstor-a-series-dtree"
name: "backend-demo"
namespace: "huawei-csi"
urls:
  - "https://192.168.129.157:8088"
parameters:
  protocol: "nfs"
  parentname: "fs-demo"
  portals:
    - "10.10.30.20"
maxClientThreads: "30"
Run the following command to create a storage backend.
oceanctl create backend -f /path/to/backend.yaml -i yamlThe following is an example of the command output:
NUMBER  CONFIGURED    NAME           STORAGE                   URLS
1       false         backend-demo   oceanstor-a-series-dtree    https://192.168.129.157:8088
Please enter the backend number to configure (Enter 'exit' to exit):
Enter the serial number of the backend to be created and enter the account and password.
Please enter the backend number to configure (Enter 'exit' to exit):1
Please enter this backend user name: admin
Please enter this backend password:

Backend backend-demo is configured
NUMBER  CONFIGURED    NAME            STORAGE                   URLS
1       true          backend-demo    oceanstor-a-series-dtree    https://192.168.129.157:8088
Please enter the backend number to configure (Enter 'exit' to exit):
Check the storage backend creation result.
oceanctl get backendThe following is an example of the command output. If the backend status is Bound, the creation is successful.
NAMESPACE     NAME            PROTOCOL    STORAGETYPE             SN                    STATUS  ONLINE  URL
huawei-csi    backend-demo    nfs         oceanstor-a-series-dtree  xxxxxxxxxxxxxxxxxxxx  Bound   true    https://192.168.129.157:8088
6.1.1.2.2.2 - DataTurbo
This section describes how to create a storage backend of the DataTurbo protocol type.
Configuration Item Description
Table 1 backend parameters
Storage backend name. The value can contain a maximum of 63 characters, including lowercase letters, digits, and hyphens (-). It must start with a letter or digit. | ||||
The storage backend must be in the same namespace as Huawei CSI. | ||||
Management URLs of the storage device. The value format is a list. | The value can be a domain name or an IP address + port number. | |||
Name of a file system on the current storage device. Dtree is created in the file system. | ||||
Storage topology awareness configuration. The parameter format is JSON of the list type. | This parameter is mandatory if storage topology awareness is enabled. For details, see Configuring Storage Topology Awareness. | |||
Maximum number of concurrent connections to a storage backend. | The value ranges from 1 to 30. If this parameter is not set or the value is not in the specified range, the default value 30 is used. | |||
Authentication mode for logging in to a storage backend. The following modes are supported: |
Creating a Storage Backend
Prepare a backend configuration file, for example, backend.yaml.
storage: "oceanstor-a-series-dtree"
name: "backend-demo"
namespace: "huawei-csi"
urls:
  - "https://192.168.129.157:8088"
parameters:
  parentname: "fs-demo"
  protocol: "dtfs"
maxClientThreads: "30"
Run the following command to create a storage backend.
oceanctl create backend -f /path/to/backend.yaml -i yamlThe following is an example of the command output:
NUMBER  CONFIGURED    NAME           STORAGE              URLS
1       false         backend-demo   oceanstor-a-series-dtree    https://192.168.129.157:8088
Please enter the backend number to configure (Enter 'exit' to exit):
Enter the serial number of the backend to be created and enter the account and password.
Please enter the backend number to configure (Enter 'exit' to exit):1
Please enter this backend user name: admin
Please enter this backend password:

Backend backend-demo is configured
NUMBER  CONFIGURED    NAME            STORAGE              URLS
1       true          backend-demo    oceanstor-a-series-dtree    https://192.168.129.157:8088
Please enter the backend number to configure (Enter 'exit' to exit):
Check the storage backend creation result.
oceanctl get backendThe following is an example of the command output. If the backend status is Bound, the creation is successful.
NAMESPACE     NAME            PROTOCOL   STORAGETYPE             SN                    STATUS  ONLINE  URL
huawei-csi    backend-demo    dtfs       oceanstor-a-series-dtree  xxxxxxxxxxxxxxxxxxxx  Bound   true    https://192.168.129.157:8088
6.1.1.3 - DME (Interconnected with an OceanStor A800 Cluster)
6.1.1.3.1 - Global File System
6.1.1.3.1.1 - NFS
This section describes how to create a storage backend of the NFS protocol type.
Configuration Item Description
Table 1 backend parameters
Storage backend name. The value can contain a maximum of 63 characters, including lowercase letters, digits, and hyphens (-). It must start with a letter or digit. | ||||
The storage backend must be in the same namespace as Huawei CSI. | ||||
Management URLs of the storage device. The value format is a list. | The value can be a domain name or an IP address + port number. | |||
On the DME management page, choose Infrastructure > Storage Devices > ESN to obtain the serial number of the storage device. | ||||
Storage pools of storage devices. The value format is a list. | ||||
Service access port. Nodes will use this port to read and write storage resources. The value format is a list. |
| |||
Storage topology awareness configuration. The parameter format is JSON of the list type. | This parameter is mandatory if storage topology awareness is enabled. For details, see Configuring Storage Topology Awareness. | |||
Maximum number of concurrent connections to a storage backend. | The value ranges from 1 to 30. If this parameter is not set or the value is not in the specified range, the default value 5 is used. |
Creating a Storage Backend
Prepare a backend configuration file, for example, backend.yaml.
storage: "oceanstor-a-series-nas"
name: "backend-demo"
namespace: "huawei-csi"
urls:
  - "https://192.168.129.157:26335"
storageDeviceSN: 21000000000000000000
pools:
  - "StoragePool001"
parameters:
  protocol: "nfs"
  portals:
    - "10.10.30.20"
maxClientThreads: "30"
Run the following command to create a storage backend.
oceanctl create backend -f /path/to/backend.yaml -i yamlThe following is an example of the command output:
NUMBER  CONFIGURED    NAME           STORAGE                   URLS
1       false         backend-demo   oceanstor-a-series-nas    https://192.168.129.157:26335
Please enter the backend number to configure (Enter 'exit' to exit):
Enter the serial number of the backend to be created and enter the account and password.
Please enter the backend number to configure (Enter 'exit' to exit):1
Please enter this backend user name: admin
Please enter this backend password:

Backend backend-demo is configured
NUMBER  CONFIGURED    NAME            STORAGE                   URLS
1       true          backend-demo    oceanstor-a-series-nas    https://192.168.129.157:26335
Please enter the backend number to configure (Enter 'exit' to exit):
Check the storage backend creation result.
oceanctl get backendThe following is an example of the command output. If the backend status is Bound, the creation is successful.
NAMESPACE     NAME            PROTOCOL    STORAGETYPE             SN                    STATUS  ONLINE  URL
huawei-csi    backend-demo    nfs         oceanstor-a-series-nas  xxxxxxxxxxxxxxxxxxxx  Bound   true    https://192.168.129.157:26335
6.1.1.3.1.2 - DataTurbo
This section describes how to create a storage backend of the DataTurbo protocol type.
Configuration Item Description
Table 1 backend parameters
Storage backend name. The value can contain a maximum of 63 characters, including lowercase letters, digits, and hyphens (-). It must start with a letter or digit. | ||||
The storage backend must be in the same namespace as Huawei CSI. | ||||
Management URLs of the storage device. The value format is a list. | The value can be a domain name or an IP address + port number. | |||
On the DME management page, choose Infrastructure > Storage Devices > ESN to obtain the serial number of the storage device. | ||||
Storage pools of storage devices. The value format is a list. | ||||
Storage topology awareness configuration. The parameter format is JSON of the list type. | This parameter is mandatory if storage topology awareness is enabled. For details, see Configuring Storage Topology Awareness. | |||
Maximum number of concurrent connections to a storage backend. | The value ranges from 1 to 30. If this parameter is not set or the value is not in the specified range, the default value 30 is used. |
Creating a Storage Backend
Prepare a backend configuration file, for example, backend.yaml.
storage: "oceanstor-a-series-nas"
name: "backend-demo"
namespace: "huawei-csi"
urls:
  - "https://192.168.129.157:26335"
storageDeviceSN: 21000000000000000000
pools:
  - "StoragePool001"
parameters:
  protocol: "dtfs"
maxClientThreads: "30"
Run the following command to create a storage backend.
oceanctl create backend -f /path/to/backend.yaml -i yamlThe following is an example of the command output:
NUMBER  CONFIGURED    NAME           STORAGE              URLS
1       false         backend-demo   oceanstor-a-series-nas    https://192.168.129.157:26335
Please enter the backend number to configure (Enter 'exit' to exit):
Enter the serial number of the backend to be created and enter the account and password.
Please enter the backend number to configure (Enter 'exit' to exit):1
Please enter this backend user name: admin
Please enter this backend password:

Backend backend-demo is configured
NUMBER  CONFIGURED    NAME            STORAGE              URLS
1       true          backend-demo    oceanstor-a-series-nas    https://192.168.129.157:26335
Please enter the backend number to configure (Enter 'exit' to exit):
Check the storage backend creation result.
oceanctl get backendThe following is an example of the command output. If the backend status is Bound, the creation is successful.
NAMESPACE     NAME            PROTOCOL   STORAGETYPE             SN                    STATUS  ONLINE  URL
huawei-csi    backend-demo    dtfs       oceanstor-a-series-nas  xxxxxxxxxxxxxxxxxxxx  Bound   true    https://192.168.129.157:26335
6.1.1.4 - Mass Storage (OceanStor Pacific/FusionStorage Block Series)
6.1.1.4.1 - File System
6.1.1.4.1.1 - NFS
This section describes how to create a storage backend of the NFS protocol type.
Configuration Item Description
Table 1 backend parameters
Storage backend name. The value can contain a maximum of 63 characters, including lowercase letters, digits, and hyphens (-). It must start with a letter or digit. | ||||
The storage backend must be in the same namespace as Huawei CSI. | ||||
This parameter is mandatory when NAS resources need to be provisioned under a specified account. | ||||
Management URLs of the storage device. The value format is a list. | The value can be a domain name or an IP address + port number. | |||
Storage pools of storage devices. The value format is a list. | ||||
Service access port. Nodes will use this port to read and write storage resources. The value format is a list. | ||||
Storage topology awareness configuration. The parameter format is JSON of the list type. | This parameter is mandatory if storage topology awareness is enabled. For details, see Configuring Storage Topology Awareness. | |||
Maximum number of concurrent connections to a storage backend. | The value ranges from 1 to 30. If this parameter is not set or the value is not in the specified range, the default value 30 is used. |
Creating a Storage Backend
Prepare a backend configuration file, for example, backend.yaml.
storage: "fusionstorage-nas"
name: "backend-demo"
namespace: "huawei-csi"
urls:
  - "https://192.168.129.157:8088"
pools:
  - "StoragePool001"
parameters:
  protocol: "nfs"
  portals:
    - "10.10.30.20"
maxClientThreads: "30"
Run the following command to create a storage backend.
oceanctl create backend -f /path/to/backend.yaml -i yamlThe following is an example of the command output.
NUMBER  CONFIGURED    NAME           STORAGE              URLS
1       false         backend-demo   fusionstorage-nas    https://192.168.129.157:8088
Please enter the backend number to configure (Enter 'exit' to exit):
Enter the serial number of the backend to be created and enter the account and password.
Please enter the backend number to configure (Enter 'exit' to exit):1
Please enter this backend user name: admin
Please enter this backend password:

Backend backend-demo is configured
NUMBER  CONFIGURED    NAME            STORAGE              URLS
1       true          backend-demo    fusionstorage-nas    https://192.168.129.157:8088
Please enter the backend number to configure (Enter 'exit' to exit):
Check the storage backend creation result.
oceanctl get backendThe following is an example of the command output. If the backend status is Bound, the creation is successful.
NAMESPACE     NAME            PROTOCOL    STORAGETYPE        SN             STATUS  ONLINE  URL
huawei-csi    backend-demo    nfs         fusionstorage-nas                 Bound   true    https://192.168.129.157:8088
6.1.1.4.1.2 - DPC
This section describes how to create a storage backend of the DPC protocol type.
Configuration Item Description
Table 1 backend parameters
Storage backend name. The value can contain a maximum of 63 characters, including lowercase letters, digits, and hyphens (-). It must start with a letter or digit. | ||||
The storage backend must be in the same namespace as Huawei CSI. | ||||
This parameter is mandatory when NAS resources need to be provisioned under a specified account. | ||||
Management URLs of the storage device. The value format is a list. | The value can be a domain name or an IP address + port number. | |||
Storage pools of storage devices. The value format is a list. | ||||
Storage topology awareness configuration. The parameter format is JSON of the list type. | This parameter is mandatory if storage topology awareness is enabled. For details, see Configuring Storage Topology Awareness. | |||
Maximum number of concurrent connections to a storage backend. | The value ranges from 1 to 30. If this parameter is not set or the value is not in the specified range, the default value 30 is used. |
Creating a Storage Backend
Prepare a backend configuration file, for example, backend.yaml.
storage: "fusionstorage-nas"
name: "backend-demo"
namespace: "huawei-csi"
urls:
  - "https://192.168.129.157:8088"
pools:
  - "StoragePool001"
parameters:
  protocol: "dpc"
maxClientThreads: "30"
Run the following command to create a storage backend.
oceanctl create backend -f /path/to/backend.yaml -i yamlThe following is an example of the command output.
NUMBER  CONFIGURED    NAME           STORAGE              URLS
1       false         backend-demo   fusionstorage-nas    https://192.168.129.157:8088
Please enter the backend number to configure (Enter 'exit' to exit):
Enter the serial number of the backend to be created and enter the account and password.
Please enter the backend number to configure (Enter 'exit' to exit):1
Please enter this backend user name: admin
Please enter this backend password:

Backend backend-demo is configured
NUMBER  CONFIGURED    NAME            STORAGE              URLS
1       true          backend-demo    fusionstorage-nas    https://192.168.129.157:8088
Please enter the backend number to configure (Enter 'exit' to exit):
Check the storage backend creation result.
oceanctl get backendThe following is an example of the command output. If the backend status is Bound, the creation is successful.
NAMESPACE     NAME            PROTOCOL    STORAGETYPE        SN               STATUS  ONLINE  URL
huawei-csi    backend-demo    dpc         fusionstorage-nas                   Bound   true    https://192.168.129.157:8088
6.1.1.4.2 - Dtree
6.1.1.4.2.1 - NFS
This section describes how to create a storage backend of the NFS protocol type.
Configuration Item Description
Table 1 backend parameters
Storage backend name. The value can contain a maximum of 63 characters, including lowercase letters, digits, and hyphens (-). It must start with a letter or digit. | ||||
The storage backend must be in the same namespace as Huawei CSI. | ||||
This parameter is mandatory when NAS resources need to be provisioned under a specified account. | ||||
Management URLs of the storage device. The value format is a list. | The value can be a domain name or an IP address + port number. | |||
Service access port. Nodes will use this port to read and write storage resources. The value format is a list. | ||||
Name of a file system on the current storage device. A dtree is created in the file system. | ||||
Storage topology awareness configuration. The parameter format is JSON of the list type. | This parameter is mandatory if storage topology awareness is enabled. For details, see Configuring Storage Topology Awareness. | |||
Maximum number of concurrent connections to a storage backend. | The value ranges from 1 to 30. If this parameter is not set or the value is not in the specified range, the default value 30 is used. |
Creating a Storage Backend
Prepare a backend configuration file, for example, backend.yaml.
storage: "fusionstorage-dtree"
name: "backend-demo"
namespace: "huawei-csi"
urls:
  - "https://192.168.129.157:8088"
parameters:
  protocol: "nfs"
  parentname: "parent-filesystem"
  portals:
    - "10.10.30.20"
maxClientThreads: "30"
Run the following command to create a storage backend.
oceanctl create backend -f /path/to/backend.yaml -i yamlThe following is an example of the command output.
NUMBER  CONFIGURED    NAME           STORAGE              URLS
1       false         backend-demo   fusionstorage-dtree  https://192.168.129.157:8088
Please enter the backend number to configure (Enter 'exit' to exit):
Enter the serial number of the backend to be created and enter the account and password.
Please enter the backend number to configure (Enter 'exit' to exit):1
Please enter this backend user name: admin
Please enter this backend password:

Backend backend-demo is configured
NUMBER  CONFIGURED    NAME            STORAGE              URLS
1       true          backend-demo    fusionstorage-dtree  https://192.168.129.157:8088
Please enter the backend number to configure (Enter 'exit' to exit):
Check the storage backend creation result.
oceanctl get backendThe following is an example of the command output. If the backend status is Bound, the creation is successful.
NAMESPACE     NAME            PROTOCOL    STORAGETYPE           SN            STATUS  ONLINE  URL
huawei-csi    backend-demo    nfs         fusionstorage-dtree                 Bound   true    https://192.168.129.157:8088
6.1.1.4.2.2 - DPC
This section describes how to create a storage backend of the DPC protocol type.
Configuration Item Description
Table 1 backend parameters
Storage backend name. The value can contain a maximum of 63 characters, including lowercase letters, digits, and hyphens (-). It must start with a letter or digit. | ||||
The storage backend must be in the same namespace as Huawei CSI. | ||||
This parameter is mandatory when NAS resources need to be provisioned under a specified account. | ||||
Management URLs of the storage device. The value format is a list. | The value can be a domain name or an IP address + port number. | |||
Storage protocol. The value is a character string.
| ||||
Name of a file system on the current storage device. A dtree is created in the file system. | ||||
Storage topology awareness configuration. The parameter format is JSON of the list type. | This parameter is mandatory if storage topology awareness is enabled. For details, see Configuring Storage Topology Awareness. | |||
Maximum number of concurrent connections to a storage backend. | The value ranges from 1 to 30. If this parameter is not set or the value is not in the specified range, the default value 30 is used. |
Creating a Storage Backend
Prepare a backend configuration file, for example, backend.yaml.
storage: "fusionstorage-dtree"
name: "backend-demo"
namespace: "huawei-csi"
urls:
  - "https://192.168.129.157:8088"
parameters:
  protocol: "dpc"
  parentname: "parent-filesystem"
maxClientThreads: "30"
Run the following command to create a storage backend.
oceanctl create backend -f /path/to/backend.yaml -i yamlThe following is an example of the command output.
NUMBER  CONFIGURED    NAME           STORAGE                URLS
1       false         backend-demo   fusionstorage-dtree    https://192.168.129.157:8088
Please enter the backend number to configure (Enter 'exit' to exit):
Enter the serial number of the backend to be created and enter the account and password.
Please enter the backend number to configure (Enter 'exit' to exit):1
Please enter this backend user name: admin
Please enter this backend password:

Backend backend-demo is configured
NUMBER  CONFIGURED    NAME            STORAGE                URLS
1       true          backend-demo    fusionstorage-dtree    https://192.168.129.157:8088
Please enter the backend number to configure (Enter 'exit' to exit):
Check the storage backend creation result.
oceanctl get backendThe following is an example of the command output. If the backend status is Bound, the creation is successful.
NAMESPACE     NAME            PROTOCOL    STORAGETYPE          SN          STATUS  ONLINE  URL
huawei-csi    backend-demo    dpc         fusionstorage-dtree              Bound   true    https://192.168.129.157:8088
6.1.1.4.3 - Block Service
6.1.1.4.3.1 - iSCSI
This section describes how to create a storage backend of the iSCSI protocol type.
Configuration Item Description
Table 1 backend parameters
Storage backend name. The value can contain a maximum of 63 characters, including lowercase letters, digits, and hyphens (-). It must start with a letter or digit. | ||||
The storage backend must be in the same namespace as Huawei CSI. | ||||
Management URLs of the storage device. The value format is a list. | The value can be a domain name or an IP address + port number. | |||
Storage pools of storage devices. The value format is a list. | ||||
Service access port. Nodes will use this port to read and write storage resources. The value format is a list. | ||||
Number of dynamic access links. This parameter is supported only in OceanStor Pacific 8.1.5 and later versions. | ||||
Storage topology awareness configuration. The parameter format is JSON of the list type. | This parameter is mandatory if storage topology awareness is enabled. For details, see Configuring Storage Topology Awareness. | |||
Maximum number of concurrent connections to a storage backend. | The value ranges from 1 to 30. If this parameter is not set or the value is not in the specified range, the default value 30 is used. |
Creating a Storage Backend
Prepare a backend configuration file, for example, backend.yaml.
storage: "fusionstorage-san"
name: "backend-demo"
namespace: "huawei-csi"
urls:
  - "https://192.168.129.157:8088"
pools:
  - "StoragePool001"
parameters:
  protocol: "iscsi"
  portals:
    - "10.10.30.20"
    - "10.10.30.21"
maxClientThreads: "30"
Run the following command to create a storage backend.
oceanctl create backend -f /path/to/backend.yaml -i yamlThe following is an example of the command output.
NUMBER  CONFIGURED    NAME           STORAGE              URLS
1       false         backend-demo   fusionstorage-san    https://192.168.129.157:8088
Please enter the backend number to configure (Enter 'exit' to exit):
Enter the serial number of the backend to be created and enter the account and password.
Please enter the backend number to configure (Enter 'exit' to exit):1
Please enter this backend user name: admin
Please enter this backend password:

Backend backend-demo is configured
NUMBER  CONFIGURED    NAME            STORAGE              URLS
1       true          backend-demo    fusionstorage-san    https://192.168.129.157:8088
Please enter the backend number to configure (Enter 'exit' to exit):
Check the storage backend creation result.
oceanctl get backendThe following is an example of the command output. If the backend status is Bound, the creation is successful.
NAMESPACE     NAME            PROTOCOL    STORAGETYPE        SN       STATUS  ONLINE  URL
huawei-csi    backend-demo    iscsi       fusionstorage-san           Bound   true    https://192.168.129.157:8088
6.1.1.4.3.2 - SCSI
This section describes how to create a storage backend of the SCSI protocol type.
Configuration Item Description
Table 1 backend parameters
Storage backend name. The value can contain a maximum of 63 characters, including lowercase letters, digits, and hyphens (-). It must start with a letter or digit. | ||||
The storage backend must be in the same namespace as Huawei CSI. | ||||
Management URLs of the storage device. The value format is a list. | The value can be a domain name or an IP address + port number. | |||
Storage pools of storage devices. The value format is a list. | ||||
Service access port. Nodes will use this port to read and write storage resources. The value format is a list. | If the protocol is scsi, the port is in dictionary format where the key indicates the name of the host where the VBS client is deployed and the value indicates the IP address of the host where the VBS client is deployed. | |||
Storage topology awareness configuration. The parameter format is JSON of the list type. | This parameter is mandatory if storage topology awareness is enabled. For details, see Configuring Storage Topology Awareness. | |||
Maximum number of concurrent connections to a storage backend. | The value ranges from 1 to 30. If this parameter is not set or the value is not in the specified range, the default value 30 is used. |
Creating a Storage Backend
Prepare a backend configuration file, for example, backend.yaml.
storage: "fusionstorage-san"
name: "backend-demo"
namespace: "huawei-csi"
urls:
  - "https://192.168.129.157:8088"
pools:
  - "StoragePool001"
parameters:
  protocol: "scsi"
  portals:
    - {"hostname01": "192.168.125.21","hostname02": "192.168.125.22"}
maxClientThreads: "30"
Run the following command to create a storage backend.
oceanctl create backend -f /path/to/backend.yaml -i yamlThe following is an example of the command output.
NUMBER  CONFIGURED    NAME           STORAGE              URLS
1       false         backend-demo   fusionstorage-san    https://192.168.129.157:8088
Please enter the backend number to configure (Enter 'exit' to exit):
Enter the serial number of the backend to be created and enter the account and password.
Please enter the backend number to configure (Enter 'exit' to exit):1
Please enter this backend user name: admin
Please enter this backend password:

Backend backend-demo is configured
NUMBER  CONFIGURED    NAME            STORAGE              URLS
1       true          backend-demo    fusionstorage-san    https://192.168.129.157:8088
Please enter the backend number to configure (Enter 'exit' to exit):
Check the storage backend creation result.
oceanctl get backendThe following is an example of the command output. If the backend status is Bound, the creation is successful.
NAMESPACE     NAME            PROTOCOL    STORAGETYPE        SN      STATUS  ONLINE  URL
huawei-csi    backend-demo    scsi        fusionstorage-san          Bound   true    https://192.168.129.157:8088
6.1.1.5 - Mass Storage (OceanDisk Series)
6.1.1.5.1 - File System
6.1.1.5.1.1 - NFS
This section describes how to create a storage backend of the NFS protocol type.
Configuration Item Description
Table 1 backend parameters
Storage backend name. The value can contain a maximum of 63 characters, including lowercase letters, digits, and hyphens (-). It must start with a letter or digit. | ||||
The storage backend must be in the same namespace as Huawei CSI. | ||||
Management URLs of the storage device. The value format is a list. The value can be a domain name or an IP address + port number. | If resources need to be provisioned to a specified vStore, set this parameter to the logical management port URL of the specified vStore. | |||
Storage pools of storage devices. The value format is a list. | ||||
The value is fixed to nfs. Ensure that an NFS client tool has been installed on the connected compute node. | ||||
Service access port. Nodes will use this port to read and write storage resources. The value format is a list. | ||||
Storage topology awareness configuration. The parameter format is JSON of the list type. | This parameter is mandatory if storage topology awareness is enabled. For details, see Configuring Storage Topology Awareness. | |||
Maximum number of concurrent connections to a storage backend. | The value ranges from 1 to 30. If this parameter is not set or the value is not in the specified range, the default value 30 is used. |
Creating Storage Backends of the Local Type
Prepare a backend configuration file, for example, backend.yaml.
storage: "oceanstor-nas"
name: "backend-demo"
namespace: "huawei-csi"
urls:
  - "https://192.168.129.157:8088"
pools:
  - "StoragePool001"
parameters:
  protocol: "nfs"
  portals:
    - "10.10.30.20"
maxClientThreads: "30"
Run the following command to create a storage backend.
oceanctl create backend -f /path/to/backend.yaml -i yamlThe following is an example of the command output.
NUMBER  CONFIGURED    NAME           STORAGE              URLS
1       false         backend-demo   oceanstor-nas        https://192.168.129.157:8088
Please enter the backend number to configure (Enter 'exit' to exit):
Enter the serial number of the backend to be created and enter the account and password.
Please enter the backend number to configure (Enter 'exit' to exit):1
Please enter this backend user name: admin
Please enter this backend password:

Backend backend-demo is configured
NUMBER  CONFIGURED    NAME            STORAGE              URLS
1       true          backend-demo    oceanstor-nas        https://192.168.129.157:8088
Please enter the backend number to configure (Enter 'exit' to exit):
Check the storage backend creation result.
oceanctl get backendThe following is an example of the command output. If the backend status is Bound, the creation is successful.
NAMESPACE     NAME            PROTOCOL    STORAGETYPE      SN                    STATUS  ONLINE  URL
huawei-csi    backend-demo    nfs         oceanstor-nas    xxxxxxxxxxxxxxxxxxxx  Bound   true    https://192.168.129.157:8088
6.1.1.5.2 - Block Service
6.1.1.5.2.1 - iSCSI
This section describes how to create a storage backend of the iSCSI protocol type.
Configuration Item Description
Table 1 backend parameters
Storage backend name. The value can contain a maximum of 63 characters, including lowercase letters, digits, and hyphens (-). It must start with a letter or digit. | ||||
The storage backend must be in the same namespace as Huawei CSI. | ||||
Management URLs of the storage device. The value format is a list. | The value can be a domain name or an IP address + port number. | |||
Storage pools of storage devices. The value format is a list. | ||||
Service access port. Nodes will use this port to read and write storage resources. The value format is a list. | ||||
Storage topology awareness configuration. The parameter format is JSON of the list type. | This parameter is mandatory if storage topology awareness is enabled. For details, see Configuring Storage Topology Awareness. | |||
Maximum number of concurrent connections to a storage backend. | The value ranges from 1 to 30. If this parameter is not set or the value is not in the specified range, the default value 30 is used. |
Creating a Storage Backend
Prepare a backend configuration file, for example, backend.yaml.
storage: "oceandisk-san"
name: "backend-demo"
namespace: "huawei-csi"
urls:
  - "https://192.168.129.157:8088"
pools:
  - "StoragePool001"
parameters:
  protocol: "iscsi"
  portals:
    - "10.10.30.20"
    - "10.10.30.21"
maxClientThreads: "30"
Run the following command to create a storage backend.
oceanctl create backend -f /path/to/backend.yaml -i yamlThe following is an example of the command output.
NUMBER  CONFIGURED    NAME           STORAGE          URLS
1       false         backend-demo   oceandisk-san    https://192.168.129.157:8088
Please enter the backend number to configure (Enter 'exit' to exit):
Enter the serial number of the backend to be created and enter the account and password.
Please enter the backend number to configure (Enter 'exit' to exit):1
Please enter this backend user name: admin
Please enter this backend password:

Backend backend-demo is configured
NUMBER  CONFIGURED    NAME            STORAGE          URLS
1       true          backend-demo    oceandisk-san    https://192.168.129.157:8088
Please enter the backend number to configure (Enter 'exit' to exit):
Check the storage backend creation result.
oceanctl get backendThe following is an example of the command output. If the backend status is Bound, the creation is successful.
NAMESPACE     NAME            PROTOCOL    STORAGETYPE     SN                    STATUS  ONLINE  URL
huawei-csi    backend-demo    iscsi       oceandisk-san   xxxxxxxxxxxxxxxxxxxx  Bound   true    https://192.168.129.157:8088
6.1.1.5.2.2 - FC
This section describes how to create a storage backend of the FC protocol type.
Configuration Item Description
Table 1 backend parameters
Storage backend name. The value can contain a maximum of 63 characters, including lowercase letters, digits, and hyphens (-). It must start with a letter or digit. | ||||
The storage backend must be in the same namespace as Huawei CSI. | ||||
Management URLs of the storage device. The value format is a list. | The value can be a domain name or an IP address + port number. | |||
Storage pools of storage devices. The value format is a list. | ||||
Storage topology awareness configuration. The parameter format is JSON of the list type. | This parameter is mandatory if storage topology awareness is enabled. For details, see Configuring Storage Topology Awareness. | |||
Maximum number of concurrent connections to a storage backend. | The value ranges from 1 to 30. If this parameter is not set or the value is not in the specified range, the default value 30 is used. |
Creating a Storage Backend
Prepare a backend configuration file, for example, backend.yaml.
storage: "oceandisk-san"
name: "backend-demo"
namespace: "huawei-csi"
urls:
  - "https://192.168.129.157:8088"
pools:
  - "StoragePool001"
parameters:
  protocol: "fc"
maxClientThreads: "30"
Run the following command to create a storage backend.
oceanctl create backend -f /path/to/backend.yaml -i yamlThe following is an example of the command output.
NUMBER  CONFIGURED    NAME           STORAGE              URLS
1       false         backend-demo   oceandisk-san        https://192.168.129.157:8088
Please enter the backend number to configure (Enter 'exit' to exit):
Enter the serial number of the backend to be created and enter the account and password.
Please enter the backend number to configure (Enter 'exit' to exit):1
Please enter this backend user name: admin
Please enter this backend password:

Backend backend-demo is configured
NUMBER  CONFIGURED    NAME            STORAGE              URLS
1       true          backend-demo    oceandisk-san        https://192.168.129.157:8088
Please enter the backend number to configure (Enter 'exit' to exit):
Check the storage backend creation result.
oceanctl get backendThe following is an example of the command output. If the backend status is Bound, the creation is successful.
NAMESPACE     NAME            PROTOCOL    STORAGETYPE        SN                    STATUS  ONLINE  URL
huawei-csi    backend-demo    fc          oceandisk-san      xxxxxxxxxxxxxxxxxxxx  Bound   true    https://192.168.129.157:8088
6.1.1.5.2.3 - NVMe over RoCE
This section describes how to create a storage backend of the NVMe over RoCE protocol type.
Configuration Item Description
Table 1 backend parameters
Storage backend name. The value can contain a maximum of 63 characters, including lowercase letters, digits, and hyphens (-). It must start with a letter or digit. | ||||
The storage backend must be in the same namespace as Huawei CSI. | ||||
Management URLs of the storage device. The value format is a list. | The value can be a domain name or an IP address + port number. | |||
Storage pools of storage devices. The value format is a list. | ||||
Service access port. Nodes will use this port to read and write storage resources. The value format is a list. | ||||
Storage topology awareness configuration. The parameter format is JSON of the list type. | This parameter is mandatory if storage topology awareness is enabled. For details, see Configuring Storage Topology Awareness. | |||
Maximum number of concurrent connections to a storage backend. | The value ranges from 1 to 30. If this parameter is not set or the value is not in the specified range, the default value 30 is used. |
Creating a Storage Backend
Prepare a backend configuration file, for example, backend.yaml.
storage: "oceandisk-san"
name: "backend-demo"
namespace: "huawei-csi"
urls:
  - "https://192.168.129.157:8088"
pools:
  - "StoragePool001"
parameters:
  protocol: "roce-nvme"
  portals:
    - "10.10.30.20"
    - "10.10.30.21"
maxClientThreads: "30"
Run the following command to create a storage backend.
oceanctl create backend -f /path/to/backend.yaml -i yamlThe following is an example of the command output.
NUMBER  CONFIGURED    NAME           STORAGE              URLS
1       false         backend-demo   oceandisk-san        https://192.168.129.157:8088
Please enter the backend number to configure (Enter 'exit' to exit):
Enter the serial number of the backend to be created and enter the account and password.
Please enter the backend number to configure (Enter 'exit' to exit):1
Please enter this backend user name: admin
Please enter this backend password:

Backend backend-demo is configured
NUMBER  CONFIGURED    NAME            STORAGE              URLS
1       true          backend-demo    oceandisk-san        https://192.168.129.157:8088
Please enter the backend number to configure (Enter 'exit' to exit):
Check the storage backend creation result.
oceanctl get backendThe following is an example of the command output. If the backend status is Bound, the creation is successful.
NAMESPACE     NAME            PROTOCOL    STORAGETYPE        SN                    STATUS  ONLINE  URL
huawei-csi    backend-demo    roce-nvme   oceandisk-san      xxxxxxxxxxxxxxxxxxxx  Bound   true    https://192.168.129.157:8088
6.1.2 - Managing Storage Backends
6.1.2.1 - Querying a Storage Backend
Run the following command to obtain the help information about querying a backend.
oceanctl get backend -hRun the following command to query a single storage backend in the default namespace.
oceanctl get backend <backend-name>Run the following command to query all storage backends in the specified namespace.
oceanctl get backend -n <namespace>Run the following command to format the output. Currently, json, yaml, and wide are supported.
oceanctl get backend <backend-name> -o json
6.1.2.2 - Updating a Storage Backend
- When you use oceanctl to update the storage backend information, only the storage backend password and authentication mode for logging in to the storage backend can be updated.
- If the backend account password is updated on the storage device, the CSI plug-in will retry due to login failures. As a result, the account may be locked. If the account is locked, change the password by referring to An Account Is Locked After the Password Is Updated on the Storage Device .
6.1.2.2.1 - Updating the Password of a Storage Backend Using oceanctl
Obtaining the Help Information About Updating a Backend
Run the following command to obtain the help information about updating a storage backend.
oceanctl update backend -hThe following is an example of the command output.
Update a backend for Ocean Storage in Kubernetes

Usage:
  oceanctl update backend <name> [flags]

Examples:
  # Update backend account information in default(huawei-csi) namespace
  oceanctl update backend <name>  --password

  # Update backend account information in specified namespace
  oceanctl update backend <name> -n namespace --password

  # Update backend account information with ldap authentication mode in default(huawei-csi) namespace
  oceanctl update backend <name> --password --authenticationMode=ldap

  # Update backend account information with local authentication mode in default(huawei-csi) namespace
  oceanctl update backend <name> --password --authenticationMode=local

  # Update backend account information with ldap authentication mode in specified namespace
  oceanctl update backend <name> -n namespace --password --authenticationMode=ldap

Flags:
      --authenticationMode string   Specify authentication mode
  -h, --help                        help for backend
  -n, --namespace string            namespace of resources
      --password                    Update account password

Global Flags:
      --log-dir string   Specify the directory for printing log files. (default "/var/log/huawei")
Example of Updating the Password of a Backend
Run the following command to update a storage backend. In the command, backend-name indicates the name of the storage backend to be updated.
oceanctl update backend backend-name --passwordEnter the user name and new password as prompted:
Please enter this backend user name:admin
Please enter this backend password:

backend/backend-name updated
6.1.2.2.2 - Updating the Login Authentication Mode of a Storage Backend
Example of Updating the Backend Login Authentication Type to LDAP
Run the following command to update a storage backend. In the command, backend-name indicates the name of the storage backend to be updated.
oceanctl update backend backend-name --password --authenticationMode=ldapEnter the user name and new password as prompted:
Please enter this backend user name:admin
Please enter this backend password:

backend/backend-name updated
6.1.2.2.3 - Updating a Storage Backend
- PVC provisioning must be based on a configured storage backend. Therefore, if a PVC has been provisioned on a storage backend, do not change the storage backend.
- The name uniquely identifies a storage backend. The name of a storage backend with a PVC provisioned cannot be changed.
- After a storage backend is modified, the new configuration applies only to volumes to be provisioned.
- Do not perform volume management operations during the modification of a storage backend.
Procedure
- Delete the storage backend to be modified. For details, see Deleting a Storage Backend .
- Create a storage backend with the same name. For details, see Configuring the Storage Backend . The storage backend name cannot be changed.
6.1.2.3 - Deleting a Storage Backend
Do not delete a storage backend when a volume management operation is being performed on it.
Example of Deleting a Backend
Run the following command to obtain information about a storage backend.
oceanctl get backendThe following is an example of the command output.
NAMESPACE     NAME         PROTOCOL    STORAGETYPE      SN                    STATUS  ONLINE  URL
huawei-csi    backend-1    roce-nvme   oceanstor-san    xxxxxxxxxxxxxxxxxxxx  Bound   true    https://192.168.129.157:8088
huawei-csi    backend-2    roce-nvme   oceanstor-san    xxxxxxxxxxxxxxxxxxxx  Bound   true    https://192.168.129.158:8088
Run the following command to delete the specified storage backend.
oceanctl delete backend backend-1Run the following command to check the deletion result.
oceanctl get backend backend-1The following is an example of the command output. If not found is displayed, the deletion is successful.
Error from server (NotFound): backend "backend-1" not found
6.1.2.4 - Adding a Storage Backend Certificate
CSI allows you to add a storage certificate to use the TLS/SSL protocol to encrypt data transmission channels, improving the security of communication with storage devices.
Prerequisites
A certificate has been created. Take OceanStor Dorado as an example. For details about how to create a certificate, click here .
Example of Creating a Certificate
Prepare a certificate file in advance, for example, cert.crt.
Run the following command to obtain information about a storage backend.
oceanctl get backendThe following is an example of the command output.
NAMESPACE     NAME         PROTOCOL    STORAGETYPE      SN                    STATUS  ONLINE  URL
huawei-csi    backend-1    roce-nvme   oceanstor-san    xxxxxxxxxxxxxxxxxxxx  Bound   true    https://192.168.129.157:8088
huawei-csi    backend-2    roce-nvme   oceanstor-san    xxxxxxxxxxxxxxxxxxxx  Bound   true    https://192.168.129.158:8088
Run the following command to create a certificate for the specified storage backend.
oceanctl create cert cert-1 -b backend-1 -f /path/to/cert.crtCheck the certificate creation result.
oceanctl get cert -b backend-1The following is an example of the command output.
NAMESPACE    NAME    BOUNDBACKEND
huawei-csi   cert-1  backend-1
6.1.2.5 - Deleting a Storage Backend Certificate
Procedure
Run the following command to obtain information about a storage backend.
oceanctl get backendThe following is an example of the command output.
NAMESPACE     NAME         PROTOCOL    STORAGETYPE      SN                    STATUS  ONLINE  URL
huawei-csi    backend-1    roce-nvme   oceanstor-san    xxxxxxxxxxxxxxxxxxxx  Bound   true    https://192.168.129.157:8088
huawei-csi    backend-2    roce-nvme   oceanstor-san    xxxxxxxxxxxxxxxxxxxx  Bound   true    https://192.168.129.158:8088
Run the following command to obtain information about the certificate of the specified storage backend.
oceanctl get cert -b backend-1The following is an example of the command output.
NAMESPACE   NAME    BOUNDBACKEND
huawei-csi  cert-1  backend-1
Run the following command to delete the certificate of the specified storage backend.
oceanctl delete cert -b backend-1Check the deletion result.
oceanctl get cert -b backend-1The following is an example of the command output. If no cert found is displayed, the deletion is successful.
Error from server (NotFound): no cert found on backend backend-1 in huawei-csi namespace
6.2 - StorageClass Management
A StorageClass provides administrators with methods to describe a storage “class”. Different types may map to a different group of capability definitions. Kubernetes cluster users can dynamically provision volumes based on a StorageClass.
6.2.1 - Configuring a StorageClass
Cluster administrators can define multiple StorageClass objects as required. When configuring a PVC, the cluster administrators need to specify a StorageClass that meets service requirements. When applying for resources from Huawei storage devices, Huawei CSI creates storage resources that meet service requirements based on the preset StorageClass.
6.2.1.1 - Flash Storage (OceanStor Dorado/OceanStor V5/OceanStor V6 and Later)
6.2.1.1.1 - File System
Creating a StorageClass
Prepare a StorageClass configuration file, for example, mysc.yaml. For details about the StorageClass configuration, see the following example.
Run the following command to create a StorageClass using the configuration file.
kubectl apply -f mysc.yamlRun the following command to view the information about the created StorageClass.
kubectl get sc myscThe following is an example of the command output.
NAME   PROVISIONER      RECLAIMPOLICY   VOLUMEBINDINGMODE   ALLOWVOLUMEEXPANSION   AGE
mysc   csi.huawei.com   Delete          Immediate           true                   8s
NFS Protocol Configuration Example
When a container uses the NFS protocol to connect to file system resources, refer to the following StorageClass configuration example. In this example, NFS version 4.1 is specified for mounting.
kind: StorageClass
apiVersion: storage.k8s.io/v1
metadata:
  name: mysc
provisioner: csi.huawei.com
parameters:
  backend: nfs-nas-181
  pool: StoragePool001
  volumeType: fs
  allocType: thin
  authClient: "*"
mountOptions:
  - nfsvers=4.1 # Specify the version 4.1 for NFS mounting.
NFS+ Protocol Configuration Example
When a container uses the NFS+ protocol to connect to file system resources, refer to the following StorageClass configuration example.
kind: StorageClass
apiVersion: storage.k8s.io/v1
metadata:
  name: mysc
provisioner: csi.huawei.com
parameters:
  backend: nfs-nas-181
  pool: StoragePool001
  volumeType: fs
  allocType: thin
  authClient: "*"
HyperMetro File System Configuration Example
When a container uses an NFS HyperMetro file system as a storage resource, refer to the following configuration example. In this example, the used backend supports HyperMetro, and hyperMetro is set to true.
kind: StorageClass
apiVersion: storage.k8s.io/v1
metadata:
  name: mysc
provisioner: csi.huawei.com
parameters:
  backend: nfs-hypermetro-dorado-181
  pool: pool001
  volumeType: fs
  hyperMetro: "true" # Provision HyperMetro volumes.
  allocType: thin
  authClient: "*"
- Before provisioning a NAS HyperMetro volume, you need to configure the HyperMetro relationship between two storage devices, including the remote device and HyperMetro domain. The HyperMetro domain of the file system can only work in HyperMetro AA mode. For details about the configuration operation, see the product documentation of the corresponding storage model.
- If a storage device is faulty, the logical management port may fail over. Deleting a PVC in the failover state will delete resources only at one end. You need to manually clear the storage resources at the peer end.
StorageClass Parameters Supported by File Systems
Table 1 StorageClass configuration parameters
Take Kubernetes v1.22.1 as an example. The value can contain digits, lowercase letters, hyphens (-), and periods (.), and must start and end with a letter or digit. | |||||
Set this parameter to the driver name set during Huawei CSI installation. The value is the same as that of driverName in the values.yaml file. | |||||
Reclamation policy. The following types are supported: | |||||
Whether to allow volume expansion. If this parameter is set to true, the capacity of the PV that uses the StorageClass can be expanded. | This function can only be used to expand PV capacity but cannot be used to reduce PV capacity. | ||||
List of mount parameters, which can be used to specify the parameters of the -o option when the mount command is executed on a host. | For details about common parameters in mountOptions, see Table 2. | ||||
Name of the backend where the resource to be created is located. This field must be set if parameters.pool is set. | If this parameter is not set, Huawei CSI will randomly select a backend that meets the capacity requirements to create resources. You are advised to specify a backend to ensure that the created resource is located on the expected backend. | ||||
Name of the storage resource pool where the resource to be created is located. | If this parameter is not set, Huawei CSI will randomly select a storage pool that meets the capacity requirements from the selected backend to create resources. You are advised to specify a storage pool to ensure that the created resource is located in the expected storage pool. | ||||
Name of the storage resource created by dynamic volume provisioning. You can configure a placeholder to customize the storage resource name. The following placeholders are supported:
|
PVC namespace: namespace. PVC name: pvc-1. PVC UID: c2fd3f46-bf17-4a7d-b88e-2e3232bae434. volumeName is set to prefix-{{ .PVCNamespace }}_{{ .PVCName }}. The ultimate storage resource name is prefix-namespace_pvc-1-c2fd3f46bf174a7db88e2e3232bae434. | ||||
Type of the volume to be created. The following types are supported: | |||||
Allocation type of the volume to be created. The following types are supported: | If this parameter is set to thin, the required space is not allocated immediately when a volume is created. Instead, the space is dynamically allocated based on the usage. | ||||
IP address of the NFS client that can access the volume. You can enter the client host name (a full domain name is recommended), client IP address, or client IP address segment. | The asterisk (*) can be used to indicate any client. If you are not sure about the IP address of the access client, you are advised to use the asterisk (*) to prevent the client access from being rejected by the storage system. If the client host name is used, you are advised to use the full domain name. The IP addresses can be IPv4 addresses, IPv6 addresses, or a combination of IPv4 and IPv6 addresses. You can enter multiple host names, IP addresses, or IP address segments and separate them with semicolons (;). Example: 192.168.0.10;192.168.0.0/24;myserver1.test | ||||
Whether to wait for the clone pair synchronization to complete during PVC creation. | In HyperMetro scenarios, this parameter can only be set to "true". | ||||
Clone speed. The value ranges from 1 to 4. | This parameter takes effect when a persistent volume is cloned or a persistent volume is created from a snapshot. | ||||
Log in to DeviceManager and choose Services > File Service > File Systems > Create to obtain the application type name. | |||||
QoS settings of the file system on the storage side of the PV. The value of the parameter is JSON character strings in dictionary format. A character string is enclosed by single quotation marks and the dictionary key by double quotation marks. Example: '{"maxMBPS": 999, "maxIOPS": 999}' | For details about the supported QoS configurations, see Table 3. | ||||
Whether a HyperMetro volume is to be created. This parameter needs to be configured when the backend is of the HyperMetro type. | When the used backend is a HyperMetro backend and a HyperMetro volume needs to be provisioned, set this parameter to "true". If this parameter is set to "false", services may be interrupted if the logical management port connected to the backend fails over. | ||||
Data synchronization speed of a HyperMetro pair. The value ranges from 1 to 4. | The configuration takes effect when a HyperMetro volume is created.
| ||||
For details about the configuration format, refer to the Linux permission settings, for example, 777 and 755. | |||||
Controls the root permission of the client. | |||||
Whether to retain the user ID (UID) and group ID (GID) of a shared directory. | |||||
Configures the krb5 security protocol. | During mounting, you can specify the sec parameter in mountOptions. | ||||
Configures the krb5i security protocol. | During mounting, you can specify the sec parameter in mountOptions. | ||||
Configures the krb5p security protocol. | During mounting, you can specify the sec parameter in mountOptions. | ||||
Whether the snapshot directory is visible. | |||||
OceanStor Dorado 6.1.5+ and OceanStor 6.1.5+ NAS storage devices are supported. | |||||
Whether to disable volume capacity verification. After this function is disabled, the system will not verify whether the volume capacity is an integer multiple of the sector size. | For OceanStor Dorado and OceanStor storage, the sector size is 512 bytes. | ||||
Advanced volume creation parameters. The value of the parameter is JSON character strings in dictionary format. A character string is enclosed by single quotation marks and the dictionary key by double quotation marks. Example: '{"CAPACITYTHRESHOLD": 90}' | For details about the supported advanced parameters, see Table 4. |
Table 2 Common parameters in mountOptions
Table 3 Supported QoS configurations
Table 4 Supported advanced volume creation parameters
For details about the default value and value range, see the corresponding storage product manual. |
6.2.1.1.2 - Dtree
Creating a StorageClass
Prepare a StorageClass configuration file, for example, mysc.yaml. For details about the StorageClass configuration, see the following example.
Run the following command to create a StorageClass using the configuration file.
kubectl apply -f mysc.yamlRun the following command to view the information about the created StorageClass.
kubectl get sc myscThe following is an example of the command output.
NAME   PROVISIONER      RECLAIMPOLICY   VOLUMEBINDINGMODE   ALLOWVOLUMEEXPANSION   AGE
mysc   csi.huawei.com   Delete          Immediate           true                   8s
Example of StorageClass Configuration Supported by the NFS Protocol
When a container uses the NFS protocol to connect to dtree resources, refer to the following StorageClass configuration example. In this example, NFS version 4.1 is specified for mounting.
kind: StorageClass
apiVersion: storage.k8s.io/v1
metadata:
  name: mysc
provisioner: csi.huawei.com
parameters:
  backend: nfs-dtree-181
  parentname: parent-filesystem-name
  volumeType: dtree
  authClient: "*"
mountOptions:
  - nfsvers=4.1 # Specify the version 4.1 for NFS mounting.
Example of StorageClass Configuration Supported by the NFS+ Protocol
When a container uses the NFS+ protocol to connect to dtree resources, refer to the following StorageClass configuration example.
kind: StorageClass
apiVersion: storage.k8s.io/v1
metadata:
  name: mysc
provisioner: csi.huawei.com
parameters:
  backend: nfs-dtree-181
  parentname: parent-filesystem-name
  volumeType: dtree
  authClient: "*"
Storage Class Parameters Supported by Dtrees
Table 1 StorageClass configuration parameters
Take Kubernetes v1.22.1 as an example. The value can contain digits, lowercase letters, hyphens (-), and periods (.), and must start and end with a letter or digit. | |||||
Set this parameter to the driver name set during Huawei CSI installation. The value is the same as that of driverName in the values.yaml file. | |||||
Reclamation policy. The following types are supported: | |||||
Whether to allow volume expansion. If this parameter is set to true, the capacity of the PV that uses the StorageClass can be expanded. | This function can only be used to expand PV capacity but cannot be used to reduce PV capacity. | ||||
List of mount parameters, which can be used to specify the parameters of the -o option when the mount command is executed on a host. | For details about common parameters in mountOptions, see Table 2. | ||||
Name of the backend where the resource to be created is located. | If this parameter is not set, Huawei CSI will randomly select a backend that meets the capacity requirements to create resources. You are advised to specify a backend to ensure that the created resource is located on the expected backend. This parameter is mandatory if parameters.parentname is configured. | ||||
Name of a file system on the current storage device. Dtree is created in the file system. | This parameter is mandatory when parentname is not configured for the backend. If parentname is configured only in the StorageClass but not configured in the storage backend, set CSIDriverObject.attachRequired to true during CSI installation. | ||||
Name of the storage resource created by dynamic volume provisioning. You can configure a placeholder to customize the storage resource name. The following placeholders are supported:
|
PVC namespace: namespace. PVC name: pvc-1. PVC UID: c2fd3f46-bf17-4a7d-b88e-2e3232bae434. volumeName is set to prefix-{{ .PVCNamespace }}_{{ .PVCName }}. The ultimate storage resource name is prefix-namespace_pvc-1-c2fd3f46bf174a7db88e2e3232bae434. | ||||
Type of the volume to be created. The following types are supported: | |||||
IP address of the NFS client that can access the volume. You can enter the client host name (a full domain name is recommended), client IP address, or client IP address segment. | The asterisk (*) can be used to indicate any client. If you are not sure about the IP address of the access client, you are advised to use the asterisk (*) to prevent the client access from being rejected by the storage system. If the client host name is used, you are advised to use the full domain name. The IP addresses can be IPv4 addresses, IPv6 addresses, or a combination of IPv4 and IPv6 addresses. You can enter multiple host names, IP addresses, or IP address segments and separate them with semicolons (;). Example: 192.168.0.10;192.168.0.0/24;myserver1.test | ||||
For details about the configuration format, refer to the Linux permission settings, for example, 777 and 755. | |||||
Controls the root permission of the client. | |||||
Whether to retain the user ID (UID) and group ID (GID) of a shared directory. | |||||
Configures the krb5 security protocol. | During mounting, you can specify the sec parameter in mountOptions. | ||||
Configures the krb5i security protocol. | During mounting, you can specify the sec parameter in mountOptions. | ||||
Configures the krb5p security protocol. | During mounting, you can specify the sec parameter in mountOptions. | ||||
Whether to disable volume capacity verification. After this function is disabled, the system will not verify whether the volume capacity is an integer multiple of the sector size.
| For OceanStor Dorado and OceanStor storage, the sector size is 512 bytes. | ||||
Table 2 Common parameters in mountOptions
6.2.1.1.3 - Block Service
Creating a StorageClass
Prepare a StorageClass configuration file, for example, mysc.yaml. For details about the StorageClass configuration, see the following example.
Run the following command to create a StorageClass using the configuration file.
kubectl apply -f mysc.yamlRun the following command to view the information about the created StorageClass.
kubectl get sc myscThe following is an example of the command output.
NAME   PROVISIONER      RECLAIMPOLICY   VOLUMEBINDINGMODE   ALLOWVOLUMEEXPANSION   AGE
mysc   csi.huawei.com   Delete          Immediate           true                   8s
Block Storage Class Configuration Example
If LUNs are used as storage resources and the file system needs to be formatted to a local file system, refer to the following example.
kind: StorageClass
apiVersion: storage.k8s.io/v1
metadata:
  name: mysc
provisioner: csi.huawei.com
parameters:
  backend: lun-181
  pool: StoragePool001
  volumeType: lun
  allocType: thin
  fsType: ext4
StorageClass Parameters Supported by Block Services
Table 1 StorageClass configuration parameters
Take Kubernetes v1.22.1 as an example. The value can contain digits, lowercase letters, hyphens (-), and periods (.), and must start and end with a letter or digit. | |||||
Set this parameter to the driver name set during Huawei CSI installation. The value is the same as that of driverName in the values.yaml file. | |||||
Reclamation policy. The following types are supported: | |||||
Whether to allow volume expansion. If this parameter is set to true, the capacity of the PV that uses the StorageClass can be expanded. | This function can only be used to expand PV capacity but cannot be used to reduce PV capacity. | ||||
List of mount parameters, which can be used to specify the parameters of the -o option when the mount command is executed on a host. | For details about common parameters in mountOptions, see Table 2. | ||||
Name of the backend where the resource to be created is located. This field must be set if parameters.pool is set. | If this parameter is not set, Huawei CSI will randomly select a backend that meets the capacity requirements to create resources. You are advised to specify a backend to ensure that the created resource is located on the expected backend. | ||||
Name of the storage resource pool where the resource to be created is located. | If this parameter is not set, Huawei CSI will randomly select a storage pool that meets the capacity requirements from the selected backend to create resources. You are advised to specify a storage pool to ensure that the created resource is located in the expected storage pool. | ||||
Name of the storage resource created by dynamic volume provisioning. You can configure a placeholder to customize the storage resource name. The following placeholders are supported:
|
PVC namespace: namespace. PVC name: pvc-1. PVC UID: c2fd3f46-bf17-4a7d-b88e-2e3232bae434. volumeName is set to prefix-{{ .PVCNamespace }}_{{ .PVCName }}. The ultimate storage resource name is prefix-namespace_pvc-1-c2fd3f46bf174a7db88e2e3232bae434. | ||||
Type of the volume to be created. The following types are supported: | |||||
Allocation type of the volume to be created. The following types are supported: | If this parameter is set to thin, the required space is not allocated immediately when a volume is created. Instead, the space is dynamically allocated based on the usage. | ||||
Type of a host file system. The supported types are:
| This parameter is available only when volumeMode of the PVC is set to Filesystem. | ||||
Clone speed. The value ranges from 1 to 4. | This parameter takes effect when a PVC is cloned or a PVC is created from a snapshot. | ||||
Log in to DeviceManager and choose Services > Block Service > LUN Groups (or Namespace Groups) > LUNs (or Namespaces) > Create to obtain the application type name. | |||||
LUN/NAS QoS settings of the PV on the storage side. The value of the parameter is JSON character strings in dictionary format. A character string is enclosed by single quotation marks and the dictionary key by double quotation marks. Example: '{"maxMBPS": 999, "maxIOPS": 999}' | For details about the supported QoS configurations, see Table 3. | ||||
For details about the configuration format, refer to the Linux permission settings, for example, 777 and 755. | |||||
Whether to disable volume capacity verification. After this function is disabled, the system will not verify whether the volume capacity is an integer multiple of the sector size. | For OceanStor Dorado and OceanStor storage, the sector size is 512 bytes. | ||||
Whether a HyperMetro volume is to be created. This parameter needs to be configured when the backend is of the HyperMetro type. | If the backend is of the HyperMetro type and HyperMetro volumes need to be provisioned, set this parameter to "true". If the parameter is not configured, common volumes will be provisioned. | ||||
Data synchronization speed of a HyperMetro pair. The value ranges from 1 to 4. | The configuration takes effect when a HyperMetro volume is created.
|
Table 2 Common parameters in mountOptions
Automatically triggers the Trim or Discard operation when a file system is mounted. This operation instructs a block device to release unused blocks. |
Table 3 Supported QoS configurations
6.2.1.2 - Flash Storage (OceanStor A600/A800)
6.2.1.2.1 - File System
Creating a StorageClass
Prepare a StorageClass configuration file, for example, mysc.yaml. For details about the StorageClass configuration, see the following example.
Run the following command to create a StorageClass using the configuration file.
kubectl apply -f mysc.yamlRun the following command to view the information about the created StorageClass.
kubectl get sc myscThe following is an example of the command output.
NAME   PROVISIONER      RECLAIMPOLICY   VOLUMEBINDINGMODE   ALLOWVOLUMEEXPANSION   AGE
mysc   csi.huawei.com   Delete          Immediate           true                   8s
NFS Protocol Configuration Example
When a container uses the NFS protocol to connect to file system resources, refer to the following StorageClass configuration example. In this example, NFS version 4.1 is specified for mounting.
kind: StorageClass
apiVersion: storage.k8s.io/v1
metadata:
  name: mysc
provisioner: csi.huawei.com
parameters:
  backend: nfs-nas-181
  pool: StoragePool001
  volumeType: fs
  allocType: thin
  authClient: "*"
mountOptions:
  - nfsvers=4.1 # Specify the version 4.1 for NFS mounting.
DataTurbo Protocol Configuration Example
If a container uses OceanStor A series storage and the storage supports DataTurbo-based access, you can refer to the following configuration example. In this example, the DataTurbo share user name is user01.
kind: StorageClass
apiVersion: storage.k8s.io/v1
metadata:
  name: mysc
provisioner: csi.huawei.com
parameters:
  backend: dtfs-nas-181
  pool: pool001
  volumeType: fs
  allocType: thin
  authUser: user01
KV Cache Configuration Example
If a container uses OceanStor A series storage and the storage supports KV cache, you can refer to the following configuration example for the NFS protocol. KV cache also supports the DTFS protocol. For details about the configuration, see the parameter description.
kind: StorageClass
apiVersion: storage.k8s.io/v1
metadata:
  name: mysc
provisioner: csi.huawei.com
parameters:
  enableKVCache: "true"
  backend: nfs-nas-181
  pool: StoragePool001
  volumeType: fs
  allocType: thin
  authClient: "*"
mountOptions:
  - nfsvers=4.1 # Specify the version 4.1 for NFS mounting.
StorageClass Parameters Supported by File Services
Table 1 StorageClass configuration parameters
Take Kubernetes v1.22.1 as an example. The value can contain digits, lowercase letters, hyphens (-), and periods (.), and must start and end with a letter or digit. | |||||
Set this parameter to the driver name set during Huawei CSI installation. The value is the same as that of driverName in the values.yaml file. | |||||
Reclamation policy. The following types are supported: | |||||
Whether to allow volume expansion. If this parameter is set to true, the capacity of the PV that uses the StorageClass can be expanded. | This function can only be used to expand PV capacity but cannot be used to reduce PV capacity. | ||||
List of mount parameters, which can be used to specify the parameters of the -o option when the mount command is executed on a host. | For details about common parameters in mountOptions, see Table 2. | ||||
Name of the backend where the resource to be created is located. This field must be set if parameters.pool is set. | If this parameter is not set, Huawei CSI will randomly select a backend that meets the capacity requirements to create resources. You are advised to specify a backend to ensure that the created resource is located on the expected backend. | ||||
Name of the storage resource pool where the resource to be created is located. | If this parameter is not set, Huawei CSI will randomly select a storage pool that meets the capacity requirements from the selected backend to create resources. You are advised to specify a storage pool to ensure that the created resource is located in the expected storage pool. | ||||
Name of the storage resource created by dynamic volume provisioning. You can configure a placeholder to customize the storage resource name. The following placeholders are supported:
|
PVC namespace: namespace. PVC name: pvc-1. PVC UID: c2fd3f46-bf17-4a7d-b88e-2e3232bae434. volumeName is set to prefix-{{ .PVCNamespace }}_{{ .PVCName }}. The ultimate storage resource name is prefix-namespace_pvc-1-c2fd3f46bf174a7db88e2e3232bae434. | ||||
Type of the volume to be created. The following types are supported: | |||||
Allocation type of the volume to be created. The following types are supported: | If this parameter is set to thin, the required space is not allocated immediately when a volume is created. Instead, the space is dynamically allocated based on the usage. | ||||
IP address of the NFS client that can access the volume. This parameter is mandatory when the nfs or nfs+ protocol is used. You can enter the client host name (a full domain name is recommended), client IP address, or client IP address segment. | The asterisk (*) can be used to indicate any client. If you are not sure about the IP address of the access client, you are advised to use the asterisk (*) to prevent the client access from being rejected by the storage system. If the client host name is used, you are advised to use the full domain name. The IP addresses can be IPv4 addresses, IPv6 addresses, or a combination of IPv4 and IPv6 addresses. You can enter multiple host names, IP addresses, or IP address segments and separate them with semicolons (;). Example: 192.168.0.10;192.168.0.0/24;myserver1.test | ||||
DataTurbo user who can access the DataTurbo share. This parameter is mandatory when the DataTurbo (DTFS) protocol is used. | You can enter multiple DataTurbo users at a time and separate them with semicolons (;). Example: auth_user1;auth_user2;auth_user3 | ||||
Log in to DeviceManager and choose Services > File Service > File Systems > Create to obtain the application type name. | |||||
For details about the configuration format, refer to the Linux permission settings, for example, 777 and 755. | |||||
Controls the root permission of the client. | |||||
Whether to retain the user ID (UID) and group ID (GID) of a shared directory. | |||||
Whether to disable volume capacity verification. After this function is disabled, the system will not verify whether the volume capacity is an integer multiple of the sector size. | |||||
Advanced volume creation parameters. The value of the parameter is JSON character strings in dictionary format. A character string is enclosed by single quotation marks and the dictionary key by double quotation marks. Example: '{"CAPACITYTHRESHOLD": 90}' | For details about the supported advanced parameters, see Table 3. | ||||
Whether to create a KV cache store. | If this parameter is set to "true", parameters.applicationType can only be set to NAS_AI_Inference or left empty. | ||||
Whether to enable proactive clearing for a KV cache. | No matter whether this parameter is set to "true" or "false", the background clears the KV cache when the memory store capacity is insufficient. When this parameter is set to "true", the background clears the expired KV cache. | ||||
KV cache expiration time. The value ranges from 1 to 3650 days. Example: 1 | This parameter is mandatory when parameters.enableTimeAwareGc is set to true. |
Table 2 Common parameters in mountOptions
NFS mount option on the host. The following mount option is supported: nfsvers: protocol version for NFS mounting. The value can be 3, 4, 4.0, 4.1, or 4.2. | This parameter specified after the -o parameter is optional when the mount command is executed on the host. The value is in list format. If the NFS version is specified for mounting, NFS 3, 4.0, 4.1, and 4.2 protocols are supported (the protocol must be supported and enabled on storage devices). If nfsvers is set to 4, the latest protocol version NFS 4 may be used for mounting due to different OS configurations, for example, 4.2. If the 4.0 protocol is required, you are advised to set nfsvers to 4.0. | |||
Domain name of the logical port used for mounting when the DataTurbo(dtfs) protocol is used. | To mount the HyperScale cluster file system, enter the domain name of the HyperScale cluster. The description of the dn parameter is for reference only. For details about other mounting parameters of the DataTurbo protocol, see OceanStor DataTurbo DTFS User Guide. |
Table 3 Supported advanced volume creation parameters
For details about the default value and value range, see the corresponding storage product manual. |
6.2.1.3 - DME (Interconnected with an OceanStor A800 Cluster)
6.2.1.3.1 - File System
Creating a StorageClass
Prepare a StorageClass configuration file, for example, mysc.yaml. For details about the StorageClass configuration, see the following example.
Run the following command to create a StorageClass using the configuration file.
kubectl apply -f mysc.yamlRun the following command to view the information about the created StorageClass.
kubectl get sc myscThe following is an example of the command output.
NAME   PROVISIONER      RECLAIMPOLICY   VOLUMEBINDINGMODE   ALLOWVOLUMEEXPANSION   AGE
mysc   csi.huawei.com   Delete          Immediate           true                   8s
NFS Protocol Configuration Example
When a container uses the NFS protocol to connect to global file system resources, refer to the following StorageClass configuration example. In this example, NFS version 3 is specified for mounting.
kind: StorageClass
apiVersion: storage.k8s.io/v1
metadata:
  name: mysc
provisioner: csi.huawei.com
parameters:
  backend: nfs-nas-181
  pool: StoragePool001
  volumeType: fs
  allocType: thin
  authClient: "*"
mountOptions:
  - nfsvers=3 # Specify the version 3 for NFS mounting.
DataTurbo Protocol Configuration Example
When a container uses the DataTurbo protocol to connect to global file system resources, refer to the following configuration example. In this example, the DataTurbo share user name is user01.
kind: StorageClass
apiVersion: storage.k8s.io/v1
metadata:
  name: mysc
provisioner: csi.huawei.com
parameters:
  backend: dtfs-nas-181
  pool: pool001
  volumeType: fs
  allocType: thin
  authUser: user01
mountOptions:
- dn=xxx # Specify the domain name of the logical port as xxx.
StorageClass Parameters Supported by File Services
Table 1 StorageClass configuration parameters
Take Kubernetes v1.22.1 as an example. The value can contain digits, lowercase letters, hyphens (-), and periods (.), and must start and end with a letter or digit. | |||||
Set this parameter to the driver name set during Huawei CSI installation. The value is the same as that of driverName in the values.yaml file. | |||||
Reclamation policy. The following types are supported: | |||||
Whether to allow volume expansion. If this parameter is set to true, the capacity of the PV that uses the StorageClass can be expanded. | This function can only be used to expand PV capacity but cannot be used to reduce PV capacity. | ||||
List of mount parameters, which can be used to specify the parameters of the -o option when the mount command is executed on a host. | For details about common parameters in mountOptions, see Table 2. | ||||
Name of the backend where the resource to be created is located. This field must be set if parameters.pool is set. | If this parameter is not set, Huawei CSI will randomly select a backend that meets the capacity requirements to create resources. You are advised to specify a backend to ensure that the created resource is located on the expected backend. | ||||
Name of the storage resource pool where the resource to be created is located. | If this parameter is not set, Huawei CSI will randomly select a storage pool that meets the capacity requirements from the selected backend to create resources. You are advised to specify a storage pool to ensure that the created resource is located in the expected storage pool. | ||||
Name of the storage resource created by dynamic volume provisioning. You can configure a placeholder to customize the storage resource name. The following placeholders are supported:
|
PVC namespace: namespace. PVC name: pvc-1. PVC UID: c2fd3f46-bf17-4a7d-b88e-2e3232bae434. volumeName is set to prefix-{{ .PVCNamespace }}_{{ .PVCName }}. The ultimate storage resource name is prefix-namespace_pvc-1-c2fd3f46bf174a7db88e2e3232bae434. | ||||
Type of the volume to be created. The following types are supported: | |||||
Allocation type of the volume to be created. The following types are supported: | If this parameter is set to thin, the required space is not allocated immediately when a volume is created. Instead, the space is dynamically allocated based on the usage. | ||||
IP address of the NFS client that can access the volume. This parameter is mandatory when the nfs or nfs+ protocol is used. You can enter the client host name (a full domain name is recommended), client IP address, or client IP address segment. | The asterisk (*) can be used to indicate any client. If you are not sure about the IP address of the access client, you are advised to use the asterisk (*) to prevent the client access from being rejected by the storage system. If the client host name is used, you are advised to use the full domain name. The IP addresses can be IPv4 addresses, IPv6 addresses, or a combination of IPv4 and IPv6 addresses. You can enter multiple host names, IP addresses, or IP address segments and separate them with semicolons (;). Example: 192.168.0.10;192.168.0.0/24;myserver1.test | ||||
DataTurbo user who can access the DataTurbo share. This parameter is mandatory when the DataTurbo(dtfs) protocol is used. | You can enter multiple DataTurbo users at a time and separate them with semicolons (;). Example: auth_user1;auth_user2;auth_user3 | ||||
Controls the root permission of the client. | |||||
Whether to retain the user ID (UID) and group ID (GID) of a shared directory. | |||||
Whether to disable volume capacity verification. After this function is disabled, the system will not verify whether the volume capacity is an integer multiple of the sector size.
| |||||
Table 2 Common parameters in mountOptions
NFS mount option on the host. The following mount option is supported: nfsvers: protocol version for NFS mounting. The value can be 3. | This parameter specified after the -o parameter is optional when the mount command is executed on the host. The value is in list format. If the NFS version is specified for mounting, the NFS 3 protocol is supported (the protocol must be supported and enabled on storage devices). | |||
Domain name of the logical port used for mounting when the DataTurbo(dtfs) protocol is used. | To mount the HyperScale cluster file system, enter the domain name of the HyperScale cluster. The description of the dn parameter is for reference only. For details about other mounting parameters of the DataTurbo protocol, see OceanStor DataTurbo DTFS User Guide. |
6.2.1.4 - Mass Storage (OceanStor Pacific/FusionStorage Block Series)
6.2.1.4.1 - File System
Creating a StorageClass
Prepare a StorageClass configuration file, for example, mysc.yaml. For details about the StorageClass configuration, see the following example.
Run the following command to create a StorageClass using the configuration file.
kubectl apply -f mysc.yamlRun the following command to view the information about the created StorageClass.
kubectl get sc myscThe following is an example of the command output.
NAME   PROVISIONER      RECLAIMPOLICY   VOLUMEBINDINGMODE   ALLOWVOLUMEEXPANSION   AGE
mysc   csi.huawei.com   Delete          Immediate           true                   8s
NFS Protocol Configuration Example
When a container uses the NFS protocol to connect to file system resources, refer to the following StorageClass configuration example. In this example, NFS version 4.1 is specified for mounting.
kind: StorageClass
apiVersion: storage.k8s.io/v1
metadata:
  name: mysc
provisioner: csi.huawei.com
parameters:
  backend: nfs-nas-181
  pool: pool001
  volumeType: fs
  allocType: thin
  authClient: "*"
mountOptions:
  - nfsvers=4.1 # Specify the version 4.1 for NFS mounting.
DPC Protocol Configuration Example
When the storage supports access using the DPC protocol, you can configure the mount parameters for DPC access in the StorageClass. In this example, acl is used as the authentication parameter for mounting, and cnflush is used to set the asynchronous disk flushing mode.
kind: StorageClass
apiVersion: storage.k8s.io/v1
metadata:
  name: mysc
provisioner: csi.huawei.com
parameters:
  backend: nfs-dpc-101
  pool: pool001
  volumeType: fs
  allocType: thin
mountOptions:
  - acl # Set the authentication parameter.
  - cnflush # Set the asynchronous disk flushing mode.
StorageClass Parameters Supported by File Systems
Table 1 StorageClass configuration parameters
Take Kubernetes v1.22.1 as an example. The value can contain digits, lowercase letters, hyphens (-), and periods (.), and must start and end with a letter or digit. | |||||
Set this parameter to the driver name set during Huawei CSI installation. The value is the same as that of driverName in the values.yaml file. | |||||
Reclamation policy. The following types are supported: | |||||
Whether to allow volume expansion. If this parameter is set to true, the capacity of the PV that uses the StorageClass can be expanded. | This function can only be used to expand PV capacity but cannot be used to reduce PV capacity. | ||||
List of mount parameters, which can be used to specify the parameters of the -o option when the mount command is executed on a host. | For details about common parameters in mountOptions, see Table 2. | ||||
Name of the backend where the resource to be created is located. This field must be set if parameters.pool is set. | If this parameter is not set, Huawei CSI will randomly select a backend that meets the capacity requirements to create resources. You are advised to specify a backend to ensure that the created resource is located on the expected backend. | ||||
Name of the storage resource pool where the resource to be created is located. | If this parameter is not set, Huawei CSI will randomly select a storage pool that meets the capacity requirements from the selected backend to create resources. You are advised to specify a storage pool to ensure that the created resource is located in the expected storage pool. | ||||
Type of the volume to be created. The following types are supported: | |||||
Allocation type of the volume to be created. The following types are supported: | If this parameter is set to thin, the required space is not allocated immediately when a volume is created. Instead, the space is dynamically allocated based on the usage. | ||||
IP address of the NFS client that can access the volume. This parameter is mandatory when the NFS protocol is used. You can enter the client host name (a full domain name is recommended), client IP address, or client IP address segment. | The asterisk (*) can be used to indicate any client. If you are not sure about the IP address of the access client, you are advised to use the asterisk (*) to prevent the client access from being rejected by the storage system. If the client host name is used, you are advised to use the full domain name. The IP addresses can be IPv4 addresses, IPv6 addresses, or a combination of IPv4 and IPv6 addresses. You can enter multiple host names, IP addresses, or IP address segments and separate them with semicolons (;). Example: 192.168.0.10;192.168.0.0/24;myserver1.test | ||||
The value of the parameter is JSON character strings in dictionary format. A character string is enclosed by single quotation marks and the dictionary key by double quotation marks. Example: '{"spaceQuota": "softQuota", "gracePeriod": 100}' | For details about the supported quota configurations, see Table 4. | ||||
QoS settings of the file system on the storage side of the PV. The value of the parameter is JSON character strings in dictionary format. A character string is enclosed by single quotation marks and the dictionary key by double quotation marks. Example: '{"maxMBPS": 999, "maxIOPS": 999}' | For details about the supported QoS configurations, see Table 3. | ||||
For details about the configuration format, refer to the Linux permission settings, for example, 777 and 755. | |||||
Controls the root permission of the client. | |||||
Whether to retain the user ID (UID) and group ID (GID) of a shared directory. | |||||
Whether the snapshot directory is visible. | |||||
Whether to disable volume capacity verification. After this function is disabled, the system will not verify whether the volume capacity is an integer multiple of the sector size. |
Table 2 Common parameters in mountOptions
NFS mount option on the host. The following mount option is supported: nfsvers: protocol version for NFS mounting. The value can be 3 or 4.1. | This parameter is optional after the -o parameter when the mount command is executed on the host. The value is in list format. If the NFS version is specified for mounting, NFS 3 and 4.1 protocols are supported (the protocol must be supported and enabled on storage devices). | |||
If the transmission protocol is rdma, set this parameter to 20049. | ||||
The DPC namespace supports the ACL function. The DPC client supports POSIX ACL, NFSv4 ACL, and NT ACL authentication. | The descriptions of acl, aclonlyposix, cnflush, and cflush are for reference only. For details about the parameters, see OceanStor Pacific Series Product Documentation and choose Configuration > Basic Service Configuration Guide for File > Configuring Basic Services (DPC Scenario) > Accessing a DPC Share on a Client > Step 2. | |||
The DPC namespace supports POSIX ACL, and the DPC client supports POSIX ACL authentication. The following protocols support POSIX ACL: DPC, NFSv3, and HDFS. If NFSv4 ACL or NT ACL is used, the DPC client cannot identify the ACL of this type. As a result, the ACL of this type does not take effect. | If aclonlyposix and acl are used together, only acl takes effect. That is, the namespace supports the ACL function. | |||
Asynchronous disk flushing mode. That is, data is not flushed to disks immediately when files in the namespace are closed. | Asynchronous flushing mode: When a file is closed, data in the cache is not flushed to storage media in synchronous mode. Instead, data is written from the cache to the storage media in asynchronous flushing mode. After the write service is complete, data is flushed from the cache to disks periodically based on the flushing period. In a multi-client scenario, if concurrent operations are performed on the same file, the file size update is affected by the disk flushing period. That is, the file size is updated only after the disk flushing is complete. Generally, the update is completed within several seconds. Synchronous I/Os are not affected by the disk flushing period. | |||
Synchronous disk flushing mode. That is, data is flushed to disks immediately when files in the namespace are closed. |
Table 3 Supported QoS configurations
Table 4 Supported quota configurations
This parameter is mandatory. Only softQuota or hardQuota can be configured. | ||
This parameter is conditionally optional only when spaceQuota is set to softQuota. |
6.2.1.4.2 - Dtree
Creating a StorageClass
Prepare a StorageClass configuration file, for example, mysc.yaml. For details about the StorageClass configuration, see the following example.
Run the following command to create a StorageClass using the configuration file.
kubectl apply -f mysc.yamlRun the following command to view the information about the created StorageClass.
kubectl get sc myscThe following is an example of the command output.
NAME   PROVISIONER      RECLAIMPOLICY   VOLUMEBINDINGMODE   ALLOWVOLUMEEXPANSION   AGE
mysc   csi.huawei.com   Delete          Immediate           true                   8s
Example of StorageClass Configuration Supported by the NFS Protocol
When a container uses the NFS protocol to connect to dtree resources, refer to the following StorageClass configuration example. In this example, NFS version 4.1 is specified for mounting.
kind: StorageClass
apiVersion: storage.k8s.io/v1
metadata:
  name: mysc
provisioner: csi.huawei.com
parameters:
  backend: nfs-dtree-181
  parentname: parent-filesystem-name
  volumeType: dtree
  authClient: "*"
mountOptions:
  - nfsvers=4.1 # Specify the version 4.1 for NFS mounting.
Example of StorageClass Configuration Supported by the DPC Protocol
When a container uses the DPC protocol to connect to dtree resources, refer to the following StorageClass configuration example. In this example, acl is used as the authentication parameter for mounting, and cnflush is used to set the asynchronous disk flushing mode.
kind: StorageClass
apiVersion: storage.k8s.io/v1
metadata:
  name: mysc
provisioner: csi.huawei.com
parameters:
  backend: nfs-dtree-181
  parentname: parent-filesystem-name
  volumeType: dtree
  authClient: "*"
mountOptions:
  - acl # Set the authentication parameter.
  - cnflush # Set the asynchronous disk flushing mode.
StorageClass Parameters Supported by Dtrees
Table 1 StorageClass configuration parameters
Take Kubernetes v1.22.1 as an example. The value can contain digits, lowercase letters, hyphens (-), and periods (.), and must start and end with a letter or digit. | |||||
Set this parameter to the driver name set during Huawei CSI installation. The value is the same as that of driverName in the values.yaml file. | |||||
Reclamation policy. The following types are supported: | |||||
Whether to allow volume expansion. If this parameter is set to true, the capacity of the PV that uses the StorageClass can be expanded. | This function can only be used to expand PV capacity but cannot be used to reduce PV capacity. | ||||
List of mount parameters, which can be used to specify the parameters of the -o option when the mount command is executed on a host. | For details about common parameters in mountOptions, see Table 2. | ||||
Name of the backend where the resource to be created is located. | If this parameter is not set, Huawei CSI will randomly select a backend that meets the capacity requirements to create resources. You are advised to specify a backend to ensure that the created resource is located on the expected backend. This parameter is mandatory if parameters.parentname is set. | ||||
Name of a file system on the current storage device. Dtree is created in the file system. | This parameter is mandatory when parentname is not set for the backend. If parentname is configured only in the StorageClass but not configured in the storage backend, set CSIDriverObject.attachRequired to true during CSI installation. | ||||
Type of the volume to be created. The following types are supported: | |||||
IP address of the NFS client that can access the volume. You can enter the client host name (a full domain name is recommended), client IP address, or client IP address segment. | The asterisk (*) can be used to indicate any client. If you are not sure about the IP address of the access client, you are advised to use the asterisk (*) to prevent the client access from being rejected by the storage system. If the client host name is used, you are advised to use the full domain name. The IP addresses can be IPv4 addresses, IPv6 addresses, or a combination of IPv4 and IPv6 addresses. You can enter multiple host names, IP addresses, or IP address segments and separate them with semicolons (;). Example: 192.168.0.10;192.168.0.0/24;myserver1.test | ||||
For details about the configuration format, refer to the Linux permission settings, for example, 777 and 755. | |||||
Controls the root permission of the client. | |||||
Whether to retain the user ID (UID) and group ID (GID) of a shared directory. | |||||
Whether to disable volume capacity verification. After this function is disabled, the system will not verify whether the volume capacity is an integer multiple of the sector size. |
Table 2 Common parameters in mountOptions
NFS mount option on the host. The following mount option is supported: nfsvers: protocol version for NFS mounting. The value can be 3 or 4.1. | This parameter is optional after the -o parameter when the mount command is executed on the host. The value is in list format. If the NFS version is specified for mounting, NFS 3 and 4.1 protocols are supported (the protocol must be supported and enabled on storage devices). | |||
If the transmission protocol is rdma, set this parameter to 20049. | ||||
The DPC namespace supports the ACL function. The DPC client supports POSIX ACL, NFSv4 ACL, and NT ACL authentication. | The descriptions of acl, aclonlyposix, cnflush, and cflush are for reference only. For details about the parameters, see OceanStor Pacific Series Product Documentation and choose Configuration > Basic Service Configuration Guide for File > Configuring Basic Services (DPC Scenario) > Accessing a DPC Share on a Client > Step 2. | |||
The DPC namespace supports POSIX ACL, and the DPC client supports POSIX ACL authentication. The following protocols support POSIX ACL: DPC, NFSv3, and HDFS. If NFSv4 ACL or NT ACL is used, the DPC client cannot identify the ACL of this type. As a result, the ACL of this type does not take effect. | If aclonlyposix and acl are used together, only acl takes effect. That is, the namespace supports the ACL function. | |||
Asynchronous disk flushing mode. That is, data is not flushed to disks immediately when files in the namespace are closed. | Asynchronous flushing mode: When a file is closed, data in the cache is not flushed to storage media in synchronous mode. Instead, data is written from the cache to the storage media in asynchronous flushing mode. After the write service is complete, data is flushed from the cache to disks periodically based on the flushing period. In a multi-client scenario, if concurrent operations are performed on the same file, the file size update is affected by the disk flushing period. That is, the file size is updated only after the disk flushing is complete. Generally, the update is completed within several seconds. Synchronous I/Os are not affected by the disk flushing period. | |||
Synchronous disk flushing mode. That is, data is flushed to disks immediately when files in the namespace are closed. |
6.2.1.4.3 - Block Service
Creating a StorageClass
Prepare a StorageClass configuration file, for example, mysc.yaml. For details about the StorageClass configuration, see the following example.
Run the following command to create a StorageClass using the configuration file.
kubectl apply -f mysc.yamlRun the following command to view the information about the created StorageClass.
kubectl get sc myscThe following is an example of the command output.
NAME   PROVISIONER      RECLAIMPOLICY   VOLUMEBINDINGMODE   ALLOWVOLUMEEXPANSION   AGE
mysc   csi.huawei.com   Delete          Immediate           true                   8s
Block StorageClass Configuration Example
If LUNs are used as storage resources and the file system needs to be formatted to a local file system, refer to the following example.
kind: StorageClass
apiVersion: storage.k8s.io/v1
metadata:
  name: mysc
provisioner: csi.huawei.com
parameters:
  backend: lun-181
  pool: StoragePool001
  volumeType: lun
  allocType: thin
  fsType: ext4
StorageClass Parameters Supported by Block Services
Table 1 StorageClass configuration parameters
Take Kubernetes v1.22.1 as an example. The value can contain digits, lowercase letters, hyphens (-), and periods (.), and must start and end with a letter or digit. | |||||
Set this parameter to the driver name set during Huawei CSI installation. The value is the same as that of driverName in the values.yaml file. | |||||
Reclamation policy. The following types are supported: | |||||
Whether to allow volume expansion. If this parameter is set to true, the capacity of the PV that uses the StorageClass can be expanded. | This function can only be used to expand PV capacity but cannot be used to reduce PV capacity. | ||||
List of mount parameters, which can be used to specify the parameters of the -o option when the mount command is executed on a host. | For details about common parameters in mountOptions, see Table 2. | ||||
Name of the backend where the resource to be created is located. This field must be set if parameters.pool is set. | If this parameter is not set, Huawei CSI will randomly select a backend that meets the capacity requirements to create resources. You are advised to specify a backend to ensure that the created resource is located on the expected backend. | ||||
Name of the storage resource pool where the resource to be created is located. | If this parameter is not set, Huawei CSI will randomly select a storage pool that meets the capacity requirements from the selected backend to create resources. You are advised to specify a storage pool to ensure that the created resource is located in the expected storage pool. | ||||
Type of the volume to be created. The following types are supported: | |||||
Allocation type of the volume to be created. The following types are supported: | If this parameter is set to thin, the required space is not allocated immediately when a volume is created. Instead, the space is dynamically allocated based on the usage. | ||||
Type of a host file system. The supported types are:
| This parameter is available only when volumeMode of the PVC is set to Filesystem. | ||||
LUN/NAS QoS settings of the PV on the storage side. The value of the parameter is JSON character strings in dictionary format. A character string is enclosed by single quotation marks and the dictionary key by double quotation marks. Example: '{"maxMBPS": 999, "maxIOPS": 999}' | For details about the supported QoS configurations, see Table 3. | ||||
For details about the configuration format, refer to the Linux permission settings, for example, 777 and 755. | |||||
Whether to disable volume capacity verification. After this function is disabled, the system will not verify whether the volume capacity is an integer multiple of the sector size.
|
Table 2 Common parameters in mountOptions
Automatically triggers the Trim or Discard operation when a file system is mounted. This operation instructs a block device to release unused blocks. |
Table 3 Supported QoS configurations
6.2.1.5 - Mass Storage (OceanDisk Series)
6.2.1.5.1 - File System
Creating a StorageClass
Prepare a StorageClass configuration file, for example, mysc.yaml. For details about the StorageClass configuration, see the following example.
Run the following command to create a StorageClass using the configuration file.
kubectl apply -f mysc.yamlRun the following command to view the information about the created StorageClass.
kubectl get sc myscThe following is an example of the command output.
NAME   PROVISIONER      RECLAIMPOLICY   VOLUMEBINDINGMODE   ALLOWVOLUMEEXPANSION   AGE
mysc   csi.huawei.com   Delete          Immediate           true                   8s
NFS Protocol Configuration Example
When a container uses the NFS protocol to connect to file system resources, refer to the following StorageClass configuration example. In this example, NFS version 4.0 is specified for mounting.
kind: StorageClass
apiVersion: storage.k8s.io/v1
metadata:
  name: mysc
provisioner: csi.huawei.com
parameters:
  backend: nfs-nas-181
  pool: StoragePool001
  volumeType: fs
  allocType: thin
  authClient: "*"
mountOptions:
  - nfsvers=4.0 # Specify the version 4.0 for NFS mounting.
StorageClass Parameters Supported by File Systems
Table 1 StorageClass configuration parameters
Take Kubernetes v1.22.1 as an example. The value can contain digits, lowercase letters, hyphens (-), and periods (.), and must start and end with a letter or digit. | |||||
Set this parameter to the driver name set during Huawei CSI installation. The value is the same as that of driverName in the values.yaml file. | |||||
Reclamation policy. The following types are supported: | |||||
Whether to allow volume expansion. If this parameter is set to true, the capacity of the PV that uses the StorageClass can be expanded. | This function can only be used to expand PV capacity but cannot be used to reduce PV capacity. | ||||
List of mount parameters, which can be used to specify the parameters of the -o option when the mount command is executed on a host. | For details about common parameters in mountOptions, see Table 2. | ||||
Name of the backend where the resource to be created is located. This field must be set if parameters.pool is set. | If this parameter is not set, Huawei CSI will randomly select a backend that meets the capacity requirements to create resources. You are advised to specify a backend to ensure that the created resource is located on the expected backend. | ||||
Name of the storage resource pool where the resource to be created is located. | If this parameter is not set, Huawei CSI will randomly select a storage pool that meets the capacity requirements from the selected backend to create resources. You are advised to specify a storage pool to ensure that the created resource is located in the expected storage pool. | ||||
Name of the storage resource created by dynamic volume provisioning. You can configure a placeholder to customize the storage resource name. The following placeholders are supported:
|
PVC namespace: namespace. PVC name: pvc-1. PVC UID: c2fd3f46-bf17-4a7d-b88e-2e3232bae434. volumeName is set to prefix-{{ .PVCNamespace }}_{{ .PVCName }}. The ultimate storage resource name is prefix-namespace_pvc-1-c2fd3f46bf174a7db88e2e3232bae434. | ||||
Type of the volume to be created. The following types are supported: | |||||
Allocation type of the volume to be created. The following types are supported: | If this parameter is set to thin, the required space is not allocated immediately when a volume is created. Instead, the space is dynamically allocated based on the usage. | ||||
IP address of the NFS client that can access the volume. You can enter the client host name (a full domain name is recommended), client IP address, or client IP address segment. | The asterisk (*) can be used to indicate any client. If you are not sure about the IP address of the access client, you are advised to use the asterisk (*) to prevent the client access from being rejected by the storage system. If the client host name is used, you are advised to use the full domain name. The IP addresses can be IPv4 addresses, IPv6 addresses, or a combination of IPv4 and IPv6 addresses. You can enter multiple host names, IP addresses, or IP address segments and separate them with semicolons (;). Example: 192.168.0.10;192.168.0.0/24;myserver1.test | ||||
Log in to DeviceManager and choose Services > File Service > File Systems > Create to obtain the application type name. | |||||
QoS settings of the file system on the storage side of the PV. The value of the parameter is JSON character strings in dictionary format. A character string is enclosed by single quotation marks and the dictionary key by double quotation marks. Example: '{"maxMBPS": 999, "maxIOPS": 999}' | For details about the supported QoS configurations, see Table 3. | ||||
For details about the configuration format, refer to the Linux permission settings, for example, 777 and 755. | |||||
Controls the root permission of the client. | |||||
Whether to retain the user ID (UID) and group ID (GID) of a shared directory. | |||||
Configures the krb5 security protocol. | During mounting, you can specify the sec parameter in mountOptions. | ||||
Configures the krb5i security protocol. | During mounting, you can specify the sec parameter in mountOptions. | ||||
Configures the krb5p security protocol. | During mounting, you can specify the sec parameter in mountOptions. | ||||
Whether the snapshot directory is visible. | |||||
Whether to disable volume capacity verification. After this function is disabled, the system will not verify whether the volume capacity is an integer multiple of the sector size.
| |||||
Advanced volume creation parameters. The value of the parameter is JSON character strings in dictionary format. A character string is enclosed by single quotation marks and the dictionary key by double quotation marks. Example: '{"CAPACITYTHRESHOLD": 90}' | For details about the supported advanced parameters, see Table 4. |
Table 2 Common parameters in mountOptions
Table 3 Supported QoS configurations
Table 4 Supported advanced volume creation parameters
For details about the default value and value range, see the corresponding storage product manual. |
6.2.1.5.2 - Block Service
Creating a StorageClass
Prepare a StorageClass configuration file, for example, mysc.yaml. For details about the StorageClass configuration, see the following example.
Run the following command to create a StorageClass using the configuration file.
kubectl apply -f mysc.yamlRun the following command to view the information about the created StorageClass.
kubectl get sc myscThe following is an example of the command output.
NAME   PROVISIONER      RECLAIMPOLICY   VOLUMEBINDINGMODE   ALLOWVOLUMEEXPANSION   AGE
mysc   csi.huawei.com   Delete          Immediate           true                   8s
Block StorageClass Configuration Example
If LUNs are used as storage resources and the file system needs to be formatted to a local file system, refer to the following example.
kind: StorageClass
apiVersion: storage.k8s.io/v1
metadata:
  name: mysc
provisioner: csi.huawei.com
parameters:
  backend: lun-181
  pool: StoragePool001
  volumeType: lun
  allocType: thin
  fsType: ext4
StorageClass Parameters Supported by Block Services
Table 1 StorageClass configuration parameters
Take Kubernetes v1.22.1 as an example. The value can contain digits, lowercase letters, hyphens (-), and periods (.), and must start and end with a letter or digit. | |||||
Set this parameter to the driver name set during Huawei CSI installation. The value is the same as that of driverName in the values.yaml file. | |||||
Reclamation policy. The following types are supported: | |||||
Whether to allow volume expansion. If this parameter is set to true, the capacity of the PV that uses the StorageClass can be expanded. | This function can only be used to expand PV capacity but cannot be used to reduce PV capacity. | ||||
List of mount parameters, which can be used to specify the parameters of the -o option when the mount command is executed on a host. | For details about common parameters in mountOptions, see Table 2. | ||||
Name of the backend where the resource to be created is located. This field must be set if parameters.pool is set. | If this parameter is not set, Huawei CSI will randomly select a backend that meets the capacity requirements to create resources. You are advised to specify a backend to ensure that the created resource is located on the expected backend. | ||||
Name of the storage resource pool where the resource to be created is located. | If this parameter is not set, Huawei CSI will randomly select a storage pool that meets the capacity requirements from the selected backend to create resources. You are advised to specify a storage pool to ensure that the created resource is located in the expected storage pool. | ||||
Type of the volume to be created. The following types are supported: | |||||
Allocation type of the volume to be created. The following types are supported: | If this parameter is set to thin, the required space is not allocated immediately when a volume is created. Instead, the space is dynamically allocated based on the usage. | ||||
Type of a host file system. The supported types are:
| This parameter is available only when volumeMode of the PVC is set to Filesystem. | ||||
Log in to DeviceManager and choose Services > Block Service > LUN Groups (or Namespace Groups) > LUNs (or Namespaces) > Create to obtain the application type name. | |||||
LUN/NAS QoS settings of the PV on the storage side. The value of the parameter is JSON character strings in dictionary format. A character string is enclosed by single quotation marks and the dictionary key by double quotation marks. Example: '{"maxMBPS": 999, "maxIOPS": 999}' | For details about the supported QoS configurations, see Table 3. | ||||
For details about the configuration format, refer to the Linux permission settings, for example, 777 and 755. | |||||
Whether to disable volume capacity verification. After this function is disabled, the system will not verify whether the volume capacity is an integer multiple of the sector size.
| |||||
Table 2 Common parameters in mountOptions
Automatically triggers the Trim or Discard operation when a file system is mounted. This operation instructs a block device to release unused blocks. |
Table 3 Supported QoS configurations
The value is an integer ranging from 1 to 999999999, expressed in MB/s. | ||
The value is an integer ranging from 1 to 999999999, expressed in MB/s. | ||
6.2.2 - Managing a StorageClass
6.2.2.1 - Querying a StorageClass
Run the following command to view the information about the created StorageClass.
kubectl get sc myscThe following is an example of the command output.
NAME   PROVISIONER      RECLAIMPOLICY   VOLUMEBINDINGMODE   ALLOWVOLUMEEXPANSION   AGE
mysc   csi.huawei.com   Delete          Immediate           true                   8s
6.2.2.2 - Modifying a StorageClass
Kubernetes allows only the allowVolumeExpansion field of a StorageClass to be modified. The modification method is as follows:
Run the following command to check whether the StorageClass can be expanded:
kubectl get sc myscIf the command output is displayed as the following example, the StorageClass mysc cannot be expanded:
NAME   PROVISIONER      RECLAIMPOLICY   VOLUMEBINDINGMODE   ALLOWVOLUMEEXPANSION   AGE
mysc   csi.huawei.com   Delete          Immediate           false                  8s
Run the following command to enable capacity expansion for the StorageClass:
kubectl patch sc mysc --patch '{"allowVolumeExpansion":true}'Check the StorageClass again and ensure that the modification is successful.
NAME   PROVISIONER      RECLAIMPOLICY   VOLUMEBINDINGMODE   ALLOWVOLUMEEXPANSION   AGE
mysc   csi.huawei.com   Delete          Immediate           true                   8s
6.2.2.3 - Deleting a StorageClass
Run the following command to view the StorageClass:
kubectl get sc myscThe following is an example of the command output.
NAME   PROVISIONER      RECLAIMPOLICY   VOLUMEBINDINGMODE   ALLOWVOLUMEEXPANSION   AGE
mysc   csi.huawei.com   Delete          Immediate           false                  8s
Run the following command to delete the StorageClass:
kubectl delete sc myscIf the following information is displayed, the deletion is successful:
storageclass.storage.k8s.io "mysc" deleted
6.3 - Persistent Volume Management
Based on service requirements, files in containers need to be persistently stored on disks. When the containers are re-built or re-allocated to new nodes, the persistent data can still be used.
To persistently store data on storage devices, you need to use the PersistentVolume (PV) and PersistentVolumeClaim (PVC) when provisioning containers.
- PV: a piece of storage in the Kubernetes cluster that has been provisioned by an administrator or dynamically provisioned using a StorageClass .
- PVC: a request for storage by a user. A PVC consumes PV resources. A PVC can request specific size and access modes. For example, a PV can be mounted in ReadWriteOnce, ReadOnlyMany, or ReadWriteMany mode. For details, see Access Modes .
This section describes how to use Huawei CSI to create, clone, and expand the capacity of a PV and PVC.
6.3.1 - Configuring PVs
Huawei CSI allows storage resources (LUNs or file systems) to be created on Huawei storage and provided for containers based on user settings. For details about the supported features, see Compatibility and Features of the storage device.
PV configurations can be classified into configuring dynamic PVs or static PVs, and managing PVs.
- Configuring dynamic PV does not require a PV to be created in advance. Huawei CSI automatically creates resources required by a PV on storage devices based on a StorageClass. In addition, you can create a PV when creating a PVC.
- Configuring a static PV requires the administrator to create required resources on a storage device in advance and use existing resources by creating a PV. In addition, you can specify the associated PV when creating a PVC.
- Managing PVs does not require a PV to be created in advance. You can specify the StorageClass and resource information on the storage device in a PVC. Create the PVC and PV at the same time, and manage all existing storage resources in the cluster.
6.3.1.1 - Configuring Dynamic PVs
Dynamic volume provisioning allows storage volumes to be created on demand. Dynamic volume provisioning depends on the StorageClass objects. The cluster administrator can define multiple StorageClass objects as required and specify a StorageClass that meets service requirements when declaring a PV or PVC. When applying for resources from Huawei storage devices, Huawei CSI creates storage resources that meet service requirements based on the preset StorageClass.
Configuration Description
Perform the following steps to configure and use dynamic PVs:
Preparation
Before configuring dynamic PVs, configure StorageClass by referring to Configuring a StorageClass .
Configuring a PVC
Prepare the PVC configuration file mypvc.yaml. The following is an example. For details about other parameters, see Table 1 .
kind: PersistentVolumeClaim
apiVersion: v1
metadata:
  name: mypvc
spec:
  accessModes:
    - ReadWriteOnce
  volumeMode: Filesystem
  storageClassName: mysc
  resources:
    requests:
      storage: 100Gi
Run the following command to create a PVC using the configuration file.
kubectl create -f mypvc.yamlAfter a period of time, run the following command to view the information about the created PVC.
kubectl get pvc mypvcThe following is an example of the command output. If the PVC status is Bound, the PVC has been created and can be used by a Pod.
NAME        STATUS   VOLUME                                     CAPACITY   ACCESS MODES   STORAGECLASS   AGE
mypvc       Bound    pvc-840054d3-1d5b-4153-b73f-826f980abf9e   100Gi      RWO            mysc           12s
- After the PVC is created, if the PVC is in the Pending state after a long time (for example, one minute), refer to When a PVC Is Created, the PVC Is in the Pending State .
- You are advised to create or delete a maximum of 100 PVCs in a batch.
Table 1 PVC parameters for configuring a dynamic PV
Take Kubernetes v1.22.1 as an example. The value can contain digits, lowercase letters, hyphens (-), and periods (.), and must start and end with a letter or digit. | ||||
Volume mode. This parameter is optional. When LUN volumes are used, the following types are supported: | This parameter takes effect when a PV is mounted. The default value is Filesystem. | |||
Size of the volume to be created. The format is ***Gi and the unit is GiB. | The PVC capacity depends on storage specifications and host specifications. For example, OceanStor Dorado 6.1.2 or OceanStor Pacific series 8.1.0 is connected to CentOS 7. If ext4 file systems are used, see Table 2. If XFS file systems are used, see Table 3. If NFS or raw devices are used, the capacity must meet the specifications of the used Huawei storage device model and version. If the PVC capacity does not meet the specifications, a PVC or Pod may fail to be created due to the limitations of storage specifications or host file system specifications. | |||
|
|
Table 2 ext4 capacity specifications
Table 3 XFS capacity specifications
Using a PVC
After a PVC is created, you can use the PVC to create a Pod. The following is a simple example of using a PVC. In this example, the created Pod uses the newly created mypvc.
apiVersion: apps/v1
kind: Deployment
metadata:
  name: nginx-deployment
spec:
  selector:
    matchLabels:
      app: nginx
  replicas: 2
  template:
    metadata:
      labels:
        app: nginx
    spec:
      containers:
      - image: nginx:alpine
        name: container-0
        volumeMounts:
        - mountPath: /tmp
          name: pvc-mypvc
      restartPolicy: Always
      volumes:
      - name: pvc-mypvc
        persistentVolumeClaim:
          claimName:  mypvc  # name of PVC
If Pods are batch created using PVCs, the Pods are in the ContainerCreating status for a long time, and the huawei-csi-node service is in the OOMKilled status, the memory of the huawei-csi-node service is insufficient. Increase the memory limit of huawei-csi-node by referring to Table 1 .
6.3.1.2 - Configuring a Static PV
Static volume provisioning allows administrators to use a resource created on the storage side as a PV for containers in the cluster.
Configuration Description
Perform the following steps to configure a static PV:
Preparation
A storage resource, such as a LUN or file system, required by the PV to be created exists on the storage device. If the storage resource is a file system, you also need to create the share and client information of the file system.
Configuring a PV
Prepare the PV configuration file mypv.yaml. The following is an example. For details about other parameters, see Table 1 .
kind: PersistentVolume
apiVersion: v1
metadata:
  name: mypv
spec:
  volumeMode: Filesystem
  storageClassName: "" # The value must be to "".
  accessModes:
    - ReadWriteOnce
  csi:
    driver: csi.huawei.com # Enter the CSI driver name.
    volumeHandle: iscsi-dorado-181.lun0001 # Enter the volume name.
    fsType: xfs # Set the file system type.
  capacity:
    storage: 100Gi
In the configuration file for static volume provisioning, storageClassName must be set to "". Otherwise, Kubernetes will use the default StorageClass.Run the following command to create a PV based on the prepared .yaml file.
kubectl create -f mypv.yamlAfter a period of time, run the following command to view the information about the created PV.
kubectl get pvThe following is an example of the command output. If the PV status is Available, the PV is successfully created.
NAME       CAPACITY   ACCESS MODES   RECLAIM POLICY   STATUS      CLAIM               STORAGECLASS   REASON   AGE
mypv       100Gi      RWO            Retain           Available                                               4s
Table 1 Parameters for configuring a static PV
Take Kubernetes v1.22.1 as an example. The value can contain digits, lowercase letters, hyphens (-), and periods (.), and must start and end with a letter or digit. | ||||
Volume mode. This parameter is optional. When LUN volumes are used, the following types are supported: | This parameter takes effect when a PV is mounted. The default value is Filesystem. | |||
Name of the StorageClass object. This parameter is mandatory. | ||||
|
| |||
Set this parameter to the driver name set during Huawei CSI installation. | ||||
Unique identifier of a storage resource. This parameter is mandatory. | The value of this parameter consists of the following parts: | |||
Type of a host file system. This parameter is optional. The supported types are:
| If this parameter is not set, the default value ext4 is used. This parameter is available only when volumeMode is set to Filesystem. | |||
Name of the parent file system when the volume resource type is dtree. | This parameter is mandatory when the managed object is a dtree resource and the parentname parameter is not configured in the storage backend. If dTreeParentName is configured only in the PV but parentname is not configured in the corresponding storage backend, set CSIDriverObject.attachRequired to true during CSI installation according to Table 5. | |||
Ensure that the size is the same as that of the corresponding resource on the storage. Kubernetes will not invoke CSI to check whether the value of this parameter is correct. Therefore, the PV can be successfully created even if its capacity is inconsistent with that of the corresponding resource on the storage. | ||||
NFS mount option on the host. The following mount option is supported: nfsvers: protocol version for NFS mounting. The value can be 3, 4, 4.0, 4.1, or 4.2. | This parameter is optional after the -o parameter when the mount command is executed on the host. The value is in list format. If the NFS version is specified for mounting, NFS 3, 4.0, 4.1, and 4.2 protocols are supported (the protocol must be supported and enabled on storage devices). If nfsvers is set to 4, the latest protocol version NFS 4 may be used for mounting due to different OS configurations, for example, 4.2. If the 4.0 protocol is required, you are advised to set nfsvers to 4.0. | |||
The DPC namespace supports the ACL function. The DPC client supports POSIX ACL, NFSv4 ACL, and NT ACL authentication. | The descriptions of acl, aclonlyposix, cnflush, and cflush are for reference only. For details about the parameters, see OceanStor Pacific Series Product Documentation and choose Configuration > Basic Service Configuration Guide for File > Configuring Basic Services (DPC Scenario) > Accessing a DPC Share on a Client > Step 2. | |||
The DPC namespace supports POSIX ACL, and the DPC client supports POSIX ACL authentication. The following protocols support POSIX ACL: DPC, NFSv3, and HDFS. If NFSv4 ACL or NT ACL is used, the DPC client cannot identify the ACL of this type. As a result, the ACL of this type does not take effect. | If aclonlyposix and acl are used together, only acl takes effect. That is, the namespace supports the ACL function. | |||
Asynchronous disk flushing mode. That is, data is not flushed to disks immediately when files in the namespace are closed. | Asynchronous flushing mode: When a file is closed, data in the cache is not flushed to storage media in synchronous mode. Instead, data is written from the cache to the storage media in asynchronous flushing mode. After the write service is complete, data is flushed from the cache to disks periodically based on the flushing period. In a multi-client scenario, if concurrent operations are performed on the same file, the file size update is affected by the disk flushing period. That is, the file size is updated only after the disk flushing is complete. Generally, the update is completed within several seconds. Synchronous I/Os are not affected by the disk flushing period. | |||
Synchronous disk flushing mode. That is, data is flushed to disks immediately when files in the namespace are closed. |
Configuring a PVC
After a PV is created in static volume provisioning mode, you can create a PVC based on the PV for containers.
Prepare the PVC configuration file mypvc.yaml. The following is an example. For details about other parameters, see Table 2 .
kind: PersistentVolumeClaim
apiVersion: v1
metadata:
  name: mypvc
spec:
  storageClassName: ""
  accessModes:
    - ReadWriteOnce
  volumeMode: Filesystem
  resources:
    requests:
      storage: 100Gi
  volumeName: mypv # Enter the name of the corresponding PV.
Run the following command to create a PVC based on the configured .yaml file.
kubectl create -f mypvc.yamlAfter a period of time, run the following command to view the information about the created PVC.
kubectl get pvcThe following is an example of the command output. If the PVC status is Bound, the PVC is successfully created.
NAME STATUS VOLUME CAPACITY ACCESS MODES STORAGECLASS AGE mypvc Bound pvc-840054d3-1d5b-4153-b73f-826f980abf9e 100Gi RWO 12s- After the PVC is created, if the PVC is in the Pending state after a long time, see When a PVC Is Created, the PVC Is in the Pending State .
- You are advised to create or delete a maximum of 100 PVCs in a batch.
Table 2 PVC parameters for configuring a static PV
Take Kubernetes v1.22.1 as an example. The value can contain digits, lowercase letters, hyphens (-), and periods (.), and must start and end with a letter or digit. | ||||
|
| |||
This parameter is optional. The value can be Filesystem or Block. The default value is Filesystem. This parameter takes effect when a Pod is created. Filesystem indicates that a file system is created on a PVC to access the storage. Block indicates that a raw volume is used to access the storage. | ||||
Size of the volume to be created. The format is ***Gi and the unit is GiB. The PVC capacity depends on storage specifications and host specifications. For example, OceanStor Dorado 6.1.2 or OceanStor Pacific series 8.1.0 is connected to CentOS 7. If ext4 file systems are used, see Table 2. If XFS file systems are used, see Table 3. If NFS or raw devices are used, the capacity must meet the specifications of the used Huawei storage device model and version. If the PVC capacity does not meet the specifications, a PVC or Pod may fail to be created due to the limitations of storage specifications or host file system specifications. When a PVC is created using a static PV and the PVC capacity is smaller than the capacity of the bound PV, the PVC capacity is set to the capacity of the bound PV. If the PVC capacity is greater than the capacity of the bound PV, the PVC cannot be created. | ||||
This parameter is mandatory when a PVC is created statically. | ||||
When a PVC is created, an empty character string is transferred. If this parameter is not set, the default StorageClass object name will be used. |
Using a PVC
The use method is the same as that for dynamic volume provisioning in Using a PVC .
6.3.1.3 - Managing PVs
Manage Volume Provisioning allows administrators to use resources created on storage as PVs and supports features of dynamic volumes, such as capacity expansion, snapshot, and clone. This is a custom capability of Huawei CSI. This feature applies to the following scenarios:
- In the reconstruction containerized applications, existing storage volumes need to be used.
- The Kubernetes cluster is rebuilt.
- Storage data is migrated in disaster recovery (DR) scenarios.
- Manage Volume Provisioning allows existing storage resources to be managed by Kubernetes. You are not allowed to manage a storage resource for multiple times and concurrently delete or create a storage resource. When a storage resource is managed by multiple clusters, operations on the managed volume in a single cluster take effect only in the cluster and will not be synchronized to other clusters. Instead, you need to perform these operations on the managed volume in other clusters. For example, when you expand the capacity of a PVC in a cluster, the capacity of the corresponding PVC in other clusters will not be automatically expanded. In this case, you need to manually expand the capacity in other clusters by running the expansion commands in Expanding the Capacity of a PV .
- When managing PVs, ensure that the PVs comply with the storage class declaration. Otherwise, Huawei CSI may fail to manage the PVs. For example, when you manage a common PV, the storage backend of the HyperMetro type is referenced in the storage class, and the HyperMetro parameter is enabled. After the PV is managed, if you clone the PV or create a PV based on a snapshot, Huawei CSI will fail to execute the operation.
Configuration Description
Perform the following steps to manage and use PVs:
Preparation
- You have registered the storage where the volume to be managed resides with CSI.
- You have logged in to the storage device to obtain the name and capacity of the volume to be managed.
- The StorageClass has been configured. For details, see Configuring a StorageClass (pay attention to the Whether the Volume Management Takes Effect field in the table).
Configuring a PVC
Prepare the PVC configuration file mypvc.yaml. The following is an example. For details about other parameters, see Table 1 .
kind: PersistentVolumeClaim
apiVersion: v1
metadata:
  name: mypvc
  annotations:
    csi.huawei.com/manageVolumeName: "*"  # Enter the storage resource name.
    csi.huawei.com/manageBackendName: "*" # Enter the storage backend name.
  labels:
    provisioner: csi.huawei.com
spec:
  accessModes:
    - ReadWriteOnce
  volumeMode: Filesystem
  storageClassName: mysc
  resources:
    requests:
      storage: 100Gi
Run the following command to create a PVC using the configuration file.
kubectl create -f mypvc.yamlAfter a period of time, run the following command to view the information about the created PVC.
kubectl get pvc mypvcThe following is an example of the command output. If the PVC status is Bound, the PVC has been created and can be used by a Pod.
NAME STATUS VOLUME CAPACITY ACCESS MODES STORAGECLASS AGE mypvc Bound pvc-840054d3-1d5b-4153-b73f-826f980abf9e 100Gi RWO mysc 12s- After the PVC is created, if the PVC is in the Pending state after a long time (for example, one minute), refer to When a PVC Is Created, the PVC Is in the Pending State .
- You are advised to create or delete a maximum of 100 PVCs in a batch.
Table 1 PVC parameters for managing PVs
PVC object annotations. Set the following parameters: | csi.huawei.com/manageVolumeName: * csi.huawei.com/manageBackendName: * |
You can run the oceanctl get backend -n huawei-csi command to obtain the backend name. | ||
Format: provisioner: Driver name specified during installation Example: provisioner: csi.huawei.com This parameter takes effect when a PVC is created. It is used to listen to PVC resources and obtain information about metadata.annotations. | ||||
Take Kubernetes v1.22.1 as an example. The value can contain digits, lowercase letters, hyphens (-), and periods (.), and must start and end with a letter or digit. | ||||
Volume mode. This parameter is optional. When LUN volumes are used, the following types are supported: NOTE: This parameter takes effect when a PV is mounted. The use method of this parameter must be the same as that of the managed volume.
| This parameter takes effect when a PV is mounted. | |||
The configuration of the StorageClass must be the same as that of the managed volume. | ||||
Size of the volume to be created. The format is ***Gi and the unit is GiB. | The PVC capacity depends on storage specifications and host specifications. For example, OceanStor Dorado 6.1.2 or OceanStor Pacific series 8.1.0 is connected to CentOS 7. If ext4 file systems are used, see Table 2. If XFS file systems are used, see Table 3. If NFS or raw devices are used, the capacity must meet the specifications of the used Huawei storage device model and version. If the PVC capacity does not meet the specifications, a PVC or Pod may fail to be created due to the limitations of storage specifications or host file system specifications. | |||
|
|
Using a PVC
The procedure is the same as that for Using a PVC for dynamic volume provisioning.
6.3.2 - Managing PVs
6.3.2.1 - Expanding the Capacity of a PV
For OceanStor V700R001C10 as well as OceanStor Dorado V700R001C10 and later versions, the minimum capacity of a file system after capacity expansion is limited. For details, see the product documentation of the corresponding storage device.
When the capacity of a PVC used by a container is insufficient, you need to expand the capacity of the PVC.
Prerequisites
A PVC has been created, the backend to which it resides exists and supports capacity expansion.
Compatibility and Features lists the storage that supports capacity expansion, and Kubernetes Feature Matrix lists the Kubernetes versions that support capacity expansion.
The csi-resizer service is enabled for huawei-csi-controller.
kubectl describe deploy huawei-csi-controller -n huawei-csi | grep csi-resizerIf the following information is displayed, the csi-resizer service is enabled.
   csi-resizer:
    Image:      k8s.gcr.io/sig-storage/csi-resizer:v1.9.0
Procedure
Run the following command to check whether the StorageClass supports capacity expansion. In the preceding command, mysc indicates the name of the StorageClass to be queried.
kubectl get sc myscThe following is an example of the command output.
NAME              PROVISIONER      RECLAIMPOLICY   VOLUMEBINDINGMODE   ALLOWVOLUMEEXPANSION   AGE
mysc              csi.huawei.com   Delete          Immediate           true                  172m
If the value of ALLOWVOLUMEEXPANSION is true, the current StorageClass supports capacity expansion. In this case, go to 3 .
Run the following command to change the value of allowVolumeExpansion to true. In the preceding command, mysc indicates the name of the StorageClass to be modified.
kubectl patch sc mysc --patch '{"allowVolumeExpansion":true}'Run the following command to query the StorageClass name of the PVC. In the preceding command, mypvc indicates the name of the PVC to be expanded.
kubectl get pvc mypvcThe following is an example of the command output.
NAME               STATUS   VOLUME                                     CAPACITY   ACCESS MODES   STORAGECLASS      AGE
mypvc              Bound    pvc-3383be36-537c-4cb1-8f32-a415fa6ba384   2Gi        RW0            mysc              145m
Run the following command to expand the capacity.
kubectl patch pvc mypvc -p '{"spec":{"resources":{"requests":{"storage":"120Gi"}}}}'In the preceding command, mypvc indicates the name of the PVC to be expanded, and 120Gi indicates the capacity after expansion. Change the values based on the site requirements.
- The PVC capacity depends on storage specifications and host specifications. For example, OceanStor Dorado 6.1.2 or OceanStor Pacific series 8.1.0 is connected to CentOS 7. If ext4 file systems are used, see Table 2 . If XFS file systems are used, see Table 3 . If NFS or raw devices are used, the capacity must meet the specifications of the used Huawei storage device model and version.
- If the PVC capacity does not meet the specifications, a PVC or Pod may fail to be created due to the limitations of storage specifications or host file system specifications.
- If the capacity expansion fails because the target capacity exceeds the storage pool capacity, see Failed to Expand the PVC Capacity Because the Target Capacity Exceeds the Storage Pool Capacity .
Run the following command to check whether the capacity modification takes effect.
kubectl get pvcThe following is an example of the command output. If the value of CAPACITY is changed to the specified capacity, the capacity expansion is successful.
NAME        STATUS   VOLUME                                     CAPACITY   ACCESS MODES   STORAGECLASS   AGE
mypvc       Bound    pvc-3383be36-537c-4cb1-8f32-a415fa6ba384   120Gi       RWO            mysc           24s
6.3.2.2 - Cloning a PV
This section describes how to clone a PVC.
When cloning a PVC, you need to specify the data source. The following is an example of cloning a PVC. In this example, mypvc is used as the data source and a PVC named myclone is created.
kind: PersistentVolumeClaim
apiVersion: v1
metadata:
  name: myclone
spec:
  storageClassName: mysc
  dataSource:
    name: mypvc
    kind: PersistentVolumeClaim
  volumeMode: Filesystem
  accessModes:
    - ReadWriteOnce
  resources:
    requests:
      storage: 2Gi
- The specified storageClassName must be the same as the StorageClass of the source volume in dataSource.
- The capacity of the clone volume must be greater than or equal to that of the source volume. Equal capacity is recommended.
Prerequisites
The source PVC already exists in the system, and the backend where the source PVC resides supports cloning. Compatibility and Features lists the storage that supports cloning, and Kubernetes Feature Matrix lists the Kubernetes versions that support cloning.
Procedure
Run the following command to create a PVC based on the configuration file of the clone volume.
kubectl create -f myclone.yaml
6.3.2.3 - Changing a PV
6.3.2.3.1 - Enabling the PVC Change Feature
The PVC change feature is disabled by default during Huawei CSI installation. To use this feature, perform the following steps.
6.3.2.3.1.1 - Enabling the PVC Change Feature Using Helm
Prerequisites
You have installed Huawei CSI using Helm.
Procedure
Use a remote access tool, such as PuTTY, to log in to any master node in the Kubernetes cluster through the management IP address.
Run the following command to check whether the PVC change feature is enabled.
helm-huawei-csi indicates the Helm chart name specified during installation, and huawei-csi indicates the Helm chart namespace specified during installation. For details about the component package path, see Table 1 .
helm get values helm-huawei-csi -n huawei-csi -a | grep volumeModify -A 1The following is an example of the command output.
- If enabled: true is displayed in the command output, the feature is enabled. In this case, skip the following steps.
- If enabled: false is displayed in the command output, perform the following steps to enable the PVC change feature.
volumeModify:
  enabled: false
Go to the /helm/esdk directory and run the following command to configure the volume change CRD.
# kubectl apply -f ./crds/volume-modify/
customresourcedefinition.apiextensions.k8s.io/volumemodifyclaims.xuanwu.huawei.io configured
customresourcedefinition.apiextensions.k8s.io/volumemodifycontents.xuanwu.huawei.io configured
If the command output contains Warning: resource customresourcedefinitions/volumemodifycontents.xuanwu.huawei.io is missing the kubectl.kubernetes.io/last-applied-configuration…, you can ignore it. This message is displayed because the kubectl create command instead of the kubectl apply command is used for installation by Helm.Run the following command to obtain the original service configuration file.
helm get values helm-huawei-csi -n huawei-csi -a > ./update-values.yamlRun the vi update-values.yaml command to open the file obtained in 4 and modify the following configuration. After the modification is complete, press Esc and enter :wq! to save the modification.
csiExtender:
  volumeModify:
    enabled: true
Run the following command to update Huawei CSI services.
helm upgrade helm-huawei-csi ./ -n huawei-csi -f ./update-values.yamlRun the following command to check whether the services are started.
kubectl get pod -n huawei-csiThe following is an example of the command output. In the preceding command, huawei-csi indicates the namespace for deploying Huawei CSI.
NAME                                     READY     STATUS    RESTARTS   AGE
huawei-csi-controller-6dfcc4b79f-9vjtq   10/10     Running   0          24m
huawei-csi-node-tqs87                    3/3       Running   0          20m
6.3.2.3.1.2 - Enabling the PVC Change Feature Manually
Prerequisites
Huawei CSI has been manually installed.
Procedure
Use a remote access tool, such as PuTTY, to log in to any master node in the Kubernetes cluster through the management IP address.
Go to the manual/esdk working directory and run the following command to configure the volume change CRD.
kubectl apply -f ./crds/volume-modify/Run the following command. For details about the component package path, see Table 1 .
kubectl apply -f ./deploy/huawei-csi-controller-extender.yamlRun the following command to check whether the services are started.
kubectl get pod -n huawei-csiThe following is an example of the command output. In the preceding command, huawei-csi indicates the namespace for deploying Huawei CSI.
NAME                                     READY     STATUS    RESTARTS   AGE
huawei-csi-controller-6dfcc4b79f-9vjtq   10/10     Running   0          24m
huawei-csi-node-tqs87                    3/3       Running   0          24m
6.3.2.3.2 - Configuring PVC Changes
The PVC change feature is implemented using CRD. Related resources are described as follows.
Table 1 Resource description
- VolumeModifyClaim resources can be created, deleted, and queried, but cannot be updated.
- VolumeModifyContent resources can only be queried and are used to display the change details of a single PVC. Do not manually create, delete, or modify the resources.
- VolumeModifyContent resources are managed by VolumeModifyClaim. Do not manually manage VolumeModifyContent resources.
6.3.2.3.2.1 - Creating a PVC Change
Prerequisites
The storage backends associated with the PVC to be changed are HyperMetro storage backends. If they are not HyperMetro storage backends, configure them by following the instructions in Updating a Storage Backend .
PVC Change File Description
The sample template of the PVC change file is /examples/volumemodifyclaim.yaml. The following table lists the configuration items.
Table 1 Parameter description
Name of a cluster resource object, which is of the string type. | The name must comply with the naming rules of a DNS subdomain name. The value can contain a maximum of 63 characters, including digits, lowercase letters, hyphens (-), and periods (.). It must start and end with a lowercase letter or digit. Note: During a PVC change, the original StorageClass is backed up. The name of the backup StorageClass is <Original StorageClass name><VolumeModifyClaim name>, and must comply with the StorageClass naming rules. | |||
Whether to change a common volume to a HyperMetro volume. Currently, the value can only be "true". | Only common storage volumes at the primary site can be changed to HyperMetro storage volumes. | |||
Data synchronization speed of a HyperMetro pair. The value ranges from 1 to 4. | This parameter is available only when spec.parameters.hyperMetro is set to "true".
|
- The spec.source.kind and spec.source.name parameters are used to specify the volume change scope. For example, if they are set to a StorageClass and the corresponding name respectively, all PVCs in the Bound state provisioned using the target StorageClass will be changed.
- After all associated PVCs are changed, Huawei CSI will replace the original StorageClass and add the spec.parameters parameter of the VolumeModifyClaim so that the PVCs meet the StorageClass definition.
For details about the configuration in typical scenarios, see the following example:
Changing a Common Volume to a HyperMetro Volume
The following is an example of changing a common volume to a HyperMetro volume:
apiVersion: xuanwu.huawei.io/v1
kind: VolumeModifyClaim
metadata:
  name: myvmc
spec:
  source:
    kind: StorageClass
    name: mysc
  parameters:
    hyperMetro: "true"
Creating a PVC Change Resource
- The changed HyperMetro volumes must be in HyperMetro AA mode.
- When a common volume is changed to a HyperMetro volume, only the storage volume at the primary site can be changed.
- Do not use Huawei CSI to manage a PVC during PVC change resource creation.
- Multiple VolumeModifyClaim resources cannot be created for the same PVC. If the target PVC needs to be changed for multiple times, perform the changes one by one.
To create a PVC change resource using a PVC change file, perform the following steps:
Use a remote access tool, such as PuTTY, to log in to any master node in the Kubernetes cluster through the management IP address.
Run the following command to create a PVC change.
kubectl create -f volumemodifyclaim.yamlQuery the creation result by following the instructions in Querying a PVC Change .
6.3.2.3.2.2 - Querying a PVC Change
This section describes how to use Kubectl to query the PVC change status. Currently, Huawei CSI provides the following APIs through CRD.
Querying a VolumeModifyClaim
To query a VolumeModifyClaim using kubectl, perform the following steps.
Use a remote access tool, such as PuTTY, to log in to any master node in the Kubernetes cluster through the management IP address.
Run the following command to query a PVC change. In the command, vmc-name indicates the name of the VolumeModifyClaim resource.
kubectl get volumemodifyclaims <vmc-name> -owideThe following is an example of the command output.
NAME    STATUS      READY   SOURCEKIND     SOURCENAME   STARTEDAT              COMPLETEDAT            AGE
myvmc   Completed   1/1     StorageClass   mysc         2024-06-06T03:19:13Z   2024-06-06T03:19:16Z   2m2s
Table 1 Command output description
You can use kubectl to view the Events information of a VolumeModifyClaim. If a VolumeModifyClaim cannot meet the creation requirements or an error occurs during the creation, the server will record the Events information. The following command is used as an example:kubectl describe volumemodifyclaims local-to-hypermetro
Querying a VolumeModifyContent
A VolumeModifyContent is created using a VolumeModifyClaim and records the change details of a single PVC. To query a VolumeModifyContent using kubectl, perform the following steps:
Use a remote access tool, such as PuTTY, to log in to any master node in the Kubernetes cluster through the management IP address.
Run the following command to query a PVC change. In the command, myvmc-uid indicates the VolumeModifyContent resource name.
kubectl get volumemodifycontents myvmc-uid -owideThe following is an example of the command output.
NAME         STATUS      MODIFYCLAIMNAME     SOURCEVOLUME   STARTEDAT              COMPLETEDAT            AGE
myvmc-uid    Completed   myvmc               default/mypvc  2024-06-06T03:19:07Z   2024-06-06T03:19:09Z   36m
Table 2 Command output description
You can use kubectl to view the Events information of a VolumeModifyContent. If a VolumeModifyContent cannot meet the creation requirements or an error occurs during the PVC change, the server will record the Events information. The following command is used as an example:kubectl describe volumemodifycontents myvmc-uid
6.3.2.3.2.3 - Deleting a PVC Change
- If STATUS of a VolumeModifyClaim is Creating, deleting the VolumeModifyClaim resource will delete the created resource on the storage side and then remove the cluster resource. After the deletion, if you continue to use the original StorageClass for PVC management, you need to restore the associated storage backend to a non-HyperMetro storage backend.
- If STATUS of a VolumeModifyClaim is Pending or Completed, deleting the VolumeModifyClaim resource will only remove the cluster resource and will not delete the created resource on the storage side (that is, there is not interaction with the storage side).
- VolumeModifyContent resources are managed by VolumeModifyClaim. Do not manually manage VolumeModifyContent resources.
- If some PVCs among the PVCs to be changed meet the change requirements and the batch change fails, all PVC changes will be removed. As a result, the PVCs that meet the change requirements will not meet the change requirements.
- If a PVC to be changed has been manually managed on the storage side, the change may fail. Do not manually manage storage volumes when using the change feature.
This section describes how to use kubectl to delete a PVC change. The procedure is as follows.
Procedure
Use a remote access tool, such as PuTTY, to log in to any master node in the Kubernetes cluster through the management IP address.
Run the following command to delete a PVC change. In the command, vmc-name indicates the name of the VolumeModifyClaim resource.
kubectl delete volumemodifyclaims <vmc-name>Query the deletion result by following the instructions in Querying a PVC Change .
7 - Advanced Services
7.1 - Snapshot Management
In Kubernetes, a VolumeSnapshot is a snapshot of a volume on a storage system. The VolumeSnapshot capability provides Kubernetes users with a standard way to replicate the content of a volume at a specified point in time without creating a volume. For example, this function enables database administrators to back up the database before making changes such as editing or deleting.
This section describes how to create a VolumeSnapshot using Huawei CSI. To create a VolumeSnapshot, perform the following steps:
- Checking information about volume snapshot-dependent components
- Configuring a VolumeSnapshotClass
- Configuring a VolumeSnapshot
Prerequisites
- Compatibility and Features lists storage that support VolumeSnapshot creation. You need to search by the storage type and service type.
- For details about the Kubernetes versions that support VolumeSnapshot creation, see Table 1 .
- If you need to use volume snapshots and features associated with volume snapshots in the container environment, perform the operations in Checking Volume Snapshot-Dependent Components to check whether volume snapshot-dependent components have been deployed in your environment and check the api-versions information about volume snapshots.
- The source PVC exists, and the backend where the PVC resides supports VolumeSnapshot creation.
7.1.1 - Configuring a Volume Snapshot
Creating a Volume Snapshot Class
VolumeSnapshotClass provides a way to describe the “classes” of storage when provisioning a VolumeSnapshot. Each VolumeSnapshotClass contains the driver, deletionPolicy, and parameters fields, which are used when a VolumeSnapshot belonging to the class needs to be dynamically provisioned.
The name of a VolumeSnapshotClass object is significant, and is how users can request a particular class. Administrators set the name and other parameters of a class when first creating VolumeSnapshotClass objects, and the objects cannot be updated once they are created.
The following is an example of a VolumeSnapshotClass used by Huawei CSI:
apiVersion: snapshot.storage.k8s.io/v1
kind: VolumeSnapshotClass
metadata:
  name: mysnapclass
driver: csi.huawei.com
deletionPolicy: Delete
You can modify the parameters according to Table 1 .
Table 1 VolumeSnapshotClass parameters
Procedure
Run the following command to create a VolumeSnapshotClass using the created VolumeSnapshotClass configuration file.
kubectl create -f mysnapclass.yamlRun the following command to view the information about the created VolumeSnapshotClass.
kubectl get volumesnapshotclassThe following is an example of the command output.
NAME          DRIVER           DELETIONPOLICY   AGE
mysnapclass   csi.huawei.com   Delete           25s
Creating a Snapshot for a Volume
VolumeSnapshot can be provisioned in two ways: pre-provisioning and dynamic provisioning . Currently, Huawei CSI supports only dynamic provisioning. This section describes how to dynamically provision a VolumeSnapshot using Huawei CSI. The following is an example of the VolumeSnapshot configuration file:
apiVersion: snapshot.storage.k8s.io/v1
kind: VolumeSnapshot
metadata:
  name: mysnapshot
spec:
  volumeSnapshotClassName: mysnapclass
  source:
    persistentVolumeClaimName: mypvc
You can modify the parameters according to Table 2 .
Table 2 VolumeSnapshot parameters
Take Kubernetes v1.22.1 as an example. The value can contain digits, lowercase letters, hyphens (-), and periods (.), and must start and end with a letter or digit. | ||
Procedure
Run the following command to create a VolumeSnapshot using the created VolumeSnapshot configuration file.
kubectl create -f mysnapshot.yamlRun the following command to view the information about the created VolumeSnapshot.
kubectl get volumesnapshotThe following is an example of the command output.
NAME         READYTOUSE   SOURCEPVC   SOURCESNAPSHOTCONTENT   RESTORESIZE   SNAPSHOTCLASS   SNAPSHOTCONTENT                                    CREATIONTIME   AGE
mysnapshot   true         mypvc                               100Gi         mysnapclass     snapcontent-1009af0a-24c2-4435-861c-516224503f2d   <invalid>      78s
7.1.2 - Managing Volume Snapshots
7.1.2.1 - Querying a VolumeSnapshot
Viewing a VolumeSnapshotClass
Run the following command to view the information about the created VolumeSnapshotClass.
kubectl get volumesnapshotclassThe following is an example of the command output.
NAME          DRIVER           DELETIONPOLICY   AGE
mysnapclass   csi.huawei.com   Delete           25s
Querying a Volume Snapshot
Run the following command to view the information about the created VolumeSnapshot.
kubectl get volumesnapshotThe following is an example of the command output.
NAME         READYTOUSE   SOURCEPVC   SOURCESNAPSHOTCONTENT   RESTORESIZE   SNAPSHOTCLASS   SNAPSHOTCONTENT                                    CREATIONTIME   AGE
mysnapshot   true         mypvc                               100Gi         mysnapclass     snapcontent-1009af0a-24c2-4435-861c-516224503f2d   <invalid>      78s
7.1.2.2 - Creating a PV Using a VolumeSnapshot
Prerequisites
- Compatibility and Features lists storage that support PVC creation using a VolumeSnapshot. You need to search by the storage type and service type.
- Kubernetes Feature Matrix lists the Kubernetes versions that support PVC creation using a VolumeSnapshot.
- A VolumeSnapshot exists, and the backend where the VolumeSnapshot resides supports cloning.
When creating a PVC, you need to specify a VolumeSnapshot as the data source. The following is an example of creating a PVC using a VolumeSnapshot. In this example, mysnapshot is used as the data source and a PVC named myrestore is created.
apiVersion: v1
kind: PersistentVolumeClaim
metadata:
  name: myrestore
spec:
  storageClassName: mysc
  dataSource:
    name: mysnapshot
    kind: VolumeSnapshot
    apiGroup: snapshot.storage.k8s.io
  volumeMode: Filesystem
  accessModes:
    - ReadWriteOnce
  resources:
    requests:
      storage: 100Gi
- The specified storageClassName must be the same as the StorageClass of the snapshot source volume in dataSource.
- The capacity of the clone volume must be greater than or equal to that of the snapshot. Equal capacity is recommended.
Procedure
Run the following command to create a PVC based on the configuration file for creating a volume using a snapshot.
kubectl create -f myrestore.yaml
7.1.2.3 - Deleting a VolumeSnapshot
Deleting a VolumeSnapshot
Perform this operation when the volume snapshot is no longer required.
Procedure
Run the following command to view the information about the created VolumeSnapshot.
kubectl get volumesnapshotThe following is an example of the command output.
NAME READYTOUSE SOURCEPVC SOURCESNAPSHOTCONTENT RESTORESIZE SNAPSHOTCLASS SNAPSHOTCONTENT CREATIONTIME AGE mysnapshot true mypvc 100Gi mysnapclass snapcontent-1009af0a-24c2-4435-861c-516224503f2d <invalid> 78sRun the following command to delete the VolumeSnapshot:
kubectl delete volumesnapshot mysnapshotIf the following information is displayed, the deletion is successful:
volumesnapshot.snapshot.storage.k8s.io "mysnapshot" deleted
Deleting a VolumeSnapshotClass
Perform this operation when the VolumeSnapshotClass is not bound to any VolumeSnapshot and the VolumeSnapshotClass is no longer required.
Procedure
Run the following command to view the VolumeSnapshotClass:
kubectl get vsclassThe following is an example of the command output.
NAME DRIVER DELETIONPOLICY AGE mysnapclass csi.huawei.com Delete 25sRun the following command to delete the StorageClass:
kubectl delete vsclass mysnapclassIf the following information is displayed, the deletion is successful:
volumesnapshotclass.snapshot.storage.k8s.io "mysnapclass" deleted
8 - Common O&M Operations
8.1 - Installing Helm 3
This section describes how to install Helm 3.
For details, see https://helm.sh/docs/intro/install/ .
Prerequisites
Ensure that the master node in the Kubernetes cluster can access the Internet.
Procedure
Run the following command to download the Helm 3 installation script.
curl -fsSL -o get_helm.sh https://raw.githubusercontent.com/helm/helm/master/scripts/get-helm-3Run the following command to modify the permission on the Helm 3 installation script.
chmod 700 get_helm.shDetermine the Helm version to be installed based on the version mapping between Helm and Kubernetes. For details about the version mapping, see Helm Version Support Policy . Then run the following command to change the DESIRED_VERSION environment variable to the Helm version to be installed and run the installation command.
DESIRED_VERSION=v3.9.0 ./get_helm.shRun the following command to check whether Helm 3 of the specified version is successfully installed.
helm versionIf the following information is displayed, the installation is successful.
version.BuildInfo{Version:"v3.9.0", GitCommit:"7ceeda6c585217a19a1131663d8cd1f7d641b2a7", GitTreeState:"clean", GoVersion:"go1.17.5"}
8.2 - Collecting Information
8.2.1 - Obtaining the CSI Version
This section describes how to view the CSI version.
Procedure
Use a remote access tool, such as PuTTY, to log in to any master node in the Kubernetes cluster through the management IP address.
Run the following command to query information about the node where huawei-csi-node resides.
kubectl get pod -A -owide | grep huawei-csi-nodeThe following is an example of the command output.
NAMESPACE NAME READY STATUS RESTARTS AGE IP NODE NOMINATED NODE READINESS GATES huawei-csi huawei-csi-node-87mss 3/3 Running 0 6m41s 192.168.129.155 node-1 <none> <none> huawei-csi huawei-csi-node-xp8cc 3/3 Running 0 6m41s 192.168.129.156 node-2 <none> <noneUse a remote access tool, such as PuTTY, to log in to any node where huawei-csi-node resides through the node IP address.
Run the following command to view the CSI version.
cat /var/lib/kubelet/plugins/csi.huawei.com/versionThe version information is displayed as follows:
4.11.0
8.2.2 - Viewing Huawei CSI Logs
Viewing Logs of the huawei-csi-controller Service
Run the following command to obtain the node where huawei-csi-controller is located.
kubectl get pod -A -o wide | grep huaweiThe following is an example of the command output, where IP indicates the node IP address and NODE indicates the node name.
NAME READY STATUS RESTARTS AGE IP NODE NOMINATED NODE READINESS GATES huawei-csi-controller-695b84b4d8-tg64l 9/9 Running 0 14s <host1-ip> <host1-name> <none> <none>Use a remote access tool, such as PuTTY, to log in to the node where the huawei-csi-controller service resides in the Kubernetes cluster through the management IP address.
Go to the log directory.
cd /var/log/huaweiRun the following command to view the customized output logs of the container.
vi huawei-csi-controllerGo to the container directory.
cd /var/log/containersRun the following command to view the standard output logs of the container.
vi huawei-csi-controller-<name>_huawei-csi_huawei-csi-driver-<container-id>.log
Viewing Logs of the huawei-csi-node Service
Run the following command to obtain the node where huawei-csi-node is located.
kubectl get pod -A -o wide | grep huaweiThe following is an example of the command output, where IP indicates the node IP address and NODE indicates the node name.
NAME READY STATUS RESTARTS AGE IP NODE NOMINATED NODE READINESS GATES huawei-csi-node-g6f7z 3/3 Running 0 14s <host2-ip> <host2-name> <none> <none>Use a remote access tool, such as PuTTY, to log in to the node where the huawei-csi-node service resides in the Kubernetes cluster through the management IP address.
Go to the log directory.
cd /var/log/huaweiRun the following command to view the customized output logs of the container.
vi huawei-csi-nodeGo to the container directory.
cd /var/log/containersRun the following command to view the standard output logs of the container.
vi huawei-csi-node-<name>_huawei-csi_huawei-csi-driver-<container-id>.log
8.2.3 - Collecting Logs
Performing Check Before Collection
Use a remote access tool, such as PuTTY, to log in to the node where the oceanctl tool is installed in the Kubernetes cluster through the management IP address.
Run the following command. The displayed version is v4.11.0.
oceanctl versionThe following is an example of the command output.
Oceanctl Version: v4.11.0Run the oceanctl collect logs –help command. The following information is displayed.
$ oceanctl collect logs --help Collect logs of one or more nodes in specified namespace in Kubernetes Usage: oceanctl collect logs [flags] Examples: # Collect logs of all nodes in specified namespace oceanctl collect logs -n <namespace> # Collect logs of specified node in specified namespace oceanctl collect logs -n <namespace> -N <node> # Collect logs of all nodes in specified namespace oceanctl collect logs -n <namespace> -a # Collect logs of all nodes in specified namespace with a maximum of 50 nodes collected at the same time oceanctl collect logs -n <namespace> -a --threads-max=50 # Collect logs of specified node in specified namespace oceanctl collect logs -n <namespace> -N <node> -a Flags: -a, --all Collect all nodes messages -h, --help help for logs -n, --namespace string namespace of resources -N, --nodename string Specify the node for which information is to be collected. --threads-max int set maximum number[1~1000] of threads for nodes to be collected. (default 50) Global Flags: --log-dir string Specify the directory for printing log files. (default "/var/log/huawei")Run the following command to check whether a Pod is started properly. In the command, huawei-csi indicates the namespace for installing CSI.
kubectl get deployment -n huawei-csiThe following is an example of the command output.
NAME READY UP-TO-DATE AVAILABLE AGE huawei-csi-controller 1/1 1 1 21h
Collecting All Logs in the CSI Namespace Using oceanctl
Use a remote access tool, such as PuTTY, to log in to the node checked in Performing Check Before Collection through the management IP address.
Run the oceanctl collect logs -n <namespace> -a –threads-max=<max_node_processing_num> command to collect CSI logs of all nodes where CSI containers reside in the cluster. In the command, threads-max indicates the maximum number of nodes for which logs can be collected at the same time. The default value is 50. You can set the value based on the host performance and load.
oceanctl collect logs -n huawei-csi -a --threads-max=10Check the log package generated in the /tmp directory. You can run the unzip <zip_name> -d collect_logs command to decompress the log package. In the preceding command, <zip_name> indicates the package name.
# date Wed Sep 20 02:49:24 EDT 2023 # ls huawei-csi-2023-09-20-02:48:22-all.zip
Collecting the Log of a Single CSI Node Using oceanctl
Use a remote access tool, such as PuTTY, to log in to the node checked in Performing Check Before Collection through the management IP address.
Run the **oceanctl collect logs -n <namespace> -N **<nodeName> command to collect CSI logs of all nodes where CSI containers reside in the cluster.
oceanctl collect logs -n huawei-csi -N node-1Check the log package generated in the /tmp directory. You can run the unzip <zip_name> -d collect_logs command to decompress the log package. In the preceding command, <zip_name> indicates the package name.
# date Thu Sep 21 04:08:47 EDT 2023 # ls huawei-csi-2023-09-21-04:05:15-node-1.zip
8.3 - Downloading a Container Image
Downloading a Container Image Using containerd
Run the following command to download an image to a local path. In the command, image:tag indicates the image to be pulled and its tag.
ctr image pull <image>:<tag>Run the following command to export the image to a file. In the command, image:tag indicates the image to be exported, and file indicates the name of the exported image file.
ctr image export <file>.tar <image>:<tag>
Downloading a Container Image Using Docker
Run the following command to download an image to a local path. In the command, image:tag indicates the image to be pulled.
docker pull <image>:<tag>Run the following command to export the image to a file. In the command, image:tag indicates the image to be exported, and file indicates the name of the exported image file.
docker save <image>:<tag> -o <file>.tar
Downloading a Container Image Using Podman
Run the following command to download an image to a local path. In the command, image:tag indicates the image to be pulled.
podman pull <image>:<tag>Run the following command to export the image to a file. In the command, image:tag indicates the image to be exported, and file indicates the name of the exported image file.
podman save <image>:<tag> -o <file>.tar
8.4 - Updating the huawei-csi-controller or huawei-csi-node Service
Perform this operation when you need to update the huawei-csi-controller or huawei-csi-node service, for example, changing the number of copies for the huawei-csi-controller service.
Procedure
Use a remote access tool, such as PuTTY, to log in to any master node in the Kubernetes cluster through the management IP address.
Go to the /helm/esdk directory and run the following command to obtain the original service configuration file. helm-huawei-csi indicates the Helm chart name specified during the installation of the earlier version, and huawei-csi indicates the Helm chart namespace specified during the installation of the earlier version. For details about the component package path, see Table 1 .
helm get values helm-huawei-csi -n huawei-csi -a > ./update-values.yamlRun the vi update-values.yaml command to open the file obtained in 2 and modify the configuration items by referring to Parameters in the values.yaml File of Helm . After the modification, press Esc and enter :wq! to save the modification.
Run the following command to update Huawei CSI services.
helm upgrade helm-huawei-csi ./ -n huawei-csi -f ./update-values.yaml
8.5 - Modifying the Log Output Mode
huawei-csi supports two log output modes: file and console. file indicates that logs are output to the fixed directory (/var/log/huawei), and console indicates that logs are output to the standard directory of the container. You can set the log output mode as required. The default mode is file.
Procedure
Use a remote access tool, such as PuTTY, to log in to any master node in the Kubernetes cluster through the management IP address.
Go to the /helm/esdk directory and run the following command to obtain the original service configuration file. helm-huawei-csi indicates the Helm chart name specified during the installation of the earlier version, and huawei-csi indicates the Helm chart namespace specified during the installation of the earlier version. For details about the component package path, see Table 1 .
helm get values helm-huawei-csi -n huawei-csi -a > ./update-values.yamlRun the vi update-values.yaml command to open the file obtained in 2 and modify the configuration items. After the modification, press Esc and enter :wq! to save the modification.
# The CSI driver parameter configuration csiDriver: # Driver name, it is strongly recommended not to modify this parameter # The CCE platform needs to modify this parameter, e.g. csi.oceanstor.com driverName: csi.huawei.com # Endpoint, it is strongly recommended not to modify this parameter endpoint: /csi/csi.sock # DR Endpoint, it is strongly recommended not to modify this parameter drEndpoint: /csi/dr-csi.sock # Maximum number of concurrent disk scans or detaches, support 1~10 connectorThreads: 4 # Flag to enable or disable volume multipath access, support [true, false] volumeUseMultipath: true # Multipath software used by fc/iscsi. support [DM-multipath, HW-UltraPath, HW-UltraPath-NVMe] scsiMultipathType: DM-multipath # Multipath software used by roce-nvme/fc-nvme. only support [HW-UltraPath-NVMe] nvmeMultipathType: HW-UltraPath-NVMe # Timeout interval for waiting for multipath aggregation when DM-multipath is used on the host. support 1~600 scanVolumeTimeout: 3 # Timeout interval for running command on the host. support 1~600 execCommandTimeout: 30 # check the number of paths for multipath aggregation # Allowed values: # true: the number of paths aggregated by DM-multipath is equal to the number of online paths # false: the number of paths aggregated by DM-multipath is not checked. # Default value: false allPathOnline: false # Interval for updating backend capabilities. support 60~600 backendUpdateInterval: 60 # Huawei-csi-controller log configuration controllerLogging: # Log record type, support [file, console] module: file # Log Level, support [debug, info, warning, error, fatal] level: info # Directory for storing logs fileDir: /var/log/huawei # Size of a single log file fileSize: 20M # Maximum number of log files that can be backed up. maxBackups: 9 # Huawei-csi-node log configuration nodeLogging: # Log record type, support [file, console] module: file # Log Level, support [debug, info, warning, error, fatal] level: info # Directory for storing logs fileDir: /var/log/huawei # Size of a single log file fileSize: 20M # Maximum number of log files that can be backed up. maxBackups: 9Run the following command to update the log configuration.
helm upgrade helm-huawei-csi ./ -n huawei-csi -f ./update-values.yaml
8.6 - Enabling the ReadWriteOncePod Feature Gate
The ReadWriteOnce access mode is the fourth access mode introduced by Kubernetes v1.22 for PVs and PVCs. If you create a Pod using a PVC in ReadWriteOncePod access mode, Kubernetes ensures that the Pod is the only Pod in the cluster that can read or write the PVC.
If the Kubernetes version is earlier than v1.29, you need to enable the ReadWriteOncePod feature in feature-gates of kube-apiserver, kube-scheduler, and kubelet.
Currently, the ReadWriteOncePod feature gate cannot be enabled on the CCE or CCE Agile platform.
Procedure
Enable the ReadWriteOncePod feature gate for kube-apiserver.
Use a remote access tool, such as PuTTY, to log in to any master node in the Kubernetes cluster through the management IP address.
Run the vi /etc/kubernetes/manifests/kube-apiserver.yaml command, press I or Insert to enter the insert mode, and add –feature-gates=ReadWriteOncePod=true to the kube-apiserver container. After the modification is complete, press Esc and enter :wq! to save the modification.
... spec: containers: - command: - kube-apiserver - --feature-gates=ReadWriteOncePod=true ...
After the editing is complete, Kubernetes will automatically apply the updates.
Enable the ReadWriteOncePod feature gate for kube-scheduler.
Use a remote access tool, such as PuTTY, to log in to any master node in the Kubernetes cluster through the management IP address.
Run the vi /etc/kubernetes/manifests/kube-scheduler.yaml command, press I or Insert to enter the insert mode, and add –feature-gates=ReadWriteOncePod=true to the kube-scheduler container. After the modification is complete, press Esc and enter :wq! to save the modification.
... spec: containers: - command: - kube-scheduler - --feature-gates=ReadWriteOncePod=true ...
After the editing is complete, Kubernetes will automatically apply the updates.
Enable the ReadWriteOncePod feature gate for kubelet.
The dynamic Kubelet configuration function is not used since v1.22 and deleted in v1.24. Therefore, you need to perform the following operations on kubelet on each worker node in the cluster.Use a remote access tool, such as PuTTY, to log in to any worker node in the Kubernetes cluster through the management IP address.
Run the vi /var/lib/kubelet/config.yaml command, press I or Insert to enter the editing state, and add ReadWriteOncePod: true to the featureGates field of the KubeletConfiguration object. If the featureGates field does not exist, add it at the same time. After the modification is complete, press Esc and enter :wq! to save the modification.
apiVersion: kubelet.config.k8s.io/v1beta1 featureGates: ReadWriteOncePod: true ...
The default path of the kubelet configuration file is /var/lib/kubelet/config.yaml. Enter the path based on site requirements.After the configuration is complete, run the systemctl restart kubelet command to restart kubelet.
8.7 - Configuring Access to the Kubernetes Cluster as a Non-root User
Procedure
Copy the authentication file of the Kubernetes cluster and modify /etc/kubernetes/admin.conf to be the actual authentication file.
mkdir -p $HOME/.kube sudo cp -i /etc/kubernetes/admin.conf $HOME/.kube/configChange the user and user group of the authentication file.
sudo chown $(id -u):$(id -g) $HOME/.kube/configConfigure the KUBECONFIG environment variable of the current user. The following uses Ubuntu 20.04 as an example.
echo "export KUBECONFIG=$HOME/.kube/config" >> ~/.bashrc source ~/.bashrc
8.8 - Configuring IPv6
This section describes how to use Huawei CSI to configure IPv6.
8.8.1 - Configuring IPv6 During the Initial Installation of Huawei CSI
This section describes how to specify IPv6 during the initial installation of Huawei CSI.
Prerequisites
- IPv6 can be configured only when the storage backend type is oceanstor-nas, oceanstor-san, or oceanstor-dtree.
- The host environment and Kubernetes cluster environment support IPv6. For details, see IPv4/IPv6 dual-stack of Kubernetes .
Procedure
Install the CSI-dependent components by following the instructions in 1 to 7 in Installation Procedure .
Run the vi values.yaml command to open the configuration file and modify the service.ipFamilyPolicy and service.ipFamilies configuration items. For details about the parameters, see Table 5 .
The following is an example:
service: ipFamilyPolicy: SingleStack ipFamilies: - IPv6Install and deploy Huawei CSI by following the instructions in 8 to 9 in Installation Procedure .
Run the following command to check the status of the service in the huawei-csi namespace.
kubectl get service -n huawei-csiThe following is an example of the command output.
NAME TYPE CLUSTER-IP EXTERNAL-IP PORT(S) AGE huawei-csi-controller ClusterIP fd00:10:96::8136 <none> 4433/TCP 19mRun the following command to check the value of ipFamilies for the huawei-csi-controller service.
kubectl get svc -n huawei-csi huawei-csi-controller -o=jsonpath='{.spec.ipFamilies}'The following is an example of the command output.
["IPv6"]Run the following command to check the value of ipFamilyPolicy for the huawei-csi-controller service.
kubectl get svc -n huawei-csi huawei-csi-controller -o=jsonpath='{.spec.ipFamilyPolicy}'The following is an example of the command output.
SingleStack
8.8.2 - Switching from IPv4 to IPv6 for Huawei CSI
This section describes how to switch from IPv4 to IPv6 when updating Huawei CSI.
Prerequisites
- The host environment and Kubernetes cluster environment support IPv6. For details, see IPv4/IPv6 dual-stack of Kubernetes .
- Huawei CSI has been installed and services are running properly.
Procedure
Run the following command to obtain the original service configuration file. helm-huawei-csi indicates the Helm chart name specified during the installation of the earlier version, and huawei-csi indicates the Helm chart namespace specified during the installation of the earlier version.
helm get values helm-huawei-csi -n huawei-csi -a > ./update-values.yamlRun the vi update-values.yaml command to open the file obtained in 1 and modify the service.ipFamilyPolicy and service.ipFamilies configuration items. For details about the parameters, see Table 5 .
The following is an example:
service: ipFamilyPolicy: SingleStack ipFamilies: - IPv6Before switching to IPv6, run the following command to delete the service in the huawei-csi namespace.
kubectl delete service -n huawei-csi --allRun the following command to upgrade Huawei CSI. In the following command, helm-huawei-csi indicates the specified Helm chart name, huawei-csi indicates the specified Helm chart namespace, and update-values.yaml indicates the file obtained in 1 .
helm upgrade helm-huawei-csi ./ -n huawei-csi -f ./values.yaml -f ./update-values.yamlRun the following command to query the ipFamilies parameter of the huawei-csi-controller service after the update.
kubectl get svc -n huawei-csi huawei-csi-controller -o=jsonpath='{.spec.ipFamilies}'The expected output is as follows:
["IPv6"]
8.9 - Configuring Storage Topology Awareness
In the Kubernetes cluster, resources can be scheduled and provisioned based on the topology labels of nodes and the topology capabilities supported by storage backends.
Prerequisites
You need to configure topology labels on worker nodes in the cluster. The method is as follows:
Use a remote access tool, such as PuTTY, to log in to any master node in the Kubernetes cluster through the management IP address.
Run the following command to view information about worker nodes in the current cluster.
kubectl get nodeThe following is an example of the command output.
NAME STATUS ROLES AGE VERSION node01 Ready controlplane,etcd,worker 42d v1.22.3 node02 Ready worker 42d v1.22.3 node03 Ready worker 42d v1.22.3Run the following command to configure a topology label for a worker node. In the preceding command, nodename indicates the name of a worker node. For details about the key and value parameters, see Table 1 .
kubectl label node <nodename> <key>=<value>Table 1 Description of topology label parameters
If key is set to zone or region, value is a user-defined parameter.
If key is set to protocol.<protocol>, value is fixed at csi.huawei.com.
- A topology label must start with topology.kubernetes.io. Topology label examples:
- Example 1: topology.kubernetes.io/region=China-west
- Example 2: topology.kubernetes.io/zone=ChengDu
- Example 3: topology.kubernetes.io/protocol.iscsi=csi.huawei.com
- Example 4: topology.kubernetes.io/protocol.fc=csi.huawei.com
- A key in a topology label on a node can have only one value.
- If multiple protocols are configured in a topology label on a node, when you configure a StorageClass, the StorageClass needs to meet only one of the protocols.
- If both the region and the zone are configured in a topology label on a node, when you configure a StorageClass, the StorageClass must meet all filter criteria.
Run the following command to view the label information about all worker nodes in the current cluster.
kubectl get nodes -o=jsonpath='{range .items[*]}[{.metadata.name}, {.metadata.labels}]{"\n"}{end}' | grep --color "topology.kubernetes.io"The following is an example of the command output.
[node01,"beta.kubernetes.io/arch":"amd64","beta.kubernetes.io/os":"linux","kubernetes.io/arch":"amd64","kubernetes.io/hostname":"node01","kubernetes.io/os":"linux","node-role.kubernetes.io/controlplane":"true","node-role.kubernetes.io/etcd":"true","node-role.kubernetes.io/worker":"true","topology.kubernetes.io/zone":"ChengDu"}]
Procedure
Use a remote access tool, such as PuTTY, to log in to any master node in the Kubernetes cluster through the management IP address.
Go to the directory where the Helm project is located. If the previous Helm project cannot be found, copy the helm directory in the component package to any directory on the master node. For details about the component package path, see Table 1 .
Go to the backend service configuration directory /examples/backend/ and back up the backend.yaml file.
cp backend.yaml backend.yaml.bakRun the vi backend.yaml command to open the file and configure topology awareness as required. The following is an example. After the modification is complete, press Esc and enter :wq! to save the modification.
storage: "oceanstor-san" name: "dorado-iscsi-155" namespace: "huawei-csi" urls: - "https://192.168.129.155:8088" pools: - "StoragePool001" parameters: protocol: "iscsi" portals: - "10.10.30.20" - "10.10.30.21" supportedTopologies: - { "topology.kubernetes.io/region": "China-west", "topology.kubernetes.io/zone": "ChengDu" } - { "topology.kubernetes.io/region": "China-south","topology.kubernetes.io/zone": "ShenZhen" } maxClientThreads: "30"Run the following command to delete the storage backend to be modified. In the command, dorado-iscsi-155 indicates the storage backend name.
oceanctl delete backend dorado-iscsi-155 -n huawei-csiRun the following command to create a storage backend.
oceanctl create backend -f ../examples/backend/backend.yaml -i yamlEnter the storage user name and password as prompted.
Please enter this backend user name:admin Please enter this backend password:Run the vi StorageClass.yaml command to modify the .yaml file. Press I or Insert to enter the insert mode and add related parameters in the .yaml file. For details about the parameters, see Table 2 . After the modification is complete, press Esc and enter :wq! to save the modification.
Add the following configuration items to the StorageClass.yaml file.
Example 1: Configure zone and region information in the StorageClass.
kind: StorageClass apiVersion: storage.k8s.io/v1 metadata: name: example-storageclass provisioner: csi.huawei.com parameters: volumeType: lun allocType: thin volumeBindingMode: WaitForFirstConsumer allowedTopologies: - matchLabelExpressions: - key: topology.kubernetes.io/zone values: - ChengDu - key: topology.kubernetes.io/region values: - China-westExample 2: Configure protocol information in the StorageClass.
kind: StorageClass apiVersion: storage.k8s.io/v1 metadata: name: protocol-example-storageclass provisioner: csi.huawei.com parameters: volumeType: lun allocType: thin volumeBindingMode: WaitForFirstConsumer allowedTopologies: - matchLabelExpressions: - key: topology.kubernetes.io/protocol.iscsi values: - csi.huawei.com
Table 2 StorageClass parameter description
PersistentVolume binding mode, used to control the time when PersistentVolume resources are dynamically allocated and bound.
You can set this parameter to WaitForFirstConsumer or Immediate.
WaitForFirstConsumer: indicates that the binding and allocation of the PersistentVolume are delayed until a Pod that uses the PVC is created.
Immediate: The PersistentVolume is bound and allocated immediately after a PVC is created.
Topology information label, which is used to filter CSI backends and Kubernetes nodes. If the matching fails, PVCs or Pods cannot be created.
key: This parameter can be set to topology.kubernetes.io/zone or topology.kubernetes.io/region.
topology.kubernetes.io/protocol.<protocol>: <protocol> indicates the protocol type and can be iscsi, fc, or nfs.
If key is topology.kubernetes.io/zone or topology.kubernetes.io/region, values must be the same as that in Prerequisites.
If key is topology.kubernetes.io/protocol.<protocol>, value is fixed at csi.huawei.com.
Run the following command to create a StorageClass based on the .yaml file.
kubectl create -f StorgeClass.yamlUse the StorageClass to create a PVC with the topology capability. For details, see Table 1 .
8.10 - Configuring ALUA
Asymmetric Logical Unit Access (ALUA) is a model that supports access to multiple target ports. In the multipathing state, ALUA presents active/passive volumes to the host and provides a port access status switchover interface to switch over the working controllers for volumes. For example, when a volume of a controller fails, you can set the status of ports on the controller to Unavailable. After the host multipathing software that supports ALUA detects the status, it switches subsequent I/Os from the failed controller to the peer controller.
8.10.1 - Configuring ALUA Parameters for a Huawei Enterprise Storage Backend
For details about how to configure ALUA for Huawei enterprise storage, see the host connectivity guide of the corresponding product.
The ALUA configuration may vary according to the OS. Visit Huawei Technical Support , enter Host Connectivity Guide in the search box, and click the search button. In the search result, select the host connectivity guide for the desired OS. Configure ALUA according to the actual situation and the description in the guide. Huawei CSI will apply the configuration items you set to the initiator of the host on Huawei storage.
A node with a Pod provisioned does not proactively change ALUA information. The host ALUA configuration changes only after a Pod is provisioned again to the node.
ALUA Parameters for OceanStor V5 Series
Table 1 lists the ALUA parameters supported by Huawei CSI for OceanStor V5 series.
Table 1 ALUA parameters supported by Huawei CSI for OceanStor V5 series
Host name rule. This parameter is mandatory. You can use a regular expression. | The host name can be obtained by running the cat /etc/hostname command. It can be matched by using regular expressions. When HostName is set to *, the configuration takes effect on hosts with any name. For details, see Regular expression. If the host name of a compute node matches multiple ALUA configuration options, they will be sorted based on the matching accuracy and the first ALUA configuration option will be used. For details about the sorting rules, see Rules for Matching ALUA Configuration Items with Host Names. | |
Multipathing type. This parameter is mandatory. The value can be: | ||
Initiator switchover mode. This parameter is conditionally mandatory. The value can be: | This parameter needs to be specified only when third-party multipathing is used. Configure the initiator switchover mode by referring to the connectivity guide. | |
Special mode type of the initiator. This parameter is conditionally mandatory. The value can be: | This parameter needs to be specified only when the initiator switchover mode is special ALUA. Configure the special mode type of the initiator by referring to the connectivity guide. | |
Initiator path type. This parameter is conditionally mandatory. The value can be: | This parameter needs to be specified only when third-party multipathing is used. Configure the initiator path type by referring to the connectivity guide. |
The following uses OceanStor 18500 V5 as an example to describe how to connect to Red Hat. For details about the host connectivity guide, see Huawei SAN Storage Host Connectivity Guide for Red Hat.
The following ALUA configuration example is recommended in the OceanStor 18500 V5 host connectivity guide for Red Hat in non-HyperMetro storage scenarios. In this example, the OS on compute node myhost01 in the Kubernetes cluster is RHEL 5.x, and that on other compute nodes is RHEL 7.x. According to the recommendation, the switchover mode of RHEL 5.x should be “ALUA not used”, and that of RHEL 7.x should be “common ALUA”.
storage: oceanstor-san
name: oceanstor-iscsi-155
urls:
- https://192.168.129.155:8088
- https://192.168.129.156:8088
pools:
- StoragePool001
parameters:
protocol: iscsi
portals:
- 192.168.128.120
- 192.168.128.121
ALUA:
^myhost01$:
MULTIPATHTYPE: 1
FAILOVERMODE: 2
PATHTYPE: 0
"*":
MULTIPATHTYPE: 1
FAILOVERMODE: 1
PATHTYPE: 0
ALUA Parameters for OceanStor and OceanStor Dorado Series
Table 2 lists the ALUA parameters supported by Huawei CSI for OceanStor and OceanStor Dorado series.
By default, the initiator host access mode of OceanStor and OceanStor Dorado series storage is “balanced mode”. Therefore, you are advised not to configure ALUA parameters for OceanStor and OceanStor Dorado series storage.
Table 2 ALUA parameters for OceanStor and OceanStor Dorado series
Host name rule. This parameter is mandatory. You can use a regular expression. | The host name can be obtained by running the cat /etc/hostname command. It can be matched by using regular expressions. When HostName is set to *, the configuration takes effect on hosts with any name. For details, see Regular expression. If the host name of a compute node matches multiple ALUA configuration options, they will be sorted based on the matching accuracy and the first ALUA configuration option will be used. For details about the sorting rules, see Rules for Matching ALUA Configuration Items with Host Names. | |
Host access mode. This parameter is mandatory. The value can be: | The balanced mode is recommended in non-HyperMetro scenarios. | |
Whether the path of the host on the current storage array is preferred in HyperMetro scenarios. The value can be: | This parameter needs to be specified only when the host access mode is set to asymmetric. |
The following uses OceanStor Dorado 18000 as an example to describe how to connect to Red Hat. For details about the host connectivity guide, see OceanStor Dorado and OceanStor Host Connectivity Guide for Red Hat.
The following ALUA configuration example is recommended in the OceanStor Dorado 18000 host connectivity guide for Red Hat in non-HyperMetro storage scenarios.
storage: "oceanstor-san"
name: "dorado-iscsi-155"
urls:
- "https://192.168.129.155:8088"
- "https://192.168.129.156:8088"
pools:
- "StoragePool001"
parameters:
protocol: "iscsi"
portals:
- "192.168.128.120"
- "192.168.128.121"
ALUA:
"*":
accessMode: 0
Rules for Matching ALUA Configuration Items with Host Names
If the configured host name rule exactly matches the host name of the service node, the ALUA configuration item corresponding to the host name rule is used.
For example, the host name rule in configuration item 1 is * and that in configuration item 2 is ^myhost01$. If the host name of a compute node is myhost01, it exactly matches configuration item 2. In this case, Huawei CSI will apply the configuration information in configuration item 2 to the storage side.
If the configured host name rule does not exactly match the host name of the service node, the first ALUA configuration item matched by regular expressions is used.
For example, the host name rule in configuration item 1 is myhost0[0-9] and that in configuration item 2 is myhost0[5-9]. In this case, configuration item 1 has a higher priority than configuration item 2. If the host name of a compute node is myhost06, both configuration items can be matched. In this case, Huawei CSI will apply the configuration information in configuration item 1 to the storage side.
8.10.2 - Configuring ALUA Parameters for a Distributed Storage Backend
For details about how to configure ALUA for Huawei distributed storage, see the host connectivity guide of the corresponding product.
The ALUA configuration may vary according to the OS. Visit Huawei Technical Support , enter Host Connectivity Guide in the search box, and click the search button. In the search result, select the host connectivity guide for the desired OS. Configure ALUA according to the actual situation and the description in the guide. Huawei CSI will apply the configuration items you set to the initiator of the host on Huawei storage.
A node with a Pod provisioned does not proactively change ALUA information. The host ALUA configuration changes only after a Pod is provisioned again to the node. In non-HyperMetro scenarios of distributed storage, you are advised to set the switchover mode to “disable ALUA” (default value). This is because the storage system is in active/active mode and “enables ALUA” is meaningless. Therefore, you are advised not to configure ALUA parameters for distributed storage.
Table 1 lists the ALUA parameters supported by Huawei CSI for distributed storage.
Table 1 ALUA parameters for distributed storage
The value of HostName is the host name of a worker node, for example, HostName1 and HostName2. | The host name can be obtained by running the cat /etc/hostname command. It can be matched by using regular expressions. When HostName is set to *, the configuration takes effect on hosts with any name. For details, see Regular expression. If the host name of a compute node matches multiple ALUA configuration options, they will be sorted based on the matching accuracy and the first ALUA configuration option will be used. For details about the sorting rules, see Rules for Matching ALUA Configuration Items with Host Names. | |
Switchover mode. This parameter is mandatory. The value can be: | In non-HyperMetro scenario, you are advised to set the switchover mode to "disable ALUA". This is because the storage system is in active/active mode and "enables ALUA" is meaningless. Currently, Huawei CSI does not support SAN HyperMetro scenarios. Exercise caution when enabling ALUA. | |
Path type. This parameter is conditionally mandatory. The value can be: | This parameter is mandatory when the switchover mode is set to "enables ALUA". |
Rules for Matching ALUA Configuration Items with Host Names
If the configured host name rule exactly matches the host name of the service node, the ALUA configuration item corresponding to the host name rule is used.
For example, the host name rule in configuration item 1 is * and that in configuration item 2 is ^myhost01$. If the host name of a compute node is myhost01, it exactly matches configuration item 2. In this case, Huawei CSI will apply the configuration information in configuration item 2 to the storage side.
If the configured host name rule does not exactly match the host name of the service node, the first ALUA configuration item matched by regular expressions is used.
For example, the host name rule in configuration item 1 is myhost0[0-9] and that in configuration item 2 is myhost0[5-9]. In this case, configuration item 1 has a higher priority than configuration item 2. If the host name of a compute node is myhost06, both configuration items can be matched. In this case, Huawei CSI will apply the configuration information in configuration item 1 to the storage side.
8.10.3 - Example ALUA Configuration Policy of OceanStor V5 Series
Example 1: The configuration file content is as follows:
parameters:
ALUA:
"*":
MULTIPATHTYPE: 1
FAILOVERMODE: 3
SPECIALMODETYPE: 0
PATHTYPE: 0
node1:
MULTIPATHTYPE: 1
FAILOVERMODE: 3
SPECIALMODETYPE: 0
PATHTYPE: 1
If the host name is node1, both of the preceding ALUA configuration sections can be used to configure initiators. According to the configuration policy rules in Configuring ALUA Parameters for a Huawei Enterprise Storage Backend , the priority of the second configuration section (where HostName is node1) is higher than that of the first configuration section (where HostName is *).
Example 2: The configuration file content is as follows:
parameters:
ALUA:
node[0-9]:
MULTIPATHTYPE: 1
FAILOVERMODE: 3
SPECIALMODETYPE: 0
PATHTYPE: 0
node[5-7]:
MULTIPATHTYPE: 1
FAILOVERMODE: 3
SPECIALMODETYPE: 0
PATHTYPE: 1
If the host name is node6, both of the preceding ALUA configuration sections can be used to configure initiators. According to the configuration policy rules in Configuring ALUA Parameters for a Huawei Enterprise Storage Backend , select the first ALUA configuration section to configure initiators.
Example 3: The configuration file content is as follows:
parameters:
ALUA:
node$:
MULTIPATHTYPE: 1
FAILOVERMODE: 3
SPECIALMODETYPE: 0
PATHTYPE: 0
node10$:
MULTIPATHTYPE: 1
FAILOVERMODE: 3
SPECIALMODETYPE: 0
PATHTYPE: 1
According to the configuration policy rules in Configuring ALUA Parameters for a Huawei Enterprise Storage Backend : For host node1, select the first ALUA configuration section to configure initiators. For host node10, select the second ALUA configuration section to configure initiators. ^ matches the beginning of a character string, and $ matches the end of a character string.
8.10.4 - Example ALUA Configuration Policy of OceanStor Dorado
Example 1: The configuration file content is as follows:
parameters:
ALUA:
"*":
accessMode: 1
hyperMetroPathOptimized: 1
node1:
accessMode: 1
hyperMetroPathOptimized: 0
If the host name is node1, both of the preceding ALUA configuration sections can be used to configure initiators. According to the configuration policy rules in Configuring ALUA Parameters for a Huawei Enterprise Storage Backend , the priority of the second configuration section (where HostName is node1) is higher than that of the first configuration section (where HostName is *).
Example 2: The configuration file content is as follows:
parameters:
ALUA:
node[0-9]:
accessMode: 1
hyperMetroPathOptimized: 1
node[5-7]:
accessMode: 1
hyperMetroPathOptimized: 0
If the host name is node6, both of the preceding ALUA configuration sections can be used to configure initiators. According to the configuration policy rules in Configuring ALUA Parameters for a Huawei Enterprise Storage Backend , select the first ALUA configuration section to configure initiators.
Example 3: The configuration file content is as follows:
parameters:
node1$:
node[0-9]:
accessMode: 1
hyperMetroPathOptimized: 1
node10$:
accessMode: 1
hyperMetroPathOptimized: 0
According to the configuration policy rules in Configuring ALUA Parameters for a Huawei Enterprise Storage Backend : For host node1, select the first ALUA configuration section to configure initiators. For host node10, select the second ALUA configuration section to configure initiators. ^ matches the beginning of a character string, and $ matches the end of a character string.
8.10.5 - Example ALUA Configuration Policy of Distributed Storage
Example 1: The configuration file content is as follows:
parameters:
ALUA:
"*":
switchoverMode: Enable_alua
pathType: optimal_path
node1:
switchoverMode: Enable_alua
pathType: non_optimal_path
If the host name is node1, both of the preceding ALUA configuration sections can be used to configure initiators. According to the configuration policy rules in Configuring ALUA Parameters for a Distributed Storage Backend , the priority of the second configuration section (where HostName is node1) is higher than that of the first configuration section (where HostName is *).
Example 2: The configuration file content is as follows:
parameters:
ALUA:
node[0-9]:
switchoverMode: Enable_alua
pathType: optimal_path
node[5-7]:
switchoverMode: Enable_alua
pathType: non_optimal_path
If the host name is node6, both of the preceding ALUA configuration sections can be used to configure initiators. According to the configuration policy rules in Configuring ALUA Parameters for a Distributed Storage Backend , select the first ALUA configuration section to configure initiators.
Example 3: The configuration file content is as follows:
parameters:
ALUA:
node1$:
switchoverMode: Enable_alua
pathType: optimal_path
node10$:
switchoverMode: Enable_alua
pathType: non_optimal_path
According to the configuration policy rules in Configuring ALUA Parameters for a Distributed Storage Backend : For host node1, select the first ALUA configuration section to configure initiators. For host node10, select the second ALUA configuration section to configure initiators. ^ matches the beginning of a character string, and $ matches the end of a character string.
9 - Troubleshooting
9.1 - Huawei CSI Service Issues
9.1.1 - Failed to Start the huawei-csi-node Service with Error Message "/var/lib/iscsi is not a directory" Reported
Symptom
The huawei-csi-node service cannot be started. When you run the kubectl describe daemonset huawei-csi-node -n huawei-csi command, error message “/var/lib/iscsi is not a directory” is reported.
Root Cause Analysis
The /var/lib/iscsi directory does not exist in the huawei-csi-node container.
Solution or Workaround
Use a remote access tool, such as PuTTY, to log in to any master node in the Kubernetes cluster through the management IP address.
Go to the directory where the Helm project is located. If the previous Helm project cannot be found, copy the helm directory in the component package to any directory on the master node. For details about the component package path, see Table 1 .
Go to the templates directory and find the huawei-csi-node.yaml file.
cd /templatesRun the following command to set path in huawei-csi-node.yaml > volumes > iscsi-dir > hostPath to /var/lib/iscsi, save the file, and exit.
vi huawei-csi-node.yamlRun the following command to upgrade the Helm chart. The upgrade command will update the Deployment, DaemonSet, and RBAC resources. In the preceding command, helm-huawei-csi indicates the custom chart name and huawei-csi indicates the custom namespace.
helm upgrade helm-huawei-csi ./ -n huawei-csi -f values.yamlThe following is an example of the command output.
Release "helm-huawei-csi" has been upgraded. Happy Helming! NAME: helm-huawei-csi LAST DEPLOYED: Thu Jun 9 07:58:15 2022 NAMESPACE: huawei-csi STATUS: deployed REVISION: 2 TEST SUITE: None
9.1.2 - Huawei CSI Services Fail to Be Started and Error Message "/etc/localtime is not a file" Is Displayed
Symptom
During the installation and deployment of CSI, a Pod fails to run and is in the ContainerCreating state. Alarm /etc/localtime is not a file is generated for the Pod.
Root Cause Analysis
When the container mounts the /etc/localtime file on the host, the type is incorrectly identified. As a result, the container fails to mount the /etc/localtime file on the host and the Pod cannot run.
Procedure
Use a remote access tool, such as PuTTY, to log in to any master node in the Kubernetes cluster through the management IP address.
Run the following command to check the running status of the Pod of the CSI services.
kubectl get pod -n huawei-csiThe following is an example of the command output. huawei-csi indicates the namespace where the CSI services are deployed.
NAME READY STATUS RESTARTS AGE huawei-csi-controller-6dfcc4b79f-9vjtq 9/9 ContainerCreating 0 24m huawei-csi-controller-6dfcc4b79f-csphc 9/9 ContainerCreating 0 24m huawei-csi-node-g6f4k 3/3 ContainerCreating 0 20m huawei-csi-node-tqs87 3/3 ContainerCreating 0 20mRun the following command to check the Events parameter of the container.
kubectl describe pod huawei-csi-controller-6dfcc4b79f-9vjtq -n huawei-csiThe following is an example of the command output. In the command, huawei-csi-controller-6dfcc4b79f-9vjtq indicates the name of the Pod in the ContainerCreating state found in 2 , and huawei-csi indicates the namespace to which the Pod belongs.
... Events: Type Reason Age From Message ---- ------ ---- ---- ------- Normal Scheduled 96s default-scheduler Successfully assigned huawei-csi/huawei-csi-controller-6dfcc4b79f-9vjtq to node1 Warning FailedMount 33s (x8 over 96s) kubelet MountVolume.SetUp failed for volume "host-time" : hostPath type check failed: /etc/localtime is not a fileRun the cd /helm/esdk/templates command to go to the CSI installation package path. For the path, see Table 1 .
Take the huawei-csi-controller.yaml file as an example. Run the following command to view the file content.
vi huawei-csi-controller.yamlFind the host-time configuration item under volumes, and delete the type: File line. Perform the same operations on the huawei-csi-node.yaml deployment file that involves the configuration item in the templates directory.
... ... volumes: - hostPath: path: /var/log/ type: Directory name: log - hostPath: path: /etc/localtime type: File name: host-time ... ...Uninstall and reinstall the service by referring to Uninstallation Using Helm .
Run the following command to check whether the Pod running status of Huawei CSI services is Running.
kubectl get pod -n huawei-csiThe following is an example of the command output.
NAME READY STATUS RESTARTS AGE huawei-csi-controller-6dfcc4b79f-9vjts 9/9 Running 0 24m huawei-csi-controller-6dfcc4b79f-csphb 9/9 Running 0 24m huawei-csi-node-g6f41 3/3 Running 0 20m huawei-csi-node-tqs85 3/3 Running 0 20m
9.1.3 - Failed to Start huawei-csi Services with the Status Displayed as InvalidImageName
Symptom
The huawei-csi services (huawei-csi-controller or huawei-csi-node) cannot be started. After the kubectl get pod -A | grep huawei command is executed, the command output shows that the service status is InvalidImageName.
kubectl get pod -A | grep huawei
The following is an example of the command output.
huawei-csi huawei-csi-controller-fd5f97768-qlldc 6/9 InvalidImageName 0 16s
huawei-csi huawei-csi-node-25txd 2/3 InvalidImageName 0 15s
Root Cause Analysis
In the .yaml configuration files of the controller and node, the Huawei CSI image version number is incorrect. For example:
...
- name: huawei-csi-driver
image: huawei-csi:4.11.0
...
Solution or Workaround
Use a remote access tool, such as PuTTY, to log in to any master node in the Kubernetes cluster through the management IP address.
Run the following command to modify the configuration file of the huawei-csi-node service. Press I or Insert to enter the insert mode and modify related parameters. After the modification is complete, press Esc and enter :wq! to save the modification.
kubectl edit daemonset huawei-csi-node -o yaml -n=huawei-csi- In huawei-csi-driver in the sample .yaml file, modify image to Huawei CSI image huawei-csi:4.11.0.
containers: ... - name: huawei-csi-driver image: huawei-csi:4.11.0Run the following command to modify the configuration file of the huawei-csi-controller service: Press I or Insert to enter the insert mode and modify related parameters. After the modification is complete, press Esc and enter :wq! to save the modification.
kubectl edit deployment huawei-csi-controller -o yaml -n=huawei-csi- In huawei-csi-driver in the sample .yaml file, modify image to Huawei CSI image huawei-csi:4.11.0.
containers: ... - name: huawei-csi-driver image: huawei-csi:4.11.0Wait until the huawei-csi-node and huawei-csi-controller services are started.
Run the following command to check whether the huawei-csi services are started.
kubectl get pod -A | grep huaweiThe following is an example of the command output. If the Pod status is Running, the services are started successfully.
huawei-csi huawei-csi-controller-58799449cf-zvhmv 9/9 Running 0 2m29s huawei-csi huawei-csi-node-7fxh6 3/3 Running 0 12m
9.2 - Storage Backend Issues
9.2.1 - A Backend Fails to Be Created Using the oceanctl Tool and Error Message "context deadline exceeded" Is Displayed
Symptom
A user fails to create a storage backend using the oceanctl tool, and “failed to call webhook: xxx :context deadline exceeded; error: exist status 1” is displayed on the console.
Root Cause Analysis
When a storage backend is created, the webhook service provided by CSI is invoked to verify the connectivity with the storage management network and the storage account and password. The possible causes are as follows:
- Huawei CSI fails to verify the connectivity of the storage management network.
- The communication between kube-apiserver and CSI webhook is abnormal.
Huawei CSI Fails to Verify the Connectivity of the Storage Management Network
Perform the following steps to check whether Huawei CSI fails to verify the connectivity of the storage management network.
Use a remote access tool, such as PuTTY, to log in to any master node in the Kubernetes cluster through the management IP address.
Run the following command to obtain CSI service information. huawei-csi indicates the namespace where the CSI services are deployed.
kubectl get pod -n huawei-csi -owideThe following is an example of the command output.
NAME READY STATUS RESTARTS AGE IP NODE NOMINATED NODE READINESS GATES huawei-csi-controller-xxx 9/9 Running 0 19h host-ip1 host-1 <none> <none> huawei-csi-node-mnqbz 3/3 Running 0 19h host-ip1 host-1 <none> <none>Log in to the node where huawei-csi-controller resides, for example, host-1 in 2 .
Go to the /var/log/huawei directory.
# cd /var/log/huaweiView the storage-backend-controller log. The following uses the storage connection timeout as an example.
tail -n 1000 storage-backend-controllerThe following is a log example.
2024-01-01 06:30:44.280661 1 [INFO]: Try to login https://192.168.129.155:8088/deviceManager/rest 2024-01-01 06:31:44.281626 1 [ERROR]: Send request method: POST, Url: https://192.168.129.155:8088/deviceManager/rest/xx/sessions, error: Post "https://192.168.129.155:8088/deviceManager/rest/xx/sessions": context deadline exceeded (Client.Timeout exceeded while awaiting headers) 2024-01-01 06:31:44.281793 1 [WARNING]: Login https://192.168.129.155:8088/deviceManager/rest error due to connection failure, gonna try another Url 2024-01-01 06:31:44.291668 1 [INFO]: Finished validateCreate huawei-csi/backend-test. 2024-01-01 06:31:44.291799 1 [ERROR]: Failed to validate StorageBackendClaim, error: unconnectedIf the log contains information about login timeout, login failure, or long request duration, check the connectivity between the host machine and the storage or the network status.
If no request is recorded in the log, the communication between kube-apiserver and CSI webhook is abnormal.
Abnormal Communication Between kube-apiserver and CSI Webhook
Contact the Kubernetes platform administrator to check the network between kube-apiserver and CSI webhook. For example, if kube-apiserver has an HTTPS proxy, the CSI webhook service may fail to be accessed.
In the temporary workaround, the webhook resource will be deleted. This resource is used to check whether the entered account information is correct and whether the connection to the storage can be set up when a storage backend is created. Therefore, deleting this resource affects only the verification during backend creation and does not affect other functions. Pay attention to the following:
- Ensure that the host machine where the huawei-csi-controller service is located can properly communicate with the storage.
- Ensure that the entered account and password are correct.
Run the following command to view CSI webhook information.
kubectl get validatingwebhookconfiguration storage-backend-controller.xuanwu.huawei.ioThe following is an example of the command output.
NAME WEBHOOKS AGE storage-backend-controller.xuanwu.huawei.io 1 4d22hContact the Kubernetes platform administrator to check whether the communication between kube-apiserver and CSI webhook is abnormal.
Perform the following temporary workaround: Run the following command to delete the webhook.
kubectl delete validatingwebhookconfiguration storage-backend-controller.xuanwu.huawei.ioCreate a storage backend. For details, see Storage Backend Management .
If the communication between kube-apiserver and CSI webhook is restored, you need to reconstruct the webhook. In this case, run the following command to restart CSI Controller and restore the number of CSI Controller copies by specifying –replicas=*. In the following example, the number is restored to 1. Change it based on actual requirements.
Change the number of copies to 0 first.
kubectl scale deployment huawei-csi-controller -n huawei-csi --replicas=0Then restore the number of copies to the original number.
kubectl scale deployment huawei-csi-controller -n huawei-csi --replicas=1
9.2.2 - The Value of the ONLINE Field Is "false" When the oceanctl Tool Is Used to Obtain Storage Backend Information
Symptom
The following command is executed to check storage backend status:
oceanctl get backend
The value of the ONLINE field of the storage backend is false:
NAMESPACE NAME PROTOCOL STORAGETYPE SN STATUS ONLINE Url
huawei-csi backend-201-nas-nfs nfs oceanstor-nas XXXXXXXXXXXXXX000006 Bound false https://192.168.129.157:8088
Root Cause Analysis
When CSI uses the account and password entered during storage backend creation to log in to the storage backend, if the login fails due to either of the following reasons, the ONLINE field will be set to false.
- Incorrect account password: The possible cause is that the password is changed on the storage backend but not updated in the Kubernetes cluster. For details about how to solve this problem, see Solution or Workaround .
- Locked account. For details about how to solve this problem, see An Account Is Locked After the Password Is Updated on the Storage Device .
Solution or Workaround
- Obtain the latest account password.
- Update the storage backend password by following the instructions in Updating the Password of a Storage Backend Using oceanctl .
9.2.3 - An Account Is Locked After the Password Is Updated on the Storage Device
Symptom
After a user changes the password on the storage device, the account is locked.
Root Cause Analysis
CSI uses the account and password configured on the storage device to log in to the storage device. After the account password is changed on the storage device, CSI attempts to log in to the storage device again after the login fails. Take OceanStor Dorado as an example. The default login policy is that an account will be locked after three consecutive password verification failures. Therefore, when CSI retries for more than three times, the account will be locked.
Solution or Workaround
If the backend account is admin, run the following command to set the number of huawei-csi-controller service copies to 0. If an account other than admin is used, skip this step.
kubectl scale deployment huawei-csi-controller -n huawei-csi --replicas=0Log in to the storage device as user admin and modify the login policy. Take OceanStor Dorado as an example. On DeviceManager, choose Settings > User and Security > Security Policies > Login Policy, click Modify, and disable Account Lockout.
If the backend account is admin, run the following command to restore the number of CSI Controller copies using –replicas=*. In the following example, the number of copies is restored to 1. Change it based on site requirements. If an account other than admin is used, skip this step.
kubectl scale deployment huawei-csi-controller -n huawei-csi --replicas=1Use the oceanctl tool to change the storage backend password. For details about how to change the backend password, see Updating a Storage Backend .
Log in to the storage device as user admin and modify the login policy. Take OceanStor Dorado as an example. On DeviceManager, choose Settings > User and Security > Security Policies > Login Policy, click Modify, and enable Account Lockout.
9.3 - PVC Issues
9.3.1 - When a PVC Is Created, the PVC Is in the Pending State
Symptom
A PVC is created. After a period of time, the PVC is still in the Pending state.
Root Cause Analysis
Cause 1: A StorageClass with the specified name is not created in advance. As a result, Kubernetes cannot find the specified StorageClass name when a PVC is created.
Cause 2: The storage pool capability does not match the StorageClass capability. As a result, huawei-csi fails to select a storage pool.
Cause 3: An error code (for example, 50331651) is returned by a RESTful interface of the storage. As a result, huawei-csi fails to create a PVC.
Cause 4: The storage does not return a response within the timeout period set by huawei-csi. As a result, huawei-csi returns a timeout error to Kubernetes.
Cause 5: Other causes.
Solution or Workaround
When a PVC is created, if the PVC is in the Pending state, you need to take different measures according to the following causes.
Use a remote access tool, such as PuTTY, to log in to any master node in the Kubernetes cluster through the management IP address.
Run the following command to view details about the PVC.
kubectl describe pvc mypvcPerform the corresponding operation according to the Events information in the detailed PVC information.
If the PVC is in the Pending state due to cause 1, perform the following steps.
Events: Type Reason Age From Message ---- ------ ---- ---- ------- Warning ProvisioningFailed 0s (x15 over 3m24s) persistentvolume-controller storageclass.storage.k8s.io "mysc" not found- Delete the PVC.
- Create a StorageClass. For details, see Configuring a StorageClass .
- Create a PVC. For details, see Configuring PVs .
If the PVC is in the Pending state due to cause 2, perform the following steps.
Events: Type Reason Age From Message ---- ------ ---- ---- ------- Normal Provisioning 63s (x3 over 64s) csi.huawei.com_huawei-csi-controller-b59577886-qqzm8_58533e4a-884c-4c7f-92c3-6e8a7b327515 External provisioner is provisioning volume for claim "default/mypvc" Warning ProvisioningFailed 63s (x3 over 64s) csi.huawei.com_huawei-csi-controller-b59577886-qqzm8_58533e4a-884c-4c7f-92c3-6e8a7b327515 failed to provision volume with StorageClass "mysc": rpc error: code = Internal desc = failed to select pool, the capability filter failed, error: failed to select pool, the final filter field: replication, parameters map[allocType:thin replication:True size:1099511627776 volumeType:lun]. please check your storage class- Delete the PVC.
- Delete the StorageClass.
- Modify the StorageClass.yaml file based on the Events information.
- Create a StorageClass. For details, see Configuring a StorageClass .
- Create a PVC. For details, see Configuring PVs .
If the PVC is in the Pending state due to cause 3, contact Huawei engineers.
Events: Type Reason Age From Message ---- ------ ---- ---- ------- Normal Provisioning 63s (x4 over 68s) csi.huawei.com_huawei-csi-controller-b59577886-qqzm8_58533e4a-884c-4c7f-92c3-6e8a7b327515 External provisioner is provisioning volume for claim "default/mypvc" Warning ProvisioningFailed 62s (x4 over 68s) csi.huawei.com_huawei-csi-controller-b59577886-qqzm8_58533e4a-884c-4c7f-92c3-6e8a7b327515 failed to provision volume with StorageClass "mysc": rpc error: code = Internal desc = Create volume map[ALLOCTYPE:1 CAPACITY:20 DESCRIPTION:Created from Kubernetes CSI NAME:pvc-63ebfda5-4cf0-458e-83bd-ecc PARENTID:0] error: 50331651If the PVC is in the Pending state due to cause 4, perform the following steps.
Events: Type Reason Age From Message ---- ------ ---- ---- ------- Normal Provisioning 63s (x3 over 52s) csi.huawei.com_huawei-csi-controller-b59577886-qqzm8_58533e4a-884c-4c7f-92c3-6e8a7b327515 External provisioner is provisioning volume for claim "default/mypvc" Warning ProvisioningFailed 63s (x3 over 52s) csi.huawei.com_huawei-csi-controller-b59577886-qqzm8_58533e4a-884c-4c7f-92c3-6e8a7b327515 failed to provision volume with StorageClass "mysc": rpc error: code = Internal desc = context deadline exceeded (Client.Timeout exceeded while awaiting headers)- Wait for 10 minutes and check the PVC details again by referring to this section.
- If it is still in the Pending state, contact Huawei engineers.
If the PVC is in the Pending state due to cause 5, contact Huawei engineers.
9.3.2 - Before a PVC Is Deleted, the PVC Is in the Pending State
Symptom
Before a PVC is deleted, the PVC is in the Pending state.
Root Cause Analysis
Cause 1: A StorageClass with the specified name is not created in advance. As a result, Kubernetes cannot find the specified StorageClass name when a PVC is created.
Cause 2: The storage pool capability does not match the StorageClass capability. As a result, huawei-csi fails to select a storage pool.
Cause 3: An error code (for example, 50331651) is returned by a RESTful interface of the storage. As a result, huawei-csi fails to create a PVC.
Cause 4: The storage does not return a response within the timeout period set by huawei-csi. As a result, huawei-csi returns a timeout error to Kubernetes.
Cause 5: Other causes.
Solution or Workaround
To delete a PVC in the Pending state, you need to take different measures according to the following causes.
Use a remote access tool, such as PuTTY, to log in to any master node in the Kubernetes cluster through the management IP address.
Run the following command to view details about the PVC.
kubectl describe pvc mypvcPerform the corresponding operation according to the Events information in the detailed PVC information.
If the PVC is in the Pending state due to cause 1, run the **kubectl delete pvc **mypvc command to delete the PVC.
Events: Type Reason Age From Message ---- ------ ---- ---- ------- Warning ProvisioningFailed 0s (x15 over 3m24s) persistentvolume-controller storageclass.storage.k8s.io "mysc" not foundIf the PVC is in the Pending state due to cause 2, run the **kubectl delete pvc **mypvc command to delete the PVC.
Events: Type Reason Age From Message ---- ------ ---- ---- ------- Normal Provisioning 63s (x3 over 64s) csi.huawei.com_huawei-csi-controller-b59577886-qqzm8_58533e4a-884c-4c7f-92c3-6e8a7b327515 External provisioner is provisioning volume for claim "default/mypvc" Warning ProvisioningFailed 63s (x3 over 64s) csi.huawei.com_huawei-csi-controller-b59577886-qqzm8_58533e4a-884c-4c7f-92c3-6e8a7b327515 failed to provision volume with StorageClass "mysc": rpc error: code = Internal desc = failed to select pool, the capability filter failed, error: failed to select pool, the final filter field: replication, parameters map[allocType:thin replication:True size:1099511627776 volumeType:lun]. please check your storage classIf the PVC is in the Pending state due to cause 3, run the kubectl delete pvc mypvc command to delete the PVC.
Events: Type Reason Age From Message ---- ------ ---- ---- ------- Normal Provisioning 63s (x4 over 68s) csi.huawei.com_huawei-csi-controller-b59577886-qqzm8_58533e4a-884c-4c7f-92c3-6e8a7b327515 External provisioner is provisioning volume for claim "default/mypvc" Warning ProvisioningFailed 62s (x4 over 68s) csi.huawei.com_huawei-csi-controller-b59577886-qqzm8_58533e4a-884c-4c7f-92c3-6e8a7b327515 failed to provision volume with StorageClass "mysc": rpc error: code = Internal desc = Create volume map[ALLOCTYPE:1 CAPACITY:20 DESCRIPTION:Created from Kubernetes CSI NAME:pvc-63ebfda5-4cf0-458e-83bd-ecc PARENTID:0] error: 50331651If the PVC is in the Pending state due to cause 4, contact Huawei engineers.
Events: Type Reason Age From Message ---- ------ ---- ---- ------- Normal Provisioning 63s (x3 over 52s) csi.huawei.com_huawei-csi-controller-b59577886-qqzm8_58533e4a-884c-4c7f-92c3-6e8a7b327515 External provisioner is provisioning volume for claim "default/mypvc" Warning ProvisioningFailed 63s (x3 over 52s) csi.huawei.com_huawei-csi-controller-b59577886-qqzm8_58533e4a-884c-4c7f-92c3-6e8a7b327515 failed to provision volume with StorageClass "mysc": rpc error: code = Internal desc = context deadline exceeded (Client.Timeout exceeded while awaiting headers)If the PVC is in the Pending state due to cause 5, contact Huawei engineers.
9.3.3 - Failed to Expand the Capacity of a Generic Ephemeral Volume
Symptom
In an environment where the Kubernetes version is earlier than 1.25, the capacity of a generic ephemeral volume of the LUN type fails to be expanded. The system displays a message indicating that the PV capacity has been expanded, but the PVC capacity fails to be updated.
Root Cause Analysis
This problem is caused by a Kubernetes bug , which has been resolved in Kubernetes 1.25.
9.3.4 - Failed to Expand the PVC Capacity Because the Target Capacity Exceeds the Storage Pool Capacity
Symptom
In a Kubernetes environment earlier than 1.23, PVC capacity expansion fails when the target capacity exceeds the storage pool capacity.
Root Cause Analysis
This is a known issue in the Kubernetes community. For details, see Recovering from Failure when Expanding Volumes .
Solution or Workaround
For details, see Recovering from Failure when Expanding Volumes .
9.4 - Pod Issues
9.4.1 - After a Worker Node in the Cluster Breaks Down and Recovers, Pod Failover Is Complete but the Source Host Where the Pod Resides Has Residual Drive Letters
Symptom
A Pod is running on worker node A, and an external block device is mounted to the Pod through CSI. After worker node A is powered off abnormally, the Kubernetes platform detects that the node is faulty and switches the Pod to worker node B. After worker node A recovers, the drive letters on worker node A change from normal to faulty.
Environment Configuration
Kubernetes version: 1.18 or later
Storage type: block storage
Root Cause Analysis
After worker node A recovers, Kubernetes initiates an unmapping operation on the storage, but does not initiate a drive letter removal operation on the host. After Kubernetes completes the unmapping, residual drive letters exist on worker node A.
Solution or Workaround
Currently, you can only manually clear the residual drive letters on the host. Alternatively, restart the host again and use the disk scanning mechanism during the host restart to clear the residual drive letters. The specific method is as follows:
Check the residual drive letters on the host.
Run the following command to check whether a DM multipathing device with abnormal multipathing status exists.
multipath -llThe following is an example of the command output. The path status is failed faulty running, the corresponding DM multipathing device is dm-12, and the associated SCSI disks are sdi and sdj. If multiple paths are configured, multiple SCSI disks exist. Record these SCSI disks.
mpathb (3618cf24100f8f457014a764c000001f6) dm-12 HUAWEI ,XSG1 size=100G features='0' hwhandler='0' wp=rw `-+- policy='service-time 0' prio=-1 status=active |- 39:0:0:1 sdi 8:48 failed faulty running `- 38:0:0:1 sdj 8:64 failed faulty running- If yes, go to step 1.2 .
- If no, no further action is required.
Run the following command to check whether the residual DM multipathing device is readable.
dd if=/dev/dm-12 of=/dev/null count=1 bs=1M iflag=directThe following is an example of the command output. If the returned result is Input/output error and the read data is 0 bytes (0 B) copied, the device is unreadable. dm-xx indicates the device ID obtained in step 1.1 .
dd: error reading '/dev/dm-12': Input/output error 0+0 records in 0+0 records out 0 bytes (0 B) copied, 0.0236862 s, 0.0 kB/sLog in to the node again in another window.
Run the following command to view the suspended process.
ps -ef | grep dm-12 | grep -w ddThe following is an example of the command output.
root 21725 9748 0 10:33 pts/10 00:00:00 dd if=/dev/dm-12 of=/dev/null count=1 bs=10M iflag=directKill the pid.
kill -9 pidRecord the residual dm-xx device and associated disk IDs (for details, see step 1.1 ) and perform the clearing operation.
Clear the residual drive letters on the host.
Run the following command to delete residual multipathing aggregation device information according to the DM multipathing device obtained in step 1 .
multipath -f /dev/dm-12If an error is reported, contact technical support engineers.
Run the following command to clear the residual SCSI disks according to the drive letters of the residual disks obtained in step 1 .
echo 1 > /sys/block/xxxx/device/deleteWhen multiple paths are configured, clear the residual disks based on the drive letters. The residual paths are sdi and sdj.
echo 1 > /sys/block/sdi/device/delete echo 1 > /sys/block/sdj/device/deleteIf an error is reported, contact technical support engineers.
Check whether the DM multipathing device and SCSI disk information has been cleared.
Run the following commands in sequence to query the multipathing and disk information. If the residual dm-12 device and SCSI disks sdi and sdj are cleared, the clearing is complete.
View multipathing information.
multipath -llThe following is an example of the command output. The residual dm-12 device is cleared.
mpathb (3618cf24100f8f457014a764c000001f6) dm-3 HUAWEI ,XSG1 size=100G features='0' hwhandler='0' wp=rw `-+- policy='service-time 0' prio=-1 status=active |- 39:0:0:1 sdd 8:48 active ready running `- 38:0:0:1 sde 8:64 active ready running mpathn (3618cf24100f8f457315a764c000001f6) dm-5 HUAWEI ,XSG1 size=100G features='0' hwhandler='0' wp=rw `-+- policy='service-time 0' prio=-1 status=active |- 39:0:0:2 sdc 8:32 active ready running `- 38:0:0:2 sdb 8:16 active ready runningView device information.
ls -l /sys/block/The following is an example of the command output. SCSI disks sdi and sdj are cleared.
total 0 lrwxrwxrwx 1 root root 0 Aug 11 19:56 dm-0 -> ../devices/virtual/block/dm-0 lrwxrwxrwx 1 root root 0 Aug 11 19:56 dm-1 -> ../devices/virtual/block/dm-1 lrwxrwxrwx 1 root root 0 Aug 11 19:56 dm-2 -> ../devices/virtual/block/dm-2 lrwxrwxrwx 1 root root 0 Aug 11 19:56 dm-3 -> ../devices/virtual/block/dm-3 lrwxrwxrwx 1 root root 0 Aug 11 19:56 sdb -> ../devices/platform/host35/session2/target35:0:0/35:0:0:1/block/sdb lrwxrwxrwx 1 root root 0 Aug 11 19:56 sdc -> ../devices/platform/host34/target34:65535:5692/34:65535:5692:0/block/sdc lrwxrwxrwx 1 root root 0 Aug 11 19:56 sdd -> ../devices/platform/host39/session6/target39:0:0/39:0:0:1/block/sdd lrwxrwxrwx 1 root root 0 Aug 11 19:56 sde -> ../devices/platform/host38/session5/target38:0:0/38:0:0:1/block/sde lrwxrwxrwx 1 root root 0 Aug 11 19:56 sdh -> ../devices/platform/host39/session6/target39:0:0/39:0:0:3/block/sdh lrwxrwxrwx 1 root root 0 Aug 11 19:56 sdi -> ../devices/platform/host38/session5/target38:0:0/38:0:0:3/block/sdiView disk information.
ls -l /dev/disk/by-id/The following is an example of the command output. SCSI disks sdi and sdj are cleared.
total 0 lrwxrwxrwx 1 root root 10 Aug 11 19:57 dm-name-mpathb -> ../../dm-3 lrwxrwxrwx 1 root root 10 Aug 11 19:58 dm-name-mpathn -> ../../dm-5 lrwxrwxrwx 1 root root 10 Aug 11 19:57 dm-uuid-mpath-3618cf24100f8f457014a764c000001f6 -> ../../dm-3 lrwxrwxrwx 1 root root 10 Aug 11 19:58 dm-uuid-mpath-3618cf24100f8f457315a764c000001f6 -> ../../dm-5 lrwxrwxrwx 1 root root 9 Aug 11 19:57 scsi-3618cf24100f8f457014a764c000001f6 -> ../../sdd lrwxrwxrwx 1 root root 9 Aug 11 19:57 scsi-3618cf24100f8f45712345678000103e8 -> ../../sdi lrwxrwxrwx 1 root root 9 Aug 3 15:17 scsi-3648435a10058805278654321ffffffff -> ../../sdb lrwxrwxrwx 1 root root 9 Aug 2 14:49 scsi-368886030000020aff44cc0d060c987f1 -> ../../sdc lrwxrwxrwx 1 root root 9 Aug 11 19:57 wwn-0x618cf24100f8f457014a764c000001f6 -> ../../sdd lrwxrwxrwx 1 root root 9 Aug 11 19:57 wwn-0x618cf24100f8f45712345678000103e8 -> ../../sdi lrwxrwxrwx 1 root root 9 Aug 3 15:17 wwn-0x648435a10058805278654321ffffffff -> ../../sdb lrwxrwxrwx 1 root root 9 Aug 2 14:49 wwn-0x68886030000020aff44cc0d060c987f1 -> ../../sdc
9.4.2 - When a Pod Is Created, the Pod Is in the ContainerCreating State
Symptom
A Pod is created. After a period of time, the Pod is still in the ContainerCreating state. Check the log information (for details, see Viewing Huawei CSI Logs ). The error message “Fibre Channel volume device not found” is displayed.
Root Cause Analysis
This problem occurs because residual disks exist on the host node. As a result, disks fail to be found when a Pod is created next time.
Solution or Workaround
Use a remote access tool, such as PuTTY, to log in to any master node in the Kubernetes cluster through the management IP address.
Run the following command to query information about the node where the Pod resides.
kubectl get pod -o wideThe following is an example of the command output.
NAME READY STATUS RESTARTS AGE IP NODE NOMINATED NODE READINESS GATES mypod 0/1 ContainerCreating 0 51s 10.244.1.224 node1 <none> <none>Delete the Pod.
Use a remote access tool, such as PuTTY, to log in to the node1 node in the Kubernetes cluster through the management IP address. node1 indicates the node queried in 2 .
Clear the residual drive letters. For details, see Solution or Workaround .
9.4.3 - A Pod Is in the ContainerCreating State for a Long Time When It Is Being Created
Symptom
When a Pod is being created, the Pod is in the ContainerCreating state for a long time. Check the huawei-csi-node log (for details, see Viewing Huawei CSI Logs ). No Pod creation information is recorded in the huawei-csi-node log. After the kubectl get volumeattachment command is executed, the name of the PV used by the Pod is not displayed in the PV column. After a long period of time (more than ten minutes), the Pod is normally created and the Pod status changes to Running.
Root Cause Analysis
The kube-controller-manager component of Kubernetes is abnormal.
Solution or Workaround
Contact container platform engineers to rectify the fault.
9.4.4 - A Pod Fails to Be Created and the Log Shows That the Execution of the mount Command Times Out
Symptom
When a Pod is being created, the Pod keeps in the ContainerCreating status. In this case, check the log information of huawei-csi-node (for details, see Viewing Huawei CSI Logs ). The log shows that the execution of the mount command times out.
Root Cause Analysis
Cause 1: The configured service IP address is disconnected. As a result, the mount command execution times out and fails.
Cause 2: For some operating systems, such as Kylin V10 SP1 and SP2, it takes a long time to run the mount command in a container using NFSv3. As a result, the mount command may time out and error message “error: exit status 255” is displayed. The possible cause is that the value of LimitNOFILE of container runtime containerd is too large (over 1 billion).
Cause 3: The mounting may fail due to network problems. The default mounting timeout period of CSI is 30 seconds. If the mounting still fails after 30 seconds, logs show that the execution of the mount command times out.
Solution or Workaround
Run the ping command to check whether the service IP network is connected. If the ping fails, the fault is caused by cause 1. In this case, configure an available service IP address. If the ping succeeds, go to 2 .
Go to any container where the mount command can be executed and use NFSv3 to run the mount command. If the command times out, the fault may be caused by cause 2. Run the systemctl status containerd.service command to check the configuration file path, and then run the **cat **/xxx/containerd.service command to check the configuration file. If the file contains LimitNOFILE=infinity or the value of LimitNOFILE is 1 billion, go to 3 . Otherwise, contact Huawei technical support engineers.
For cause 2, perform the following operations:
- Try using NFSv4.0.
- Change the value of LimitNOFILE to a proper one by referring to change solution provided by the community . This solution will restart the container runtime. Evaluate the impact on services.
Manually mount the file system on the host machine where the mounting fails. If the required time exceeds 30 seconds, check whether the network between the host machine and the storage node is normal. An example of the mount command is as follows.
Run the following command to create a test directory.
mkdir /tmp/test_mountRun the mount command to mount the file system and observe the time consumed. The value of ip:nfs_share_path can be obtained from the huawei-csi-node log. For details, see Viewing Huawei CSI Logs .
time mount ip:nfs_share_path /tmp/test_mountAfter the test is complete, run the following command to unmount the file system.
umount /tmp/test_mount
9.4.5 - A Pod Fails to Be Created and the Log Shows That the mount Command Fails to Be Executed
Symptom
In NAS scenarios, when a Pod is being created, the Pod keeps in the ContainerCreating status. In this case, check the log information of huawei-csi-node (for details, see Viewing Huawei CSI Logs ). The log shows that the mount command fails to be executed.
Root Cause Analysis
The possible cause is that the NFS 4.0/4.1/4.2 protocol is not enabled on the storage side. After the NFS v4 protocol fails to be used for mounting, the host does not negotiate to use the NFS v3 protocol for mounting.
Solution or Workaround
- Enable the NFS 3/4.0/4.1/4.2 protocol on the storage side and retry the default mounting.
- Specify an available NFS protocol for mounting. For details, see Configuring a StorageClass .
9.4.6 - A Pod Fails to Be Created and Message "publishInfo doesn't exist" Is Displayed in the Events Log
Symptom
When a Pod is being created, the Pod keeps in the ContainerCreating state. It is found that the following alarm event is printed for the Pod: rpc error: code = Internal desc = publishInfo doesn’t exist
Root Cause Analysis
As required by CSI, when a workload needs to use a PV, the Container Orchestration system (CO system, communicating with the CSI plug-in using RPC requests) invokes the ControllerPublishVolume interface (provided by huawei-csi-controller) in the CSI protocol provided by the CSI plug-in to map the PV, and then invokes the NodeStageVolume interface (provided by huawei-csi-node) provided by the CSI plug-in to mount the PV. During a complete mounting operation, only the huawei-csi-node service receives the NodeStageVolume request. Before that, the huawei-csi-controller service does not receive the ControllerPublishVolume request. As a result, the huawei-csi-controller service does not map the PV volume and does not send the mapping information to the huawei-csi-node service. Therefore, error message publishInfo doesn’t exist is reported.
Solution
To solve this problem, Kubernetes needs to invoke the ControllerPublishVolume interface.
If this operation is triggered by all workloads created by earlier versions in the cluster, this problem will not occur.
Procedure
Use a remote access tool, such as PuTTY, to log in to any master node in the Kubernetes cluster through the management IP address.
Run the following command to obtain the information about the node where a workload is located.
kubectl get pod error-pod -n error-pod-in-namespace -owideThe following is an example of the command output.
NAME READY STATUS RESTARTS AGE IP NODE NOMINATED NODE READINESS GATES pod-nfs 0/1 ContainerCreating 0 3s <none> node-1 <none> <none>Fail over the workload to another node.
If the failover cannot be completed in the cluster, you can delete the workload and create a new one on the original node.
Check whether the workload is successfully started. If it fails to be started, contact Huawei technical support engineers.
Checking Cluster Workloads
When Kubernetes invokes the CSI plug-in to complete volume mapping, the VolumeAttachment resource is used to save the mapping information, indicating that a specified volume is attached to or detached from a specified node. This problem occurs because publishInfo does not exist. You can view the VolumeAttachment resource information to check whether this problem is also involved in other workloads in the cluster. The procedure is as follows:
Use a remote access tool, such as PuTTY, to log in to any master node in the Kubernetes cluster through the management IP address.
Run the following command to obtain the VolumeAttachment information and retain resources whose ATTACHER field is csi.huawei.com. csi.huawei.com indicates the Huawei CSI driver name and can be configured in the values.yaml file. The corresponding configuration item is csiDriver.driverName. For details about the configuration item, see Table 4 .
kubectl get volumeattachments.storage.k8s.ioThe following is an example of the command output.
NAME ATTACHER PV NODE ATTACHED AGE csi-47abxx csi.huawei.com pvc-1xx node-1 true 12hRun the following command to view the VolumeAttachment resource details. In the following information, csi-47abxx is the resource name obtained in 2 .
kubectl get volumeattachments.storage.k8s.io csi-47abxx -o yamlThe following is an example of the command output.
kind: VolumeAttachment metadata: annotations: csi.alpha.kubernetes.io/node-id: '{"HostName":"node-1"}' finalizers: - external-attacher/csi-huawei-com name: csi-47abxxx uid: 0c87fa8a-c3d6-4623-acb8-71d6206d030d spec: attacher: csi.huawei.com nodeName: debian-node source: persistentVolumeName: pvc-1xx status: attached: true attachmentMetadata: publishInfo: '{<PUBLISH-INFO>}'If status.attachmentMetadata.publishInfo exists in the resource obtained in 3 , the problem described in this FAQ is not involved in the workloads created using pvc-1xx on the node-1 node. node-1 and pvc-1xx are the query results in 2 . If status.attachmentMetadata.publishInfo does not exist, rectify the fault by referring to Solution .
If multiple VolumeAttachment resources exist, repeat 3 to 4 .
9.4.7 - After a Pod Fails to Be Created or kubelet Is Restarted, Logs Show That the Mount Point Already Exists
Symptom
When a Pod is being created, the Pod is always in the ContainerCreating state. Alternatively, after kubelet is restarted, logs show that the mount point already exists. Check the log information of huawei-csi-node (for details, see Viewing Huawei CSI Logs ). The error information is: The mount /var/lib/kubelet/pods/xxx/mount is already exist, but the source path is not /var/lib/kubelet/plugins/kubernetes.io/xxx/globalmount
Root Cause Analysis
The root cause of this problem is that Kubernetes performs repeated mounting operations.
Solution or Workaround
Run the following command to unmount the existing path. In the command, /var/lib/kubelet/pods/xxx/mount indicates the existing mount path displayed in the logs.
umount /var/lib/kubelet/pods/xxx/mount
9.4.8 - "I/O error" Is Displayed When a Volume Directory Is Mounted to a Pod
Symptom
When a Pod reads or writes a mounted volume, message “I/O error” is displayed.
Root Cause Analysis
When a protocol such as SCSI is used, if the Pod continuously writes data to the mount directory, the storage device will restart. As a result, the link between the device on the host and the storage device is interrupted, triggering an I/O error. When the storage device is restored, the mount directory is still read-only.
Solution
Remount the volume. That is, reconstruct the Pod to trigger re-mounting.
9.4.9 - Failed to Create a Pod Because the iscsi_tcp Service Is Not Started Properly When the Kubernetes Platform Is Set Up for the First Time
Symptom
When you create a Pod, error Cannot connect ISCSI portal *.*.*.*: libkmod: kmod_module_insert_module: could not find module by name=‘iscsi_tcp’ is reported in the /var/log/huawei-csi-node log.
Root Cause Analysis
The iscsi_tcp service may be stopped after the Kubernetes platform is set up and the iSCSI service is installed. You can run the following command to check whether the service is stopped.
lsmod | grep iscsi | grep iscsi_tcp
The following is an example of the command output.
iscsi_tcp 18333 6
libiscsi_tcp 25146 1 iscsi_tcp
libiscsi 57233 2 libiscsi_tcp,iscsi_tcp
scsi_transport_iscsi 99909 3 iscsi_tcp,libiscsi
Solution or Workaround
Run the following command to manually load the iscsi_tcp service.
modprobe iscsi_tcp
lsmod | grep iscsi | grep iscsi_tcp
9.4.10 - A Pod Fails to Be Created and Logs Show That an Initiator Has Been Associated with Another Host
Symptom
When a Pod is created using SAN storage, the Pod is always in the ContainerCreating status. The Pod logs report alarm event “rpc error: code = Internal desc = initiator xxx is already associated to another host”.
Root Cause Analysis
Cause 1: CSI automatically creates hosts, host groups, and initiators based on certain rules. If the same resources exist on the storage side before CSI is used, conflicts will occur. The possible cause is that the same initiator has been added before CSI is used.
Cause 2: In the container cluster, the initiator names of different worker nodes are the same. In this case, perform the following steps to rectify the fault:
Log in to different worker nodes in the container cluster and run the following command to check whether different worker nodes use the same initiator name:
To view the iSCSI initiator name, run the following command:
cat /etc/iscsi/initiatorname.iscsiTo view the FC initiator name, run the following command:
cat /sys/class/fc_host/host*/port_nameTo view the RoCE initiator name, run the following command:
cat /etc/nvme/hostnqn
If different worker nodes use the same initiator name, rectify the fault according to Solution or Workaround .
Solution or Workaround
Check whether the host associated with the initiator has volumes in use. If the host has volumes in use, migrate the Pod in use to another node.
After confirming that the host has no volume in use, change the initiator name to ensure that the initiator is unique.
Run the following command to restart the iscsid service.
systemctl restart iscsid
Restarting the iscsid service may cause I/O interruption. Before restarting the service, ensure that the host associated with the initiator has no volume in use.Restart the huawei-csi-node service.
9.4.11 - A Pod Fails to Be Created and Logs Show "Get DMDevice by alias: dm-x failed"
Symptom
When a Pod is created, the Pod is in the ContainerCreating status for a long time. In addition, the following error message is reported in the logs of huawei-csi-node (for details, see Viewing Huawei CSI Logs ):
check device: dm-1 is a partition device failed. error: Get DMDevice by alias:dm-1 failed. error: Can not get DMDevice by alias: dm-1
Root Cause Analysis
In the DM-Multipath configuration file, the user_friendly_names parameter is not set to yes.
Solution or Workaround
Check whether the worker node where the Pod is running has volumes in use. If the node has volumes in use, migrate the Pod in use to another node.
Configure the /etc/multipath.con file by following the instructions in Checking the Host Multipathing Configuration .
Run the following command to restart the multipathing software.
systemctl reload multipathd.service systemctl restart multipathd
Restarting the multipathing software may cause I/O interruption. Ensure that the worker node where the Pod is running has no volume in use before restarting the multipathing software.
9.4.12 - After Pods on the Same Node Are Deleted in a Batch Using the NVMe Protocol, Residual NVMe Links Exist on the Node
Symptom
In the NVMe protocol scenario, when pods on the same node are deleted in a batch, the pods are successfully deleted, but the NVMe links on the node are not cleared.
# nvme list-subsys
nvme-subsys0 - NQN=nqn.xxx.nvme:nvm-subsystem-sn-xxxxxxx
\
+- nvme0 tcp traddr=xxx.xxx.xxx.xxx,trsvcid=4420,src_addr=xxx.xxx.xxx.xxx live
+- nvme1 tcp traddr=xxx.xxx.xxx.xxx,trsvcid=4420,src_addr=xxx.xxx.xxx.xxx live
Root Cause Analysis
If the NVMe protocol is used, the device paths on the host are cleared only after the host is unmapped from the storage resources. When multiple pods are mounted to the same volume and the pods are deleted in a batch, the CSI in the NodeUnstageVolume phase (unmount phase) cannot detect the device path cleanup in the subsequent ControllerUnpublishVolume phase (unmap phase). As a result, the NVMe links cannot be cleared in a timely manner.
Solution or Workaround
The residual NVMe links do not affect the CSI functions. However, the storage resources that are mounted subsequently scan for the corresponding device paths based on the residual links. If the number of links does not need to be reduced, you do not need to clear the residual links.
If the number of links to be mounted later needs to be reduced, you can manually delete the residual links on the node. For example, to clear the links in the preceding symptom, run the following commands:
nvme disconnect -d nvme0 nvme disconnect -d nvme1
9.4.13 - In the SAN HyperMetro Scenario, the Subpath of the Aggregated Disks Corresponding to the Mounted Volume Is Lost
Symptom
The subpath of the aggregated disks corresponding to the mounted resource is lost.
Root Cause Analysis
Figure 1 SAN HyperMetro subpath loss
As shown in Figure 1 , if the link between the host and the storage device is disconnected due to factors such as HBA/NIC exceptions, switch/network jitter, or storage array service port faults, the host restarts and triggers disk scanning again. In this case, the link to the faulty storage device is disconnected on the host. After the fault is rectified, the link information is lost after the host scans the disks again. As a result, the lost link will not be automatically restored.
To restore the link, you can drift over a pod to another host and enable CSI to automatically remount the link. To manually restore the lost link on the current host, perform the following steps:
Solution or Workaround (iSCSI Protocol)
Run the following command to check whether the iSCSI node corresponding to the service IP address exists on the host. In the command, 192.168.1.100 indicates the service IP address. If the node exists, go to 3 . If the node does not exist, go to 2 .
iscsiadm -m node | grep 192.168.1.100Run the following command to discover the iSCSI node:
iscsiadm -m discovery -t st -p 192.168.1.100Run the following command to log in to the iSCSI node:
iscsiadm -m node -p 192.168.1.100 -lRun the following command to query the iSCSI host ID based on the corresponding service IP address:
iscsiadm -m session -P3Log in to DeviceManager, choose Services > Host Groups > Hosts > Mapping, and find the host LUN ID corresponding to the LUN.
Run the following disk scanning command to supplement the lost link. In the command, host_lun_id indicates the host LUN ID obtained in 5 , and host_no indicates the host ID obtained in 4 .
echo "- - <host_lun_id>" > /sys/class/scsi_host/host<host_no>/scanRun the following command to check whether the link is supplemented:
multipath -ll
Solution or Workaround (FC Protocol)
Run the following command to query all FC initiators on the current host:
cat /sys/class/fc_host/host*/port_name | awk 'BEGIN{FS="0x";ORS=" "}{print $2}'Run the following command to query the host ID of the initiator whose path is lost. In the command, port_name indicates the initiator name obtained in 1 .
for h in /sys/class/fc_host/host*; do echo $h: $(cat $h/port_name); done | grep <port_name>Log in to DeviceManager, choose Services > Host Groups > Hosts > Mapping, and find the host LUN ID corresponding to the LUN.
Run the following disk scanning command to supplement the lost link. In the command, host_lun_id indicates the host LUN ID obtained in 3 , and host_no indicates the host ID obtained in 2 .
echo "- - <host_lun_id>" > /sys/class/scsi_host/host<host_no>/scanRun the following command to check whether the link has been supplemented:
multipath -ll
9.5 - Common Problems and Solutions for Interconnecting with the Tanzu Kubernetes Cluster
This section describes the common problems and solutions for interconnecting with the Tanzu Kubernetes cluster. Currently, the following problems occur during interconnection with the Tanzu Kubernetes cluster:
- A Pod cannot be created because the PSP permission is not created.
- The mount point of the host is different from that of the native Kubernetes. As a result, a volume fails to be mounted.
- The livenessprobe container port conflicts with the Tanzu vSphere port. As a result, the container restarts repeatedly.
9.5.1 - A Pod Cannot Be Created Because the PSP Permission Is Not Created
Symptom
When huawei-csi-controller and huawei-csi-node are created, only the Deployment and DaemonSet resources are successfully created, and no Pod is created for the controller and node.
Root Cause Analysis
The service account used for creating resources does not have the “use” permission of the PSP policy.
Solution or Workaround
Use a remote access tool, such as PuTTY, to log in to any master node in the Kubernetes cluster through the management IP address.
Run the vi psp-use.yaml command to create a file named psp-use.yaml
vi psp-use.yamlConfigure the psp-use.yaml file.
apiVersion: rbac.authorization.k8s.io/v1 kind: ClusterRole metadata: name: huawei-csi-psp-role rules: - apiGroups: ['policy'] resources: ['podsecuritypolicies'] verbs: ['use'] --- apiVersion: rbac.authorization.k8s.io/v1 kind: ClusterRoleBinding metadata: name: huawei-csi-psp-role-cfg roleRef: kind: ClusterRole name: huawei-csi-psp-role apiGroup: rbac.authorization.k8s.io subjects: - kind: Group apiGroup: rbac.authorization.k8s.io name: system:serviceaccounts:huawei-csi - kind: Group apiGroup: rbac.authorization.k8s.io name: system:serviceaccounts:defaultRun the following command to create the PSP permission.
kubectl create -f psp-use.yaml
9.5.2 - Changing the Mount Point of a Host
Symptom
A Pod fails to be created, and error message “mount point does not exist” is recorded in Huawei CSI logs.
Root Cause Analysis
The native Kubernetes cluster in the pods-dir directory of huawei-csi-node is inconsistent with the Tanzu Kubernetes cluster.
Solution or Workaround
Go to the helm/esdk/ directory and run the vi values.yaml command to open the configuration file.
vi values.yamlChange the value of kubeletConfigDir to the actual installation directory of kubelet.
# Specify kubelet config dir path. # kubernetes and openshift is usually /var/lib/kubelet # Tanzu is usually /var/vcap/data/kubelet kubeletConfigDir: /var/vcap/data/kubelet
9.5.3 - Changing the Default Port of the livenessprobe Container
Symptom
The livenessprobe container of the huawei-csi-controller component keeps restarting.
Root Cause Analysis
The default port (9808) of the livenessprobe container of huawei-csi-controller conflicts with the existing vSphere CSI port of Tanzu.
Solution or Workaround
Change the default port of the livenessprobe container to an idle port.
Go to the helm/esdk directory and run the vi values.yaml command to open the configuration file.
vi values.yamlChange the default value 9808 of controller.livenessProbePort to an idle port, for example, 9809.
controller: livenessProbePort: 9809Update Huawei CSI using Helm. For details, see Upgrade Using Helm .
9.5.4 - Failed to Create an Ephemeral Volume
Symptom
A generic ephemeral volume fails to be created, and the error message PodSecurityPolicy: unable to admit pod: [spec.volumes[0]: Invalid value: “ephemeral”: ephemeral volumes are not allowed to be used spec.volumes[0] is displayed.
Root Cause Analysis
The current PSP policy does not contain the permission to use ephemeral volumes.
Solution or Workaround
Add the permission to use ephemeral volumes to the default PSP pks-privileged and pks-restricted. The following is an example of modifying pks-privileged:
Use a remote access tool, such as PuTTY, to log in to any master node in the Kubernetes cluster through the management IP address.
Run the following command to modify the pks-privileged configuration.
kubectl edit psp pks-privilegedAdd ephemeral to spec.volumes. The following is an example.
# Please edit the object below. Lines beginning with a '#' will be ignored, # and an empty file will abort the edit. If an error occurs while saving this file will be # reopened with the relevant failures. # apiVersion: policy/v1beta1 kind: PodSecurityPolicy metadata: annotations: apparmor.security.beta.kubernetes.io/allowedProfileName: '*' seccomp.security.alpha.kubernetes.io/allowedProfileNames: '*' creationTimestamp: "2022-10-11T08:07:00Z" name: pks-privileged resourceVersion: "1227763" uid: 2f39c44a-2ce7-49fd-87ca-2c5dc3bfc0c6 spec: allowPrivilegeEscalation: true allowedCapabilities: - '*' supplementalGroups: rule: RunAsAny volumes: - glusterfs - hostPath - iscsi - nfs - persistentVolumeClaim - ephemeralRun the following command to check whether the addition is successful.
kubectl get psp pks-privileged -o yaml
10 - Command Parameter Description
10.1 - Description of oceanctl Commands
Obtaining Help Information
Obtain the oceanctl help information.
oceanctl --helpCheck the oceanctl version.
oceanctl versionSpecify the custom log file directory. The following example describes how to check the oceanctl version.
oceanctl version --log-dir=/path/to/custom
Creating a Storage Backend
Run the following command to obtain the help information about creating a backend.
oceanctl create backend -hRun the following command to create a storage backend based on the specified yaml file.
oceanctl create backend -f /path/to/backend.yaml -i yamlRun the following command to create a storage backend based on the specified json file. The huawei-csi-configmap file can be exported only in json format.
oceanctl create backend -f /path/to/configmap.json -i jsonRun the following command to create a storage backend in the specified namespace.
oceanctl create backend -f /path/to/backend.yaml -i yaml -n <namespace>Run the following command to create a storage backend and ignore the storage backend name verification, for example, uppercase letters and underscores (_). Do not run this command unless necessary.
oceanctl create backend -f /path/to/backend.yaml -i yaml --not-validate-nameRun the following command to create a storage backend and specify provisioner. csi.oceanstor.com is the driver name specified during installation. For details, see 4 .
This command is used only when a backend is created on the CCE or CCE Agile platform.oceanctl create backend -f /path/to/backend.yaml -i yaml --provisioner=csi.oceanstor.com
Querying a Storage Backend
Run the following command to obtain the help information about querying a backend.
oceanctl get backend -hRun the following command to query a single storage backend in the default namespace.
oceanctl get backend <backend-name>Run the following command to query all storage backends in the specified namespace.
oceanctl get backend -n <namespace>Run the following command to format the output. Currently, json, yaml, and wide are supported.
oceanctl get backend <backend-name> -o json
Updating a Storage Backend
Run the following command to obtain the help information about updating a backend.
oceanctl update backend -hRun the following command to update the specified storage backend in the default namespace.
oceanctl update backend <backend-name> --passwordRun the following command to update a storage backend in the specified namespace.
oceanctl update backend <backend-name> -n <namespace> --password
Deleting a Storage Backend
Run the following command to obtain the help information about deleting a backend.
oceanctl delete backend -hRun the following command to delete the specified storage backend in the default namespace.
oceanctl delete backend <backend-name>Run the following command to delete all storage backends in the default namespace.
oceanctl delete backend --allRun the following command to delete a storage backend in the specified namespace.
oceanctl delete backend <backend-name> -n <namespace>
Creating a Storage Backend Certificate
Run the following command to obtain the help information about querying a certificate.
oceanctl create cert -hRun the following command to create a certificate for a single storage backend in the default namespace based on the specified .crt certificate file.
oceanctl create cert <name> -f /path/to/cert.crt -b <backend-name>Run the following command to create a certificate for a single storage backend in the specified namespace based on the specified .crt certificate file.
oceanctl create cert <name> -f /path/to/cert.crt -b <backend-name> -n <namespace>Run the following command to create a certificate for a single storage backend in the specified namespace based on the specified .pem certificate file.
oceanctl create cert <name> -f /path/to/cert.pem -b <backend-name> -n <namespace>
Querying a Storage Backend Certificate
Run the following command to obtain the help information about querying a certificate.
oceanctl get cert -hRun the following command to query the certificate of a specified storage backend in the default namespace.
oceanctl get cert -b <backend-name>Run the following command to query the certificate of a specified storage backend in the specified namespace.
oceanctl get cert -b <backend-name> -n <namespace>
Updating a Storage Backend Certificate
Run the following command to obtain the help information about updating a certificate.
oceanctl update cert -hRun the following command to update a certificate for a specified storage backend in the default namespace based on the specified .crt certificate file.
oceanctl update cert -b <backend-name> -f /path/to/cert.crtRun the following command to update a certificate for a specified storage backend in the specified namespace based on the specified .crt certificate file.
oceanctl update cert -b <backend-name> -n <namespace> -f /path/to/cert.crtRun the following command to update a certificate for a specified storage backend in the specified namespace based on the specified .pem certificate file.
oceanctl update cert -b <backend-name> -n <namespace> -f /path/to/cert.pem
Deleting a Storage Backend Certificate
Run the following command to obtain the help information about deleting a certificate.
oceanctl delete cert -hRun the following command to delete the certificate of a specified storage backend in the default namespace.
oceanctl delete cert -b <backend-name>Run the following command to delete the certificate of a specified storage backend in the specified namespace.
oceanctl delete cert -b <backend-name> -n <namespace>
11 - Appendix
11.1 - Communication Matrix
Used by Kubernetes to check the health status of CSI controller | ||||
For details about how to change the webhook port, see the CSI user guide. |
11.2 - Configuring Custom Permissions
User-defined Role Configurations
For different storage resources, refer to the following configurations:
- For NAS resources, configure the minimum permissions by referring to Table 1 .
- For SAN resources, configure the minimum permissions by referring to Table 2 .
For details about how to configure permissions for user-defined roles, see OceanStor Dorado 6000, Dorado 18000 Series Product Documentation .
Table 1 Minimum permissions for NAS resources
Queries storage device information (this object needs to be configured only when the owning group is the system group). | |||
Table 2 Minimum permissions for SAN resources
Queries storage device information (this object needs to be configured only when the owning group is the system group). | |||
11.3 - Huawei CSI Resource Management
This section lists the resource requests and limits used by each container of the Huawei CSI plug-in. For details about the unit, see Resource units in Kubernetes .
Table 1 Container resource requests and limits
Modifying Resource Requests and Limits
If you need to modify the resource requests and limits of a container, perform the following steps (in the following example, Helm is used to install Huawei CSI):
If Helm is used for installation, go to the /helm/esdk/templates directory. For manual deployment, the file to be modified is in the /manual/esdk/deploy directory. For details about the component package path, see Table 1 .
Modify the deployment template file.
- If the Pod name is huawei-csi-controller, modify the huawei-csi-controller.yaml file.
- If the Pod name is huawei-csi-node, modify the huawei-csi-node.yaml file.
For details about Pod names, see Table 1 .For example, to modify the resource request of the huawei-csi-driver container in the Pod named huawei-csi-node, run the following command to edit the configuration file and find the container whose spec.template.spec.containes.name is huawei-csi-driver. Modify resource requests and limits as required.
vi huawei-csi-node.yamlEdit the following content.
containers - name: huawei-csi-driver ... resources: limits: cpu: 500m memory: 1Gi requests: cpu: 50m memory: 128MiIf Huawei CSI is not installed, the modification of resource requests and limits takes effect after Huawei CSI is installed by referring to Installing Huawei CSI on Kubernetes, OpenShift, and Tanzu .
If Huawei CSI has been installed, the modification of resource requests and limits takes effect after Huawei CSI is updated by referring to Upgrading Huawei CSI .
11.4 - Kubernetes Feature Matrix
This section describes the features of different Kubernetes versions supported by Huawei CSI.
Table 1 Kubernetes versions and supported features
- Note 1: Manage Provisioning is a volume management feature customized by Huawei CSI. This feature allows existing storage resources to be managed by Kubernetes. You are not allowed to manage a storage resource for multiple times and concurrently delete or create a storage resource. When a storage resource is managed by multiple clusters, operations on the managed volume in a single cluster take effect only in the cluster and will not be synchronized to other clusters. Instead, you need to perform these operations on the managed volume in other clusters.
- Note 2: Modify Volume is a PVC change feature customized by Huawei CSI. This feature allows a common volume to be changed to a HyperMetro volume. To use this feature, ensure that the connected storage supports the volume HyperMetro feature.